or 'How to Suck Less at Photography'
So often I'll get back from a day's shoot and I'm disappointed by a greater or lesser portion of my photos. Things that looked great in the field simply look bleurgh on my computer screen and I'm not always sure why. A mountain vista, a forest scene, a great skyline all looked really impressive in real life, but for one reason or another the picture fails to live up to the reality. There are as many strategies for improving the quality of our images as there are photographers, and believe me, I've listened to a lot of them. In the field I've tried to concentrate on the conventional rules of composition, but sometimes something still just isn't right. With experience I've started recognising more and more frequently what will and what won't work - a photographer's spidey-sense. I've come to realise that part of the problem lies in the differences between what we perceive in the field and what the camera sees.

Of course there are technical mistakes we can make in the field too that result in images being sent straight to the recycle bin; too slow shutter speed resulting in motion blur, missed focus, over- and under-exposure, but those are rookie mistakes we don't make any more, aren't they? (I wish!)
Three Differences Between your Eyes and your Camera
There are (at least) three significant differences between our eyes and even the best camera that negatively affect the images we create. Knowing what they are can seriously improve our photography. Forewarned is forearmed, as they say, and if we know ahead of time what isn't going to work, we can either avoid those shots or we can try to compensate for our cameras' 'deficiencies'.
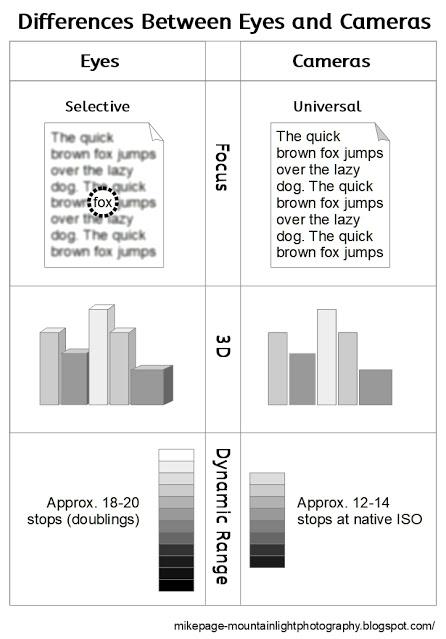
Vision or Gaze Focus
Let's start with focus. How broad is your vision focus? What do I mean? If we include our peripheral vision, most people can see approximately a 170° arc in front of us. Coming forward we pass from far- to mid- and near-peripheral vision before we reach centre gaze. There's a great little Wikipedia article about it. Not with me? Try this. Put your finger in the middle of a piece of text such as this page of writing. Focus on your finger and now try to read a word at the edge of the page without shifting your focus. Chances are, depending on the size of the font and the size of screen that you're reading this on, you'll only be able to read a couple of words either side of your finger before you have to start making educated guesses.
Our focal range is extremely narrow and has to do with the concentration of light receptor cells in a narrow part of the retina in our eyes. It's actually extremely efficient to see like this - peripheral vision is our radar for detecting things of potential interest, but we don't need to be able to discern all the information in this part of our sight, especially when we're in a familiar environment. It would take up far too much of our attention. Instead, the ability to discern detail in a scene is limited to a few degrees directly in front of direction of gaze.
By way of contrast, our camera picks up all the information equally over the whole picture. There's no concentration of pixels at the centre of an image, we're presented with all of it at once. Of course, when we're looking at a photograph we can only focus on a narrow part of that image, but all the information is there.
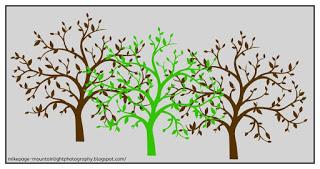
Why is this important? Of all of the differences between our eyes and cameras, I think that this is the one that's most difficult to get our heads around. At least until we become aware of it, and even then it catches me out as often as not. Take this image of a mountain woodland scene taken on a recent excursion to the alps. Walking down the path I was struck by the glossy lime green beech tree left of centre. The photograph doesn't work though, there are too many details competing for your attention. It's one of those scenes that is almost impossible to capture well unless the conditions are on your side, but we'll look at that in a minute.
 |
| When Selective Focus Lets Us Down |
3D
This is the obvious one. Stereoscopic vision affords us the ability to perceive our surroundings in three dimensions, particularly objects at close range. There are three mechanisms we use to estimate the distance of an object - stereoscopic vision, experience and motion. If we know how big an object is, we can estimate its distance depending on its size independent of stereoscopic vision, similarly, if we know the type of object we're looking at our brain is quite good at interpolating that object's speed to distance. Surprisingly, our 3D vision is only reliable to about 6 m (!). Nevertheless, the fact that we perceive in 3D is very different to the way a single lens camera depicts an image. We're afforded an instant snapshot of a scene. We can only discern the three dimensional context based on visual cues that we're familiar with.
Dynamic Range
Dynamic range is the difference in light intensity between the darkest and lightest parts of a scene. Photographers like to talk in terms of stops, a stop being a doubling or halving of the amount of light. A good camera can differentiate up to 14 stops of light at its native ISO (the standard ISO of the camera, not necessarily the lowest). That's a factor of 16,348 from the darkest point to the lightest point. Impressive, huh? Sure. Until you realise that the eye is able to distinguish 18-20 stops - up to a factor of just over a million. So the eye is 64x better at distinguishing between light and dark than your camera.
So How do we Overcome the Deficiencies of our Cameras?
To make good images, we have to compensate for these differences and bring the viewer's eye to the subject of the photo using some tricks. This is the art of composition, creating a strong image using the tools available to us.
There are ways of overcoming our cameras' 'deficiencies' (actually I prefer to think about differences between eye and camera rather than deficiencies of the latter - our cameras are actually pretty advanced tools): In order to overcome issues associated with dynamic range, we can take multiple shots at different exposure settings and combine them either in camera or in post-production (high dynamic range or HDR images). There are numerous techniques for enhancing the 3D-feel of our images, for example by shooting low to the ground or using a wide angle lens. The aim of all these techniques is to lead the viewer's eye to the subject of our composition. There are also numerous composition tricks we can use to do this, structuring our photos using the rule of thirds or the golden rule, geometry, leading lines and the like. There's plenty of good content out there on how tame our cameras to compensate for these differences.
Vision focus isn't so easy though and requires that we think about our images slightly differently. One way of understanding how to bring the viewer's attention to the subject of our image is to think in terms of separation: How can I separate the subject of my photo from its environment in order to make it clear to the viewer that this is what the image is about? Of course, this pre-supposes that we know what the subject of our image is ourselves, which isn't always obvious, particularly when it isn't even a concrete object.
Achieving Separation
What do I mean by separation? It's the skill of highlighting the subject of your image in such a way that it's obvious to the viewer what the photo is about. This separation can be subtle or obvious, there are a number of tricks we can use. I want to mention five here. The list is not exhaustive and they can all be combined with one another for more or less effect. Sometimes using just one of them can lead to really strong images though.
Light
Light is the easiest of the five tools to use. The eye naturally falls on the brightest parts of an image. Spotlights pick out the members of a band at a concert to focus your attention on them rather than the mess of back stage. Parts of our image that are unintentionally bright distract the eyes and pull them away from what we want the viewer to look at.
Of course, we can turn this on its head and use dark to highlight the subject of the image, but the default setting is that light attracts. By using light to emphasise the subject of our photograph, we're effectively shining the spotlight on it. Woodland can be very effective for this, such as this picture of wood sorrel. On a stormy day gaps in the clouds can yield similar effects, such as the photo of Cinque Torri in the Dolomites in my gallery.

Colour
After light, the next most obvious tool to draw your viewer's attention to the subject of your image is colour. Bold, saturated colours are more effective than muted, pastel colours (think of text highlighters!). Many photographers will talk to you about colour theory and complementary colours. All well and good, but instinctively I think we know which colours work together and which colours contrast (if we didn't it wouldn't work).
The red-purple marsh orchid really stands out here against the lush green spring grass of this Bavarian pastorale.
 |
| Outstanding in its Field |
Depth of Field
Depth of field is the relative distance in front of and behind the focal plane of the camera that is effectively in focus. A narrow depth of field means that focus is restricted to a short distance around the focal plane, a wide depth of field puts more of the image into focus.
We can control it using the camera's aperture; an open aperture generally results in a narrow depth of field, a closed aperture in a broader depth of field. The closer the subject matter and the longer the focal length of the lens used, the narrower the depth of field too.
Like with light, the eye naturally wanders to what's in focus in an image, like the dandelion centre left here. The closer and further flowers are out of focus thanks to an aperture of f5.6. A similar effect can be achieved in mist or fog.

Composition
I showed you an example of poor composition earlier; the beech tree against the woods. It was literally impossible to see the wood for the trees! If, though, you can put a bit of empty space between your subject and its environment - what photographers classically call separation - it's easier for the eye to find its intended target. It's a frame within a frame, like a bulls-eye saying 'look at me'.
 |
| Parting is such sweet sorrel - using the roots to frame the greenery |
Texture
Texture is particularly powerful in monochrome photography, where it can really stand out in an image. It's probably the subtle changes in light that stick out and help the viewer to focus.
I didn't have a good example of this from the field so I took this quick and dirty photo of the rug in our living room. Rug, edging and tiles all have a very similar tones, but the texture of the three elements is clearly distinct, allowing the viewer to visually separate the elements.


Bringing it all Together
So how do we put all this into practice? When something catches your eye in the field, before you raise your camera to your eye, stop a second and analyse what's in front of you. What is that has caught your attention? Let your eye wander over the scene for a second or two so that you can identify the subject and ask yourself whether there's enough separation between the subject and the background that the viewer can identify what the subject is. If there isn't, how can you generate separation using some of the tools I've mentioned above?
If you've found this article useful, let me know below. Also, if you're in the Munich area and would be interested in exploring putting some of this into practice together in the field, drop me a line (contact details on the right) and we'll see if we can set something up!
Very well presented tour through the artistry of photography. I have loads of books about how to take better photographs, but this is much more useful and implementable ...
ReplyDeleteamazing article!
ReplyDeleteThank you very much Emma
Delete