Showing posts with label Allgäu. Show all posts

Sunday 7 March 2021

The Wrong Mountain

In future, I think we'll stick to doing winter tours that we know from the summer. Yesterday The Wife and I embarked on a winter tour from one of the books I bought her for Christmas. It was supposed to take us up the 1542 m Reuterwanne above Jungholz, a small Austrian village that is accessible to Germany during the lockdown due to the fact that it exists as an enclave into Germany. Who knows what they were drinking when they drew up the borders after WWII?, but this is definitely a weird one.

From the Pfeiffenberg || Olympus 13 mm, f/8, 1/1000 s, ISO 200 
Instead we ended up on the 1458 m Pfeiffenberg because we followed the tracks in the snow. Although most of the valley snow has disappeared, it snowed again on Friday. With a cold but sunny forecast for Saturday we decided that it would be rude to sit at home doing nothing and decided to head out to the hills once more. We were treated to a day of two halves. Actually, to be more accurate, we had a foggy day with a sunny interlude because the fog rolled in again as we came down the mountain, giving us some really special images, but more of that later.

Frosty Trees || Olympus 34 mm, f/8, 1/1600 s, ISO 200
We set off from a surprisingly empty car park in Jungholz - whether people were intimidated by driving into Austria (😮), they'd been put off by the fog, or whether in March they'd simply had enough of the snow, there simply weren't that many people under way, which suited us just fine. Finding the first landmark on the tour was easy since it simply required us to follow the signposts to the Stubentalalpe. The book (and signs) had the path following up the hillside behind the hut to the Reuterwanne and so we blindly followed the tracks leading up the hillside. What we failed to see was where the path to the Reuterwanne diverged and so we found ourselves atop the wrong mountain with no discernible path to getting on the right one.

The Process

But never mind, because we came home with an SD card full of 'keepers' and memories of a lovely winter tour pretty much on our own. A keeper is a photo that I'll keep (duh!) and show either here, Instagram or on my private Facebook page. Not necessarily the best of the best, but good enough to air publicly. After years of photography, I have developed a clear sorting method for photos at the end of the day. I'll import the photos directly into ON1, applying my own private preset - a set of standard modifications that I use during RAW processing. Almost all of these are not actually applied, but available to be used at a single click rather than diving through various menus. During import, I also back the photos up to an external USB hard drive. This has actually saved my butt once recently too as I managed to delete a whole folder worth of photos from my laptop.

Keeper or Not? || Olympus 47 mm, f/8, 1/1000 s, ISO 400 
Once imported, I use the ***** system to indicate which photos I actually want to process with a single star. I'll then go through these one by one, applying the edits I think best enhance the photo to emphasise the aspect of the image that really caught my attention. The edits that I'm happy with I'll give two stars to. These are the images I end up exporting to jpg from ON1, most of which will end up being published somewhere. I tend not to be overly selective here. I have one friend who posts perhaps a couple of photos there a month and they're really top-notch images. I'm a bit more indiscriminate and tend to spray my images everywhere. The really good ones will get three stars, but that's perhaps a small handful of images in a month.

The Foggy Half

Photographing isn't necessarily the first thing you think about doing in fog - but the results can be amazing. I got a couple of really painterly images from yesterday's tour that couldn't have been taken in any other conditions.  This first one of the shed in the snow was actually the very first image I took of the day. This I might even classify as a three star image. Note that it thumbs its nose completely at the rule of thirds etc., but it works, for me at least. Great way to start the day

Lone Shed || Olympus 29 mm, f/6.3, 1/1000 s, ISO 400
As well as the fresh snow there was a wicked hoarfrost as we walked up out of the village due to the freezing fog. We tend to think of nature as a constant, what's there today will be there tomorrow, but these photos tell a different story. Even as I write this 24 h after taking the photos, I know that they were unique, unrepeatable snapshots in time. Never again will that shed scene look exactly like that. Never again will that branch have that constellation of ice crystals. The same is the case for images with powerful clouds. Sobering thoughts.

Ice Crystals || Olympus  100 mm, f/11, 1/160 s, ISO 400
I decreased the aperture to f/11 here to increase the depth of field on the crystals. F/8, my standard aperture for this lens, just wasn't doing it and I didn't want to stop down too much further as it would have reduced the shutter speed to a level where motion blur might start becoming an issue. A lot of photographers only talk about aperture as a means to control depth of field, but it's only one of three factors influencing how much of your scene will be in focus alongside focal length and focal distance (how long your lens is and how close you are to the subject respectively).

Once we reached the Stubentalalpe we were out in the brilliant blue skies of an early spring day - after all meteorological spring started last week and we continued enjoying that light until we came down again after lunch. There was fog below us and rolling over the tops every now and then, but by and large it was pure sunshine until we descended back to the hut.

Standing Out and Hidden || Olympus 20 mm, f/8, 1/250 s, ISO 200
Snaking our way back down the tarmac to Jungholz at the end of our tour we came across this group of trees across the road. At a first glance the images look black and white, but they're full colour as you can see if you look at the snow poles and trail sign. An interesting set of images that aren't quite my usual style, but I really like them and could imagine them looking good printed on wood.


The Sunny Half

Once we'd reached the Stubentalalpe it was blue skies all the way, giving rise to a different sort of monochrome - white and blue instead of black and white. The colour of the fir trees was essentially non-existent given the bright light. Normally I would have had my CPL polarising filter on in conditions like this, but because the scene was so bright anyway I decided not to use it as it would have made the skies even darker and I was looking for some brighter images.

At the Stubentalalpe || Olympus 21 mm, f/8, 1/2500 s, ISO 400
Arriving at the Pfeiffenberg we found this delightful little wooden cross. At this point we thought we were still on the right path - we weren't -  and could see the Reuterwanne but couldn't clearly see how to get to it. Again, a unique image. Never again will this particular snow pattern exist to be photographed.

Pfeffenberg || Olympus 66 mm, f/5.6, 1/4000 s, ISO 200 
This next image is a complete fake! The path ran through the snow to the left of the drift. Apart from looking ugly, I wanted to see how far I could take the image correction. There are a couple of blotches that I might be able to correct with a little more effort, but the resulting image is adequate without being a showstopper. This is about the limit of corrections that I'll apply to an image outside of focus or exposure bracketing. I won't do sky replacements, for example, not because it's wrong per se, but photography for me is about conveying the beauty of what I saw and experienced. There's an inherent authenticity involved. This is probably a step too far.

Drifts || Olympus 23 mm, f/4.5, 1/6400 s, ISO 200 
Coming off the top we descended into a mini winter wonderland of baby fir trees. You can clearly see the valley fog in this photo. The trail through the snow is the same one as the shot of the drifts, demonstrating the extent of the 'corrections' that were necessary.

Winter Wonderland ||  Olympus HR 12 mm, f/8, 1/1250 s, ISO 200
And I can't come away from a trip to the mountains without a photo of a tree stump!

The Stump || Olympus 31 mm, f/8, 1/1600 s, ISO 200
Descending further we came across a mini plateau with a series of deciduous trees that still had snow and/or hoarfrost on the branches giving rise to this fantastic vista - as well as providing a great spot for lunch. 

Ming Vase-Landscape ||  Olympus 12 mm, f/8, 1/1600 s, ISO 200
Sat opposite this vista for quite a while gave me plenty of opportunity to 'work the composition' as the profi's would put it, and I tried a number of approaches including two with some 'foreground interest', but as so often with these scenes for me, I found the best image to have been my first 'instinct' shot when I arrived at the scene. The others seem contrived somehow with the foreground detracting from the simplicity of the scene that this one conveys nicely rather than adding to it.

Long Pines ||  Olympus 75 mm, f/8, 1/1250 s, ISO 200
It was also nice light to catch a couple of rare up close shots of Sharon in her natural element - the mountains.

The Wife ||  Olympus 80 mm, f/7.1, 1/1000 s, ISO 200
Mahlzeit! ||  Olympus 12 mm, f/7.1, 1/2000 s, ISO 200
So that was our Saturday morning. What did you get up to, anything interesting?

Monday 23 November 2020

Between Times

November and April are strange months in central Europe near the foot of the Alps. In April there's not enough snow in the mountains to go skiing any more but too much to go hiking. In November, autumn's over; the trees have lost their colour and winter hasn't yet arrived. I used to dread this time of year. In my fourties I went through several years of seasonal affective disorder - winter depression. For a couple of years it was so bad that I was prescribed medication in order to be able to function, until I worked out that the side effects were at least as bad as - if not worse than - the symptoms. Towards the end of last week I began to feel the old claws began to sink into my shoulders and I knew I needed to get out, get some sunlight and exercise. Sharon was kind enough to set our Saturday plans aside and join me as I headed down to Oberstaufen and the Buchenegger Waterfalls. 

(Tip: If you click on a photo, you get taken to the gallery view where you can see a larger version and can flip between the images without having to read the boring bits 😉).

Hoarfost on the Hündlekopf || Olympus 44 mm, f/7.1, 1/400 s, ISO 200 
The mild weather had given way to a frosty weekend - it was so cold that by the end of the day there was still frost on the fields where the sun hadn't shone - and there was snow on the ground from about 1,000 m up combined with hoarfrost in the trees. We parked at Steiblis and made our way through the woods down to the waterfalls. The frost had only made its way into the edge of the woods - the further we pressed on the less of it there was to see, and even then it was predominantly on the wild raspberry leaves. 

Frosty Raspberries  || Olympus 66 mm, f/4, 1/400 s, ISO 1600 
Isolated Farmstead  || Olympus 21 mm, f/8, 1/80 s, ISO 200 
When I visited the waterfall back in early September, I struggled with the intense light of a late summer day as well as an over-abundance of foliage getting in the way. I knew at the time that I'd be back in late autumn or on a more overcast day to see whether I could do anything else with the pool. But even in better light there wasn't a whole lot I could do with this relatively straightforward scene. 

Buchenegger Waterfall || Olympus 17 mm, f/20, 10 s (live ND), ISO 200 

The Funnel || Olympus 100 mm, f/20, 3.2 s, ISO 200 
The best view of both sections of the falls is to be had half way up to Buchenegg on the eastern side of the river, but even this disappointed. The leaves had gone from the trees but there were too many saplings in the way for a decent shot. Next time I'll just have to bring my lopping shears with me 😉.

Upper and Lower Falls || Olympus 66 mm, f/8, 1/20 s, ISO 200 
What I did get though was this juicy shot of the sun shining through the moss on the side of a tree. I hadn't noticed in the field (alright, in the forest) that the background was so cool. This one breaks all the composition rules, but it works really nicely (IMHO), partly because of the palette of colours.

Mossy Tree || Olympus 44 mm, f/8, 1/60 s, ISO 200 
Tree stumps are wonderful things to photograph. I've really discovered them this year and they rarely let me down. They're microcosms of the forest, whether they have bracken growing out of them or moss like here. If you're lucky, you'll get a root system as well thrown in for free. My bonus here was the raspberry plant. 

Stumped for a Composition? || Olympus 86 mm, f/8, 1/80 s (HDR), ISO 200 
Having climbed out of the valley our route took us past a number of lovely old farmsteads, many of which would have normally been selling buttermilk or a cool beer to supplement their income. Today they were all boarded up for the winter, but still looked pretty in the sun, especially when accompanied by larches like this. Larches are the only fir trees to cast their needles in the winter. Before they do this, though, the needles turn a magnificent golden colour. In the right light they can be real eye-catchers.

Bifurcation || Olympus 23 mm, f/5.6, 1/250 s (HDR), ISO 200 
Frozen Puddle || Olympus 41 mm, f/5.6, 1/125 s, ISO 200 
Last Colours || Olympus 100 mm, f/5.6, 1/50 s, ISO 200 
Frost Border || Olympus 44 mm, f/8, 1/80 s, ISO 200 
On days like this there are plenty of details to catch. Some photographers tend to plan every shot down to the last degree, plotting where the sun's going to set and when, slavishly studying tide tables and weather systems. I tend to be a bit more spontaneous with my shots, with the exception of Milky Way photography, where you need a strong foreground and a new moon. For the rest of it, a little research can't hurt, but more often than not it's the chance encounters that delight.

Crystals || Olympus 75 mm, f/5.6, 1/80 s, ISO 200 
Forest || Olympus 86 mm, f/5.6, 1/100 s, ISO 200 
Transitions || Olympus 31 mm, f/5.6, 1/200 s, ISO 200 
Walking back along the other side of the Mittelbach towards the Weißach river we were given occasional glimpses of a ridge a little ways above us that had managed to stay mostly in the shade of the main ridge. One tree in particular caught our interest, a well-shaped deciduous tree on a bare ridge surrounded by firs. My longest lens was the one I had on my camera - my trusty 12-100 mm, but Sharon, bless her, had brought the 100-300 mm Lumix that I'd given her when I bought my 100-400 mm (following so far?). Once she'd finished with it, I begged a borrow (no, I hadn't packed the bazooka, it weighs almost 1,200 g and I hadn't thought I'd need it). I hadn't noticed the farm on the left until I processed the image, and yes, I did take the liberty of enhancing the colour of the roof. It's art!

Standing Out || Olympus 120 mm, f/5.6, 1/500 s (HDR), ISO 200 
As we descended back towards Steiblis where we'd left the car, there were a couple of larch trees catching the late afternoon light and glowing golden in a very tantalising manner. There was too much foreground though, and by the time we got to a place where we had a clear line of sight the light had dipped too far behind the ridge leaving them unappealingly dull. You win some, you lose some. Walking along the road though Sharon pointed out that the moon had just risen above the Hochgrat (yes, THE Hochgrat of the sunset fame). And whaddaya know, there were some larches lurking in the foreground, rounding off the day very nicely.

Half Moon over Hochgrat || Olympus 100 mm, f/5.6, 1/400 s, ISO 200 
When I go out on a walk like this, I don't usually reckon on getting a single three star image, let alone three of them. Let me explain. I take so many photos these days that if I didn't have a rating system to help me organise them I'd drown. When I import my photos into ON1 Photo Raw, I scan through them and sort out the discards - shots that are out of focus, the 'butt-dial shots' where I've pressed the release putting the camera back on its bracket (yeah, I do it too!). At the same time I give a single star to the images that I at least want to look into editing. Once I've sifted through all the shots from a shoot like this, I move onto editing. If I'm happy enough with an image that I think I'll want to share it to social media (Facebook, Instagram or here on the blog), I'll give the image two stars. Once I've edited the whole set I batch-process the pictures, exporting the two-star images to jpegs. If I really like an image, I'll give it three stars. These are the ones I feel confident about submitting to PicFair for selling or submitting to magazines, photos that I'd be happy to print and hang. Occasionally I might even print one. Once or twice a year, I'll give an image four stars. I've yet to take a five-star shot.

So, can you spot the three-star images here? It's a completely subjective system of course, everyone has their own preferences. Which are your favourites?

Saturday 7 November 2020

HDR Edit in ON1 Photo Raw 2021

I thought it was time to do another edit run-through, in case anyone's interested in that sort of thing. I do 99% of my post-processing using an all-in-one editor called ON1 Photo Raw 2021, it's a great programme that covers a lot of the functionality of Lightroom and Photoshop in one package.

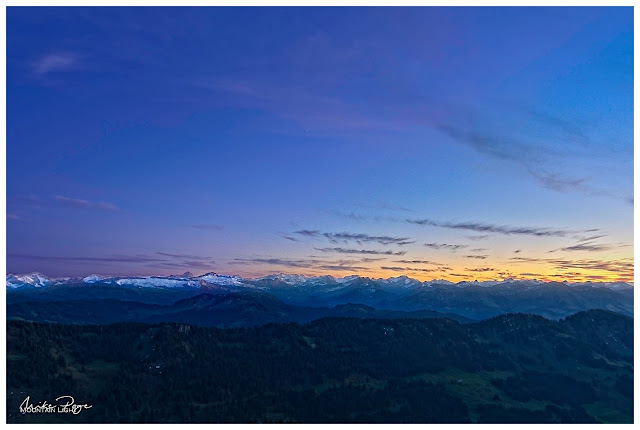
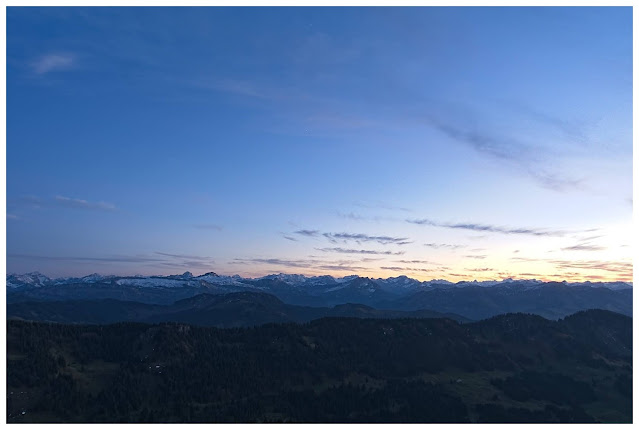
Blue Hour over the Allgäu last Saturday
Talking to friends, I have the impression that for a lot of photographers, post-processing is a book with seven seals and something that they'd rather not bother with. To be fair, a lot of cameras produce excellent quality jpegs, but what a lot of people don't realise is that a jpeg isn't an unprocessed image: It's an image that has been processed by your camera (or RAW editing software) using automated algorithms. 

So the question is - who do you want to edit your digital negative? your camera or other automated processing software, or yourself? If you're happy with the edit your camera/software has made, then there's not a lot of need for further editing. If, on the other hand, the jpeg out of camera doesn't meet your expectations, or more importantly (for me at least), if the final photo doesn't convey the emotion that you experienced in the field, the only solution is to get to grips with digital processing. That's deep isn't it? And that's the principle underlying most of my editing; I want to convey to the observer the emotion that I experienced when I took the photo. 

HDR Assembly

This photo is a high dynamic range (HDR) image. It has been assembled from three separate exposures taken one after the other; one exposed as normal, one for the dark parts of the scene and one for the bright parts of the scene. The camera has a much lower capacity for distinguishing between the brightest and darkest parts of an image for the human eye. Conservatively, my eye is 30x more sensitive to extremes of light and dark than my camera sensor is. To compensate for this, it's necessary to take multiple images and compact them together in order to arrive at a compelling image.

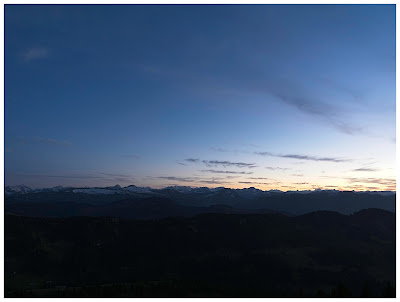
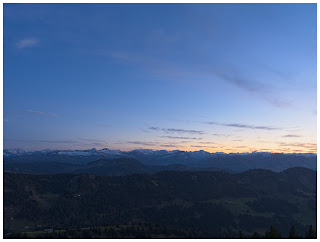
Base Exposure; 12 mm, f/8, 0.6 s, ISO 200
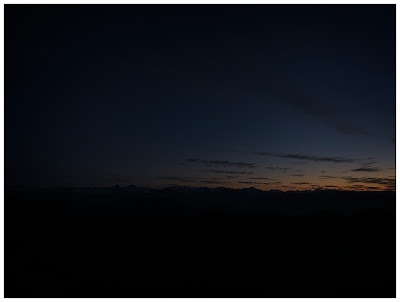
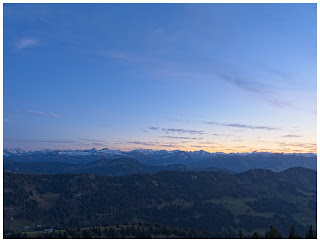
Dark: ibid with 1/13 s
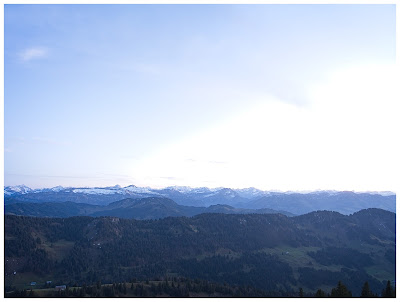
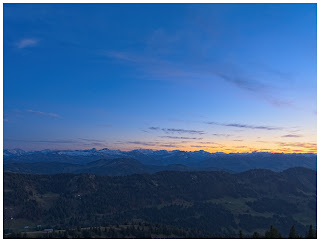
Light: ibid with 5 s
Normally I would set the camera to expose two stops over and two under for 1/4 and 4x the brightness (one stop= one doubling or halving of the exposure). Here I elected to use a three stop bracket due to the extreme conditions. The three base images are nothing special, as you'll see here. The basic image is exposed for the sky, the darker image has more colour in the brighter sections of the sky and the lighter one for the valley foreground.

To create the HDR base image, you'll need to select the three images in ON1 Photo Raw Browse and then click the HDR button on the right. You'll now be confronted with a number of choices; Deghosting, Default Look and a bunch of sliders and options. 
Deghosting is all about how the programme processes compositional differences between the images, which will play a role if the shot was hand-held or if there are moving elements in the scene. Here neither is the case; the photo was shot from a tripod and there's nothing in the image that was moving sufficiently to cause problems over this distance and time-scale. The orange square reflects which image you've selected as the base image.

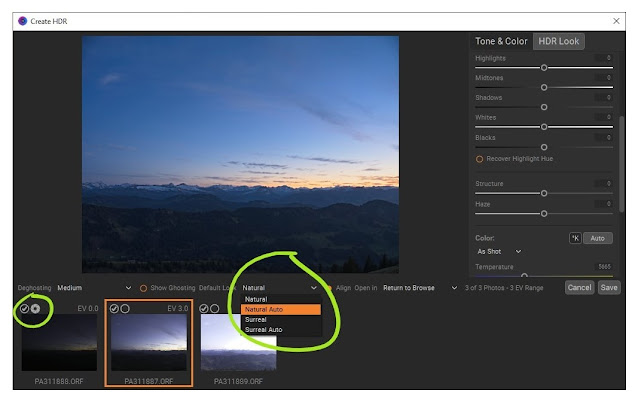
Selecting the base exposure and HDR algorithm
The next choice to make the Default Look. This dictates how ON1 processes your images into the final HDR picture. There are four options here; Natural and Surreal, both with and without Auto processing. Just for fun, I've tried all four options here below. The difference between Auto and native is that ON1 chooses how to set the basic level sliders for you. 

Natural

Natural Auto

Surreal

Surreal Auto

Because I want the image to reflect the darker mood of blue-hour, the dusk hour after sunset when there's still ambient light to see by, I've set the base image for the exposure using the iris icon in the left-hand image in the HDR window.

Effects and Local Edits

Once ON1 has generated a base image that you're happy with, it's off to the Develop module to do the actual editing. This is where the magic happens and where you can turn a good image into something special. Of course you've still got the option of just hitting AI Auto at this stage for ON1 to perform an automatic edit. If you really want to make the image sing, however, a little more finesse is involved.

Normally if I was editing an image, I would have applied one of a personal custom preset, applying a bunch of Effects and Local Edits to the image. Actually in my custom preset, most of these aren't actually applied, instead they're pre-loaded but not yet selected. This is a huge time- (and wrist-)saver, because it means that I don't have to click through a number of menus items to select the standard edits that I use on most photos. I apply this preset automatically at the import stage, but the output file from the HDR module strips the photos of all these filters.

I used the Natural Auto HDR as my base image as a starting point. Everyone has their own particular style. Mine tends toward the hyper-realistic feeling of Albert Dros or Fabio Antenore, two landscape photographers whose eye-catching Instagram images  really stuck out to me, but I don't take it quite as far as they do.

Having set the base image using the HDR sliders, it's down to some Effects and Local Adjustments:

1. Base Image
Here's the base image. I've cropped to a 2:3 format to cut out the immediate foreground.
 

2. Noise Reduction
I hate performing noise reduction. It's process I don't understand and usually involves me randomly sliding Luminance and Detail up and down until I arrive at a compromise I'm happy with. Unfortunately, cameras with small sensors are prone to noise grain. I normally avoid this by leaving the ISO at the native level. Even though I did that here, I seem to have picked up some noise in the sky. I've reached an unhappy compromise here with a Luminance of 40 and Detail 15.


3. Colo(u)r Enhancer: Increase Colo(u)r
Adds some colour saturation to the image, deepening the blue of the sky. I've applied it to the whole scene at 100% opacity except the yellower area of the sky because it became too dominant.


4. Tonal Enhancer: Highlights Darker
Darkens the sky somewhat, intensifying the colour even further. Applied to the sky with a gradient mask. There was no need to apply it to the foreground.


5. Tonal Enhancer: Tonal Contrast I
Adds a bit of sharpness to the scene. Applied using a large feathered brush at opacity 50% to the mountain area to restore some detail. 


6. Tonal Enhancer: Tonal Contrast II
I applied a second, more gentle tonal contrast filter as a gradient at 33% opacity to the bottom of the picture to give the trees a little more detail.


7. Split Tone
Using the split tone filter you can add different colours to both the highlights and the shadows of an image. Here I've used it as a diagonal gradient with the highlights unaltered (set to white) but the shadows given a purple tone. As you can see it subtly changes the darker blue tones into slightly purple ones. 
Note: the purple bottom-left was unintentional and removed in later photos.


8. Local Adjustment: Lighten
The foreground was looking just a little too dark for my taste, so I adjusted the Exposure to +0.6, Contrast to +20 and Saturation and Vibrance each to +15. Applied as a gradient to the bottom of the photo.


9. Local Adjustment: Reduce Highlights
The orange sky was still a little wan for my taste so I applied a radial gradient to the right-hand side of the photo in which I only pulled the Highlights down to -85. No Exposure adjustment, just the Highlights, it's a neat way of dealing with local Highlight (or Shadow) issues in a photo and here it just enhances the colour in the western sky towards the set sun.


10. Local Adjustment: Lighten
This last step is the salt in the soup and one I'm quite proud of: Instead of decreasing the highlights as one usually does, I selectively increase them - on the snow. Again, the exposure on this edit was left neutral and I just upped the Highlights by +40 and Midtones by +70. Then to rescue the snow a little bit out of the blue tone I increased the colour temperature by 5. This slider is incredibly sensitive at this level, but +5 really brings it enough towards white that it stands out.

Applying this brush wasn't easy and took me several attempts. In the end I opted for the ON1 AI Quick Mask, modified at the micro level along the ridge of the mountains and then removed from the immediate foreground. I love the way that you can set a gradient or mask in ON1 to tell the programme where to apply the effect that you want and then make micro adjustments to that mask to correct any mistakes.

Looking back up the series, the difference between steps is relatively subtle, so before I reveal the finished image, let's look again quickly at the starting point and then immediately on to the final photo for comparison:

Before

After: Blue Hour over the Allgäu

Anyway, that's the final edit (for now). Let me know below if you've found this helpful at all, or if you'd have done anything differently. Until then, stay safe and happy shooting.