Saturday 27 February 2021

A Walk In The Park With The Olympus M. Zuiko 100-400 f/5-6.3

I was talking to a colleague on Wednesday when she let it drop that her husband, a good friend of mine, was in one of the parks in Munich photographing tawny owls with their son. I'd known about at least one of the owls - the infamous Kazimir - from another photographer's Facebook posts, but when I learned that there were four of five of them, that they were in relatively predictable positions, that the best time of year to shoot them is when there are no leaves on the trees and that the weather for the following day was going to be great, well I had to go, didn't I? Plus I have such a backlog of leave from last year that I really need to start using up and so early Thursday morning I set off in the car to drive into the centre of Munich.

Schloß Nymphenburg || Olympus 12 mm, f/8, 1/500 s, ISO 200
We've been having some spectacular sunrises at the moment due to Sahara sand in the air and Thursday morning was no exception. Driving down to the motorway I was greeted by the most amazing sight; a perfect disc of yellow rising behind some naked trees with a misty foreground. One of those once in a lifetime shots and I had a car full of camera gear. But also a date with some owls. It'll have to be one of those that got away...

Kanali Catching the Rays || Olympus 400 mm, 1/125 s, f/6.3, ISO 200
Finding my friend in the park wasn't difficult, the first known roost tree is just behind Nymphenburg palace by the canal (I don't think I'm giving any secrets away here), and so there I was before 8 am setting up my tripod in the park, getting out my new mega zoom and trying to find a position through the twigs and branches. The photos make it look easier than it was. Getting the right angle was not straightforward and emphasised the need to be shooting these beautiful birds now rather than in a month's time, when the trees will be shooting bright green new leaves.

Hi-Res Kanali || Olympus 400 mm, 1/125 s, f/6.3, ISO 200
This was one of the first photos I took of the bird who has affectionately been named "Kanali" due to his proximity to the canal (yeah, the Germans can be really imaginative). Remarkably, the bird was sitting still enough for me to engage one of the Olympus camera's super-powers; the high res mode. Using some technical jiggery-pokery, the camera moves the sensor by a few microns in each direction over multiple shots, creating an 80 MP shot using a 20 MP sensor. I never imagined I'd be using this magic on wildlife, but I didn't have anything to lose and am really happy with the way it turned out. If you look at the branches above the owl you can see some artefacts generated by the breeze moving the twigs between the individual shots, but I'm really pleased with how this turned out and could easily imaging this hanging on my wall.

Canada Goose || Olympus 400 mm, 1/160 s, f/6.3, ISO 200

Classical Swan || Olympus 400 mm, 1/160 s, f/13, ISO 200
Of course there aren't only owls in the park. There are more lesser spotted woodpeckers than you can shake a stick at, plenty of tits and nuthatches. An ornithologist friend who was out with us was able to point out the song of some wallcreepers and of course with all the open water there is also an abundance of ducks, geese and swans. On another day I'd have had an eye out for the swans in flight, landing on the water and taking off, but today was all about the owls. I did allow myself to be distracted for a couple of minutes to take this canadian goose resting between the frost-crested mole hills and a classical swan shot. Nothing to write home about, but nice portraits nevertheless. I particularly like the repeating patterns of the molehills with the goose - a nice bit of tessellation with a difference.

Light Through the Palace || Olympus 342 mm, f/11, 1/200 s, ISO 200
After spending an hour or so admiring Kanali we headed north to the Pagoda and the Kleiner See - the little lake. There's another owl roost east of the lake, but be warned that the park rangers don't look kindly on people walking on the grass here.

Tawny Owl || Olympus 400 mm, 1/160 s, f/6.3, ISO 200
Our third owl was in the woods north of the lake, set well back from the path with a poor line of sight. This one is very shy and we had to wait a while for him to show even this much above the lip of his hole.

Shy Owl || Olympus 400 mm, 1/100 s, f/6.3, ISO 200
When shooting birds like this, don't be afraid to fill up your memory cards. Some of the owl shots were taken with manual focus, some with auto focus. Not even the pros get 100% focus lock and so really can be a case of 'spray and pray', sorting out the very best shots afterwards on the PC. You're looking at my pick from 150 photos here, a much lower keeper rate than I'm used to from my landscape and macro photos, but this is a different game and different rules apply.

Back to Kanali || Olympus 400 mm, 1/200 s, f/6.3, ISO 200
You will need a good length lens to get decent shots though. Most of these shots are cropped at least a little bit to focus in on the birds. I was mostly shooting at the long end of the 100-400 mm - that's 200-800 mm in full format terms and I think the tripod was necessary. With more megapixels you could probably get away with a shorter lens, but it would be a compromise.

Leaving the park I was struck by the clumps of snowdrops and crocuses lining the paths and so I dropped back to my trusty 12-100 mm for a few close ups before heading hope for lunch.

Snowdrops || Olympus 54 mm, f/5.6, 1/1000 s, ISO 200

Crocus || Olympus 100 mm, f/8, 1/200 s, ISO 200
Incidentally, if you're interested in getting together to shoot some time, we've now created a Facebook group: Munich Expats Photo Group. If you on Facebook, get in touch, otherwise drop me a line using the contact information on the right here. I'm always looking for partners in crime!

Micro Four Thirds Filter Comparison: Kase Wolverine vs. Lee Seven5

I don't often do gear reviews, but I've recently had reason to change my filter system and I thought I'd compare my old Lee Seven5 filters with the new Kase Wolverine Magnetic filters for my m43 Panasonic Leica 8-18 mm f/2.8-4.

When I made the move from a high-end bridge camera to the micro four thirds system two years ago, I also invested in a filter system so that I could dabble my toes in the waters of long-exposure photography. These filters are essentially light-blockers of various intensities. Because they don't (or at least shouldn't) affect the quality of the light (i.e. the colour), they are referred to as neutral density or ND filters.

At the time I was looking around, the Lee filters were very highly thought of in the field and I quickly snapped up a filter kit designed specifically for cropped sensor cameras such as the m43 system without doing much research. Unfortunately, whilst optically excellent, the Lee Seven5 system is only good down to a focal length of 14 mm when you use the accompanying CPL which attaches to the front of the filter holder. Any wider than this and you can start to see the edges of the filter mount in the corners. Because my widest lens is the Panasonic Leica 8-18 mm, essentially I can't use this filter system with the CPL when using this lens.

Vignetting with the Lee Seven5 CPL


8 mm

10 mm

12 mm

18 mm

Lee Seven5 CPL Vignetting

Although I don't do a huge amount of long-exposure photography, I do some and so this has been an issue for me. Fast forward to 2021 and I've finally got round to doing something about it. A number of the photographers I follow on YouTube had been talking about a new system of filters from a filter manufacturer that I'd not heard of before - Kase. As well as the traditional filters involving a filter holder into which you drop the square sheets of glass, they also provide an innovative system involving circular filters that can be stacked on the front of the lens and which attach simply via magnets. This means a lot less faffing about than the traditional filter contraptions, and if nothing else I'm a huge fan of less faff!

A couple of weeks ago I drifted onto the Kase UK website. As I was browsing, an automatic chat window popped up, asking me if there was anything they could help me with. Because my question was very specific - 'what size filter system do I need to avoid vignetting on the Leica 8-18 mm lens?' I decided to give it a go and was pleasantly surprised to have a very quick reply from someone who clearly knew what they were talking about. A fellow Olympus enthusiast who was familiar with the lenses and issues involved but who couldn't say for sure whether I needed the 82 mm system or I could get away with the 77 mm filters. In the end we decided that I could order both and return the one I didn't need, but I'll save that saga for later.

There are a number of things to bear in mind when considering filters. First and foremost they need to be completely uniform, otherwise you'll get blotches on your photos that will be very difficult to remove in post. A close second requirement is colour fidelity; if the photos come out with a magenta or green colour cast it's a pain. It can be fixed to a certain degree, but it's less than optimal. After this, there are a number of further considerations, but if the filters don't fulfil these requirements then leave well alone. Durability, ease of use, cost, accessories and availability of replacements also need to be born in mind.

Optical Comparison

When the Kase filters arrived we were experiencing milky skies due to dust storms from the Sahara (we live in southern Germany). The morning after the packet arrived I slipped over the road to shoot some test shots against the rising sun. With zero cloud cover this made ideal conditions for testing the filters as there were no clouds to create artefacts - the sky should be a homogenous gradation. All the shots were taken within a few minutes of each other (I hadn't had breakfast yet and so was highly motivated to get through the various series) at a constant aperture of f/4 and ISO 200. The images are a 25% crop of the top left quadrant of the photos. They are from the raw files but are essentially unprocessed apart from lens correction. Although I had the camera, an Olympus OMD E-M1 Mk III, set on auto white balance, this only affects the jpeg images and not the raw files. I exposure-bracketed each time and have chosen the +2 EV images in order to give the lightest possible images to compare the exposures.

With the Lee filters I used the 0.45 and 0.9 ND filters (1.5 and 3 stops respectively), for the Kase filters I used the ND8, ND 64 (3 and 6 stops respectively) as well as the CPL filters - a stack of three filters (this will be important later - see below under Afterthought).

Filter

None

Lee Seven5

Kase Wolverine 77 mm

Kase Wolverine 82 mm

8 mm

*

10 mm

12 mm

18 mm

*top right corner chosen as a mis-aligned filter caused shadow on the corner - this was not a vignetting issue.

Lastly, I tested the 82 mm filter at 8 mm focal length with the tripod high-res mode. A friend had mentioned that he’d seen vignetting with HR that hadn’t been visible in normal mode. Not a biggy, but something to watch out for.

High-res mode with 3x 82 mm filters
The bottom line is that both systems appear to be colour neutral as well as highly homogenous and that the 77 mm Kase Wolverine filters vignette slightly with multiple filters at 8 and 10 mm but the 82 mm filters don’t - unless you’re shooting in the Olympus high res mode.

Afterthought

The reason I stacked three filters for Kase is because that's how I often used the Lee filters; the 1.5- and 3-stop filters are relatively weak and I often found myself stacking them. Having slept on it, I'd probably normally only use two Wolverine filters - the 3-, 6- or 10-stop with the CPL in front. In the meantime the clouds have come in and so I was restricted to lighting up a section of wall in the house to see whether reducing from three to two filters could overcome the last vignetting issues. Again, all photos at f/4, ISO 200 and this time all at 8 mm and top left hand quarter of image.

8 mm, no filters
8 mm, 2x 82 mm filter
8 mm, 2x 82 mm filter, tripod high-res
8 mm, 2x 77 mm filter
8 mm, 2x 77 mm filter, tripod high-res
As you can see, there's hardly any shadow with the 82 mm filters, but a little with the 77 mm's still. The 82 mm filter works fine with the Leica 8-18 mm at the widest end even in high-res mode.


Other Features

As I mentioned above, optical comparison is not the only feature to take into consideration; durability, ease of use, cost, accessories and availability of replacements. Both systems have their pros and cons, though I notice that the Lee Seven5 appears to have been discontinued in favour of their 85 mm square filter system - perhaps they realised that the CPL was essentially unusable for wide angle photography.

System

Lee Seven5

Wolverine Kase Magnetic Pro

Availability

Available, but no longer in production

Available

Filters provided

1.5, 3 and 10 stops, CPL, hard grad

3, 6 and 10 stops, CPL

Durability

Hard resin, resistant to falling damage but not to scratching.

Toughened optical glass, reportedly extremely durable.

Ease Of Use

Easy to use, though attaching the CPL can be a bit fiddly in low light

Extremely easy to use, though details regarding which filter is which written very small

Drawbacks

  • Bulky with the holder and CPL

  • Susceptible to light bleed from the side (unless using the big stopper which has a gasket)

  • Not readily combinable with graduated filters (there is a circular soft grad available, but unless your horizon is slap bang in the middle it’s not much use)

Accessories

  • Cordura filter pouch with strap

  • Cleaning cloths (separate cloth pouch for each filter)

  • Graduated filter

  • Leather filter pouch with sturdy clip

  • Cleaning cloth

  • Wax paper envelopes for filters


Bottom Line

I really like the look and feel of the Kase filters and will definitely be keeping the 82 mm set and pensioning off my Lee system. Anyone in the EU want a 77 mm set of Kase Wolverine filters? Otherwise I'll have to send it back to the UK. Somehow. Wish me luck! 

If you're interested in these filters, look up one of their affiliate photographers to get a 10% discount. In the UK you could go to Ian Worth (though you may need to sign up to his Clubhouse). Here in Germany I got a voucher from Manfred Zobrist. Otherwise, check out the Kase website of your country of choice and look up their affiliate photographers.

The Ordering Saga

Warning: Long, rambling story ahead: I live in Germany. My interaction was mostly with the UK Kase website simply because even after 30 years and despite being fluent in German, conversing in English is still my first language. Plus my initial contact via the website was extremely positive and this continued throughout. The people on the other side were very friendly, very knowledgeable, seemingly available at all hours and just willing to chat. In fact I don't think I've ever come across customer service this good. Believe it or not, Sauter Munich also rate very highly with me due to their help tracking down a camera and lens last year, but the Kase people were first in class.

After the initial contact I managed to get my hands on a 10% discount voucher via Ian Worth's website. Bearing in mind Brexit, I thought I'd be clever and order the filters from Kase Germany. Having sorted out the order, I got to the last step - entering the voucher code - and got bounced. Code not recognised. After asking around a bit we worked out that Ian's voucher was only valid with the UK site. I looked around a bit for a German equivalent, but at the time couldn't find one. So back to the UK site, Again, all the goodies in the basket (there were 6 items in all, the two filter systems plus two adapters each for for a 67 mm and 72 mm lens thread) - all from different parts of the website. Voucher accepted. Great. Shipping information: no shipping to Germany. Nuts! The chat box was active again and I brought up the shipping issue with the Kase colleague at the other end. "No problem sir, we'll have that fixed in an instant" - no sooner said than done and literally within seconds I was able to process the order on a Friday evening.

In the meantime, I'd managed to find a German photographer who was offering Kase discount codes on his website. I sent off a request, but unlike the UK people, he appeared to be off for the weekend already. Anticipating a positive response, I checked back with Kase UK (I did say this was a long, rambling story, didn't I?) to ask whether the order could be delayed for a couple of days whilst I waited for the German voucher. They checked, but unfortunately by this stage the order had been processed and couldn't be held up any longer.

A couple of days later I received an email from the package service asking me to pay the European VAT/MWSt. I'd envisioned having to drive several miles to my nearest customs depot to pay import tax, but contrary to the experience of other ex-pat friends, DPD appears to have all its ducks in a row. After filling out the requisite forms and giving my credit card details (yes, of course I cross-checked the package number from the DPD payment request with the Kase dispatch note), the order was once again on its way and a couple of days later in my hands. 

So now the filters are tested, the 77 mm Pro kit back in its box and waiting to either go back to Kase UK or on to some lucky person this side of the Channel. If you don't have anything wider than about 14 mm (m43 equivalent) and are interested in a set of top quality filters, get in touch, perhaps we can do a deal...

Monday 15 February 2021

Winter Sundowner at the Ammersee

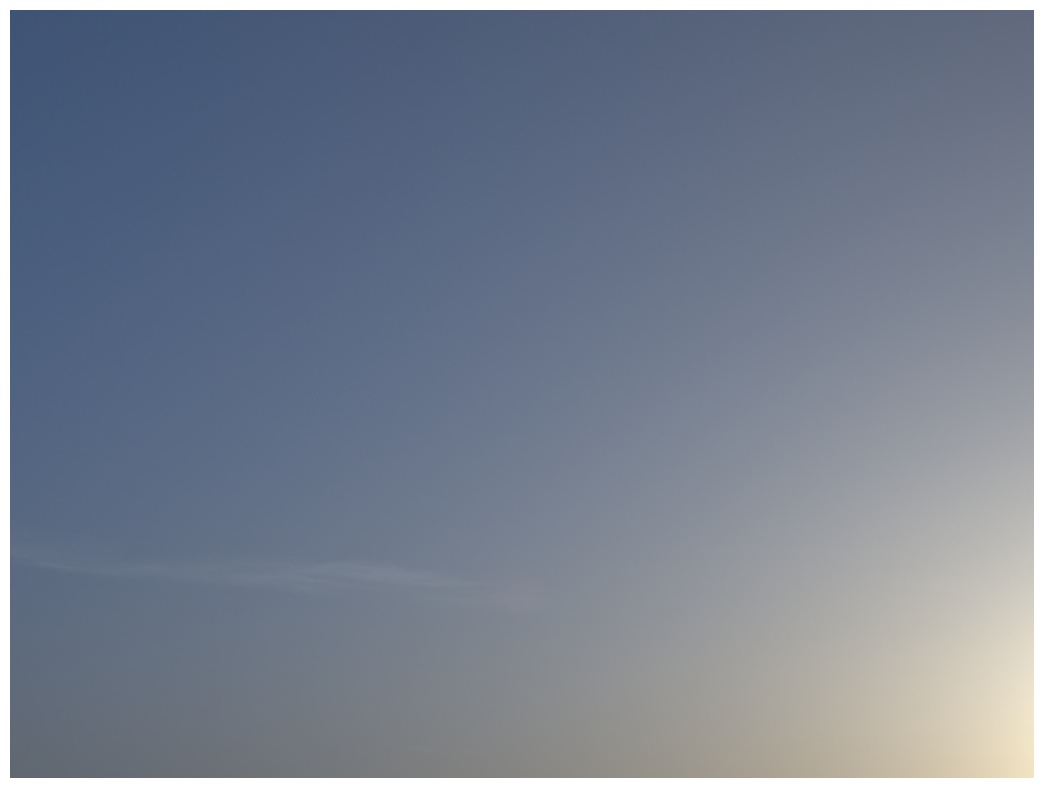
I have the enormous privilege of living about a 10 min car ride from one of Bavaria's most picturesque lakes, the Ammersee. We've seen it in all conditions, from balmy sunny evenings, after torrential rain with mosquito plagues, autumn storms with huge waves and speeding kite surfers to completely frozen over in 2006. Working from home it's really easy to get there for a quick excursion. Although it's really chilly here at the moment - we're talking negative double digit Celsius - I was really surprised not to find more ice when I took off after work on Friday afternoon to check it out. Dawn that day had been really pretty and I had high hopes for the sunset despite the lack of significant cloud.

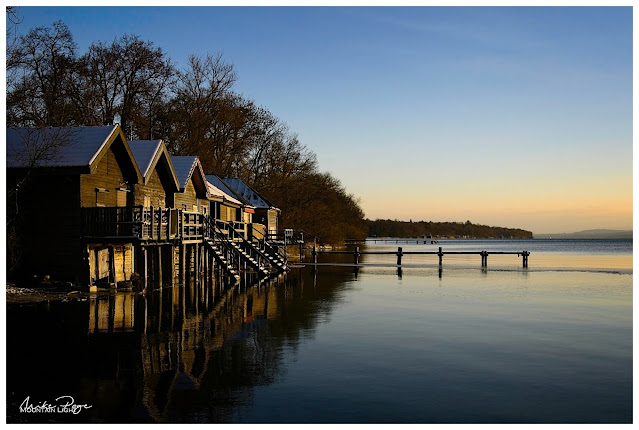
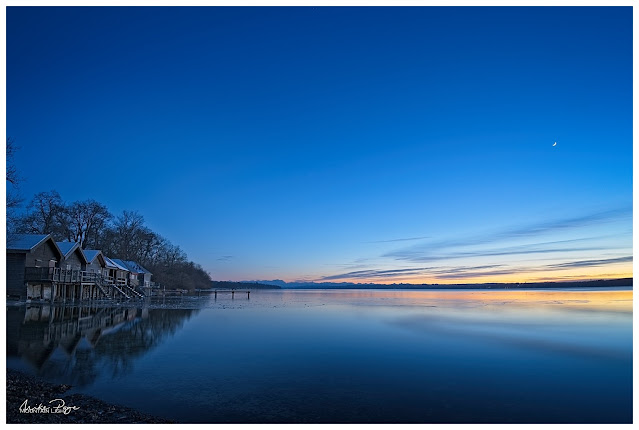
The Boathouse at Stegen I || Olympus 12 mm, f/4, 15 s, ISO 200 
Dressing up warm is critical in conditions like this. I knew I was going to be spending quite a while outside and so I put on downhill ski trousers over my jeans, heavy mountain boots with a second pair of socks, a windproof jacket, scarf, woolly hat and my latest acquisition, my Vallerret Markhof Pro 2.0 photography gloves. These are great thick gloves with foldable tips on the index fingers and thumbs allowing you to access all the necessary dials and buttons on the camera without exposing your whole hand. The finger tips fold back on strong magnets hidden unobtrusively within the fabric to keep out of the way.

I've included a screenshot of a Google map of Stegen (am Ammersee) detailing where each shot was taken in case you're interested. For more original ideas and inspiration regarding where to shoot at the Ammersee, Google images of the Ammersee or check out some of the local photo websites, such as Werner's Fototräume (also great for other photo spots in the vicinity).
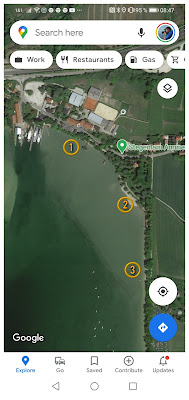
Photo Locations from this Blog


The Solitary Boathouse at Stegen (1)

Arriving at the car park as most people were beginning to leave - not that the car park was very full anyway (had I mentioned how nippy it was?) - I was at first disappointed at the lack of ice, but I'd had the foresight to bring my neutral density filters and was confidant that I'd be able to get a few decent images out of the evening.

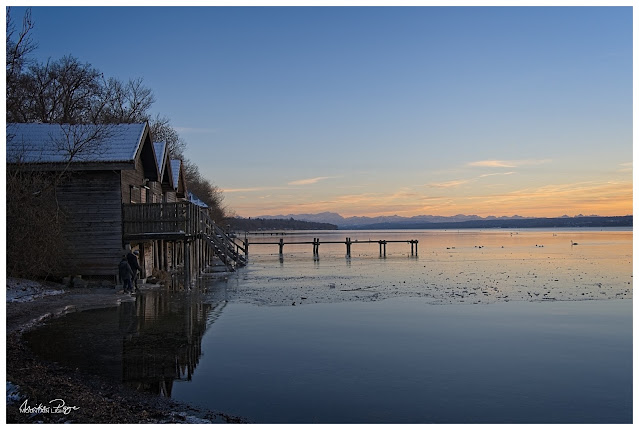
The Boathouse at Stegen II || Olympus 16 mm, f/8, 1/50 s, ISO 200
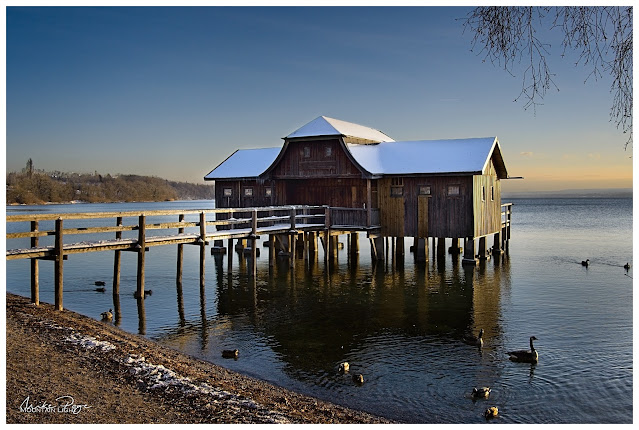
Once you get past the restaurants, the first landmark is the boathouse next to the beer garden. Always a thankful motive in the evening sun. The light was quite challenging so I slipped the Olympus into exposure bracketing mode and hand-took this image. It's not an HDR, but it is an exposure blend, with the sky, water and boathouse are all taken from separate images and assembled in ON1 Photo Raw - though any decent processing software will do the trick.

Boathouse Row at Stegen (2)

The second landmark is the row of boathouses with the Wasserwacht or lifeguard station. Again, sunset is always kind to these huts as you can see here. Whether or not you use the shoreline as a curved leading line is entirely up to you. On a clear day, the Alps form a pleasing backdrop to the right inviting you to taking a wider panorama. This time I had to be content with a pleasant orange glow on the horizon, which also works. The way the trees echo the line of the houses and the reflection all emphasise the structures in the scene.

Boathouse Row I || Olympus 23 mm, f/8, 1/125 s, ISO 200

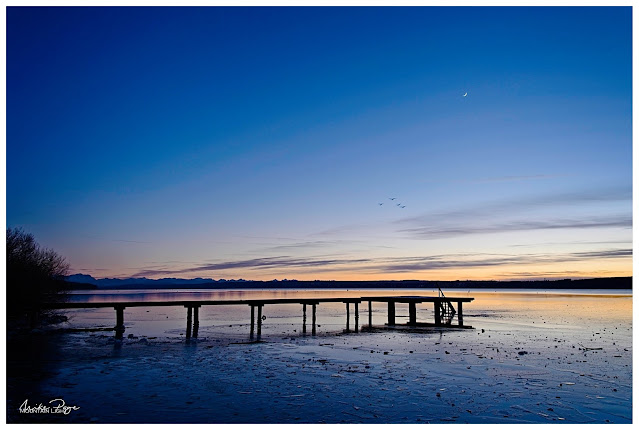
The Jetty at Stegen (3)

The third stop and my actual destination was the background jetty in the photo here. The jetty leading from the beach huts doesn't work as there are no crosspieces down at the moment and looking along it you just get a wooden skeleton. I took my time setting up for this shot. At other times of the year you can line up the jetty pointing at the sun, but in February that's just not going to work. In order to bring a connection between the elements I elected for this 'compromise', placing the setting sun just over the end of the jetty. Tripod out, filters out. Assemble everything together, careful not to zoom out too far as my filters tend to vignette below about 14 mm. It was here that I noticed that the L-bracket had come loose. The clever people at Vallerret had anticipated this eventuality though. The back of each glove has a little pocket that you can stuff things like lens cloths in. The left pocket comes with a tripod key on a lengthy lanyard and so instead of having to fumble around in the fading light for the necessary tool, it was literally to hand.

You can see from the previous shot of the huts that the although the water near the shore was protected and relatively flat, further out the wind was ruffling the surface. In order to reduce the impact of the phenomenon it was time for the Big Stopper, an almost opaque piece of glass that goes in front of lens to reduce light, turning a 1/60 s exposure into a 20 s exposure, the minimum that was needed to iron out those waves. The almost direct sun was a bit of a problem so the next tool in the bag was the graduated filter. This is less dark than the Big Stopper but is gradated, one half being clear and the other darker for bringing down dark skies.

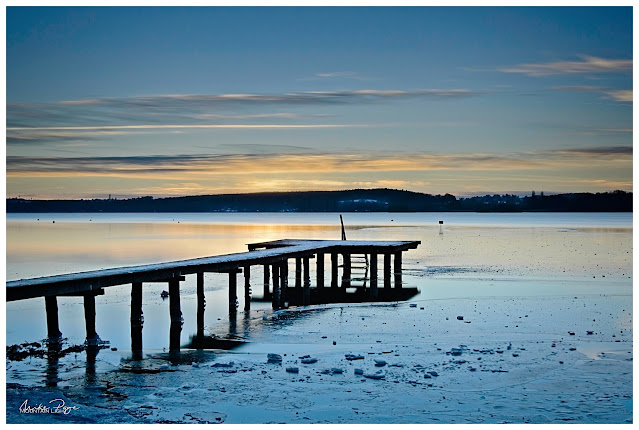
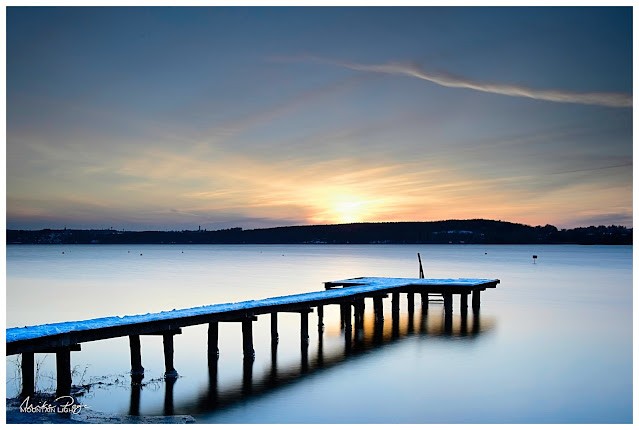
The Jetty I || Olympus 16 mm, f/5.6, 20 s, ISO 200
Processing-wise there wasn't a lot to do here. I've further darkened the sky and actually de-saturated it a bit to make the colours more pastel. I've done my usual trick of actually brightening the snow on the jetty to emphasise the line. As long as you don't blow the exposure, this is a really great technique to make an image stand out that I discovered when astro-shooting in the Alps in the early summer and revisited in my November edit of an image of the first snow of the season. They say that a good photo has rhythm - a difficult thing to define. One of the things I like about this photo is the repeating structures of the lines which are nicely parallel, from the jetty to the clouds and contrails (remember them?).

I shot quite a few of this scene as the sun sank below the horizon, but I think this one was the best of the set. There are always going to be shots that are blurred due to slight movements of the tripod, so shoot a few and sort out the best when you get back to the warm.

Back to Boathouse Row (2)

With the sun well and truly set it was time to start walking back to the car. A couple more 'togs were lingering around the boathouses and so I stopped to scout around to see what the fuss was about. I found this tiny inlet in the shore that caught my interest. Not a classical leading line, but it still takes the  viewer's eye in the right direction. I went as wide as I could, having put the Panasonic Leica 8-18 mm on the camera for this shot. The tripod was set low to the ground too.

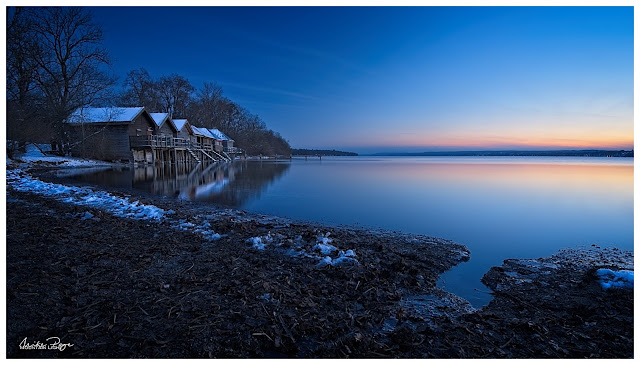
Boathouse Row II || Olympus 8 mm, f/4.5, 5 s, ISO 64
Satisfied that I'd got the best out of the boathouses for the day I combed the beach back towards the restaurants. The sky still had a lot of interesting colour in it and it looked beautiful above the docked pleasure steamers at Stegen. Unfortunately, looking beautiful doesn't always translate to a great photo. I took a few, but none made the cut.

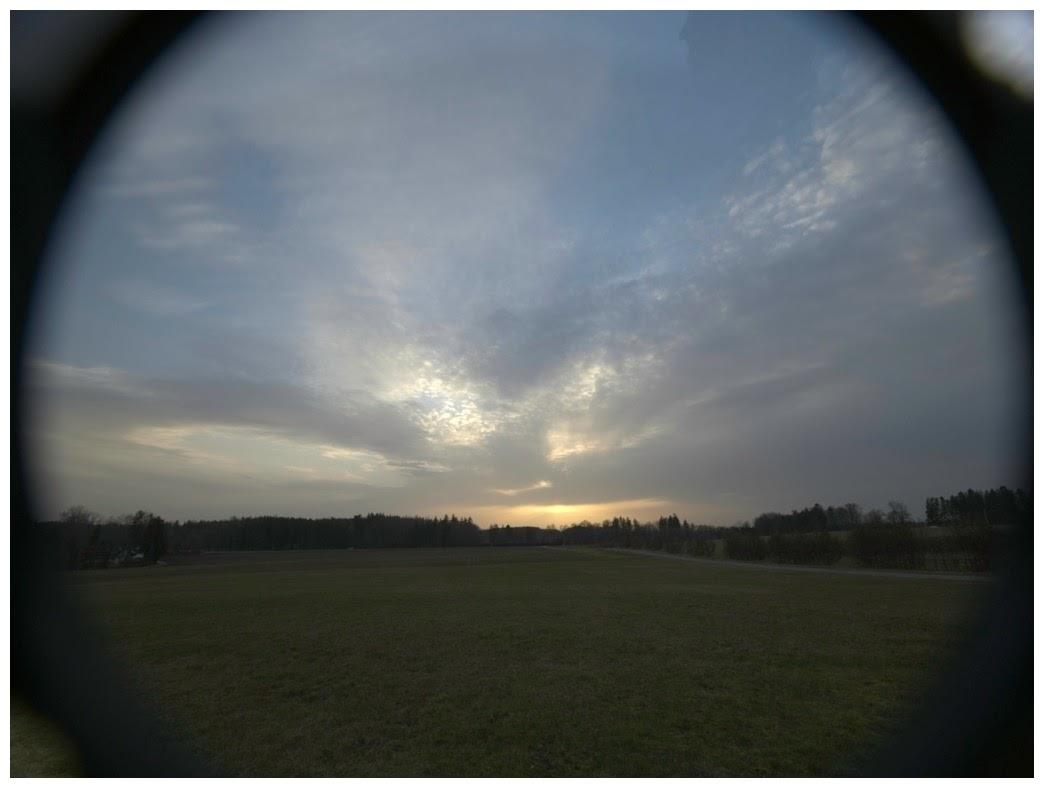
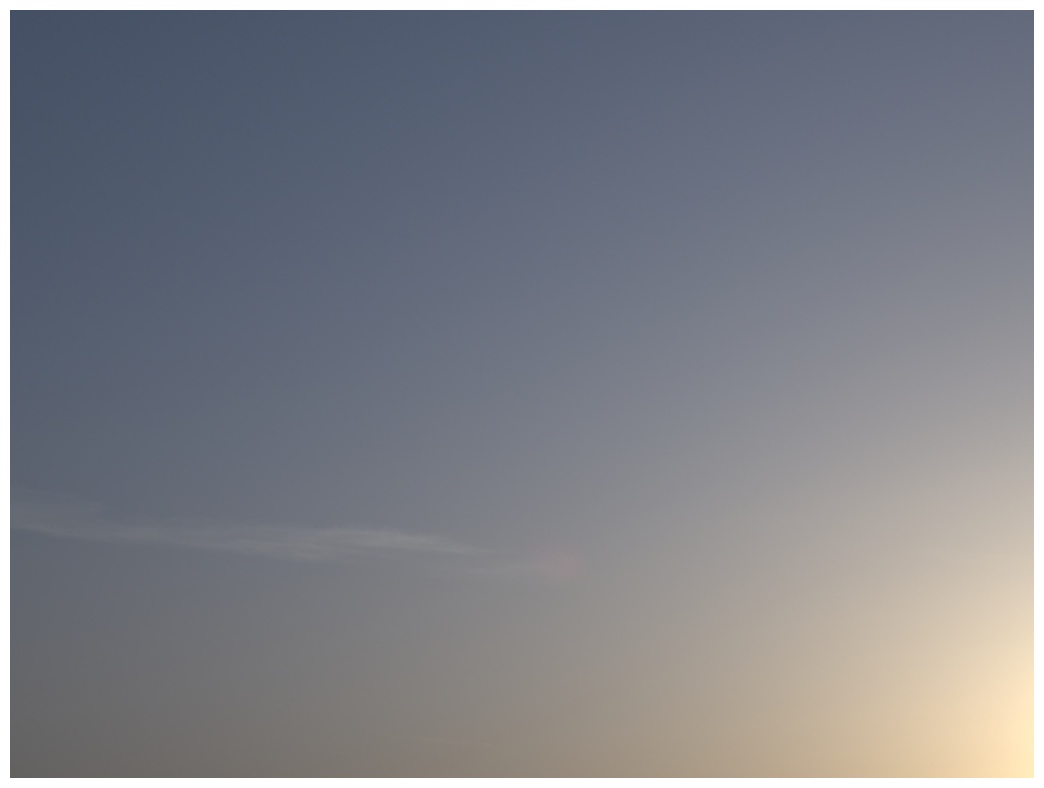
The Solitary Boathouse Revisited (1)

The last port of call was the original boathouse. By now, even though there was still a bit of colour in the sky, it was getting quite dark. But I'd come prepared with both my LumeCube panel and a head torch. The panel didn't like the cold very much. Even though I'd charged it completely before coming out it was only showing 30% power, plus it wasn't really cutting through the dark as I'd hoped. It wasn't the light source for the job. Fortunately the head torch was. My first image was from the east looking towards the sunset (first photo above). You can imagine from the photo why a little extra illumination was necessary. The light beam from the torch was quite narrow and so I waved my head back and forth over the wooden structure over the whole 15 s exposure. If you look carefully you can see the first stars beginning to appear in the sky. This for me is the magic window of light for photography - enough ambient light to be able to see features on the ground, the first stars visible and with a bit of colour in the sky from the setting sun. As you can imagine, it's a very narrow window, but if you get it right you can get some stunning images.

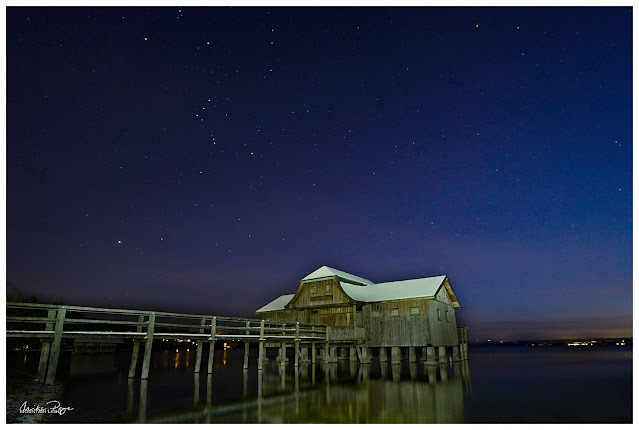
The Boathouse at Stegen III || Olympus 12 mm, f/4, 20 s, ISO 400
This last image is from the other side of the boathouse as the light was really fading. Again the boathouse was lit by my head torch. By playing around I found that if I illuminated for 10 s out of a 20 s exposure the light on the house was about right, though I did adjust it a bit in post - it's always difficult to accurately assess exposure in the dark as the camera screen always looks comparatively bright unless you dim it down. Keeping an eye on the histogram can certainly help, but here it was tricky to judge exactly how much light to add. I was certainly glad of the Vallerrets at this point. I really didn't want to have to be taking gloves on and off to fiddle with the settings in those temperatures.

I love how prominent Orion's Belt is in the winter sky here. Given the wide aperture I was surprised that the stars were as sharp as they have turned out here. That's micro four thirds cameras for you.

If you're local to us in Bavaria and are interested in a pair of Vallerret Markhofs, size L, drop me a line. They were just too small for me and I had to go XL. They're out of stock with Vallerret at the moment so if you want to do some winter photography this season I can warmly recommend them.

Afterword - If At First You Don't Succeed

A couple of the photography YouTube greats have recently released vlogs saying essentially the same thing. The one thing that will advance you as a photographer more than any other, the golden lesson of photography is... ...perseverance. I've had a couple of opportunities to practice this discipline over the last 12 months, whether the various attempts at astrophotography or trying again and again to get the right conditions on the covered bridge at Bad Hindelang, and every time it has paid off in spades. There were a couple of issues with the photos I took on Friday. I was especially unhappy with the photo of the jetty; the composition was off meaning that I had to heavily crop the image to get one that I was happy with and the aperture was so wide open that the depth of field was too narrow to catch the background ridge in focus (below). So tonight I returned, wife and girl-child in tow, to try and rectify my errors.

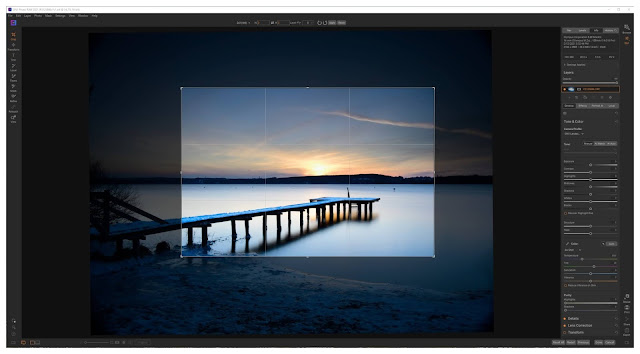
Reducing a picture to the essential elements

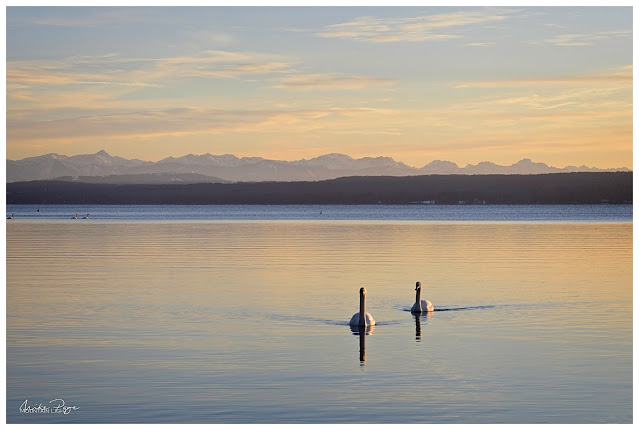
Valentine's Swans || Olympus 57 mm, f/8, 1/125 s, ISO 200
This time the view to the mountains was clear and there was some ice forming on the still water in front of the row of boathouses. On top of this, there were multiple pairs of swans on the water - how aposite for Valentine's day. I allowed myself to be distracted by both the birds and the boathouses before hurrying down to the jetty. I got a better crop, but the bitty ice detracts from the simplicity of the previous image and a lot of snow had gone from the jetty.

Boathouse Row III - HDR || Olympus 17 mm, f/8, 1/80 s, ISO 200 
This time I could get the composition and focus fixed on the jetty... ...but the ice is too gritty after kids were playing on it all day and the colours in the sky weren't quite as good. But hey, ho.

The Jetty II || Olympus 24 mm, f/8, 10 s, ISO 100
It's always a good idea to look around even when you've got a specific composition in mind. Ice had formed around the legs of the jetty and the water level had subsequently decreased, leaving these feet around the bottom. Against the light they formed an interesting sculpture.

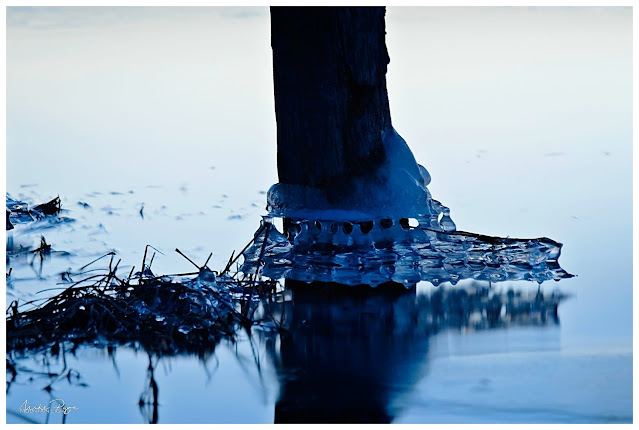
Icy Foot || Olympus 86 mm, f/4, 50 s, ISO 100
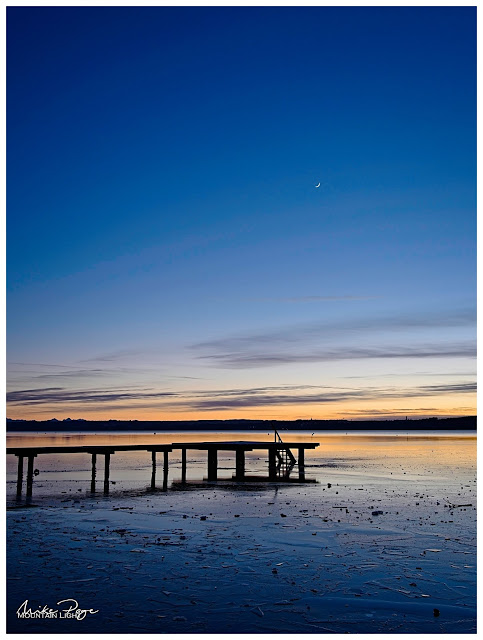
And then the new moon revealed itself in the southwestern sky, giving me a chance to try another composition with the jetty including the mountains in the background...

The Jetty III  with New Moon and Swans || Olympus 14 mm, f/8, 1/10 s, ISO 100

The Jetty IV || Olympus 17 mm, f/8, 5 s, ISO 100
...and yet another with the boathouses before I was dragged back to the car by my half-frozen ladies. But I had promised them that we wouldn't stay too long and I was happy enough with the blue-hour photos from Friday. 

Boathouse Row IV || Olympus 8 mm, f/8, 5 s, ISO 100

Lessons Learned

Every time I go out I make mistakes. Every time I make mistakes I learn something. On Friday I learned about the best composition for the jetty. On Sunday I learned more about the Olympus high res mode and that patience is required when using it in conjunction with long exposures. A couple of times I thought it had crashed, when in fact it was just taking its time. Because I thought it had crashed I turned the camera off mid-processing, leading to me losing the first 2 or 3 high res shots. This mode is also too slow for lunar photography in combination with these long exposures - the moon simply moves too fast. Fewer mistakes to make next time.

Photography is like sailing or hiking. In fair weather it's easy. Mistakes are easily rectified, items are easy to find in rucksacks, etc. But the practice of doing those mundane things in straightforward conditions pays dividends when the going gets tough. When it's so cold that you can't think straight. When it's so dark that you can't remember where you put that filter. When the conditions are changing fast and you need to access a particular function on the camera, if you don't have the fair weather experience to fall back on, you'll just go home frustrated. If you want to be a good photographer, if you want to come home with the great photos taken in challenging conditions, practice all you can. You will be rewarded.