Showing posts with label location guide. Show all posts

Sunday, 9 January 2022

Revisiting Old Haunts - A Winter Photography Guide to Füssen and Surroundings

I think we probably all have our favourite local places for photography. We're lucky where we are with my local little woodland and Lake Ammersee only 10 min away by car. One of my other go-to places for a day-long photo trip is Füssen, home to the (in)famous Castle Neuschwanstein. I've only been to the castle once, and that was before I was living in Germany, and I have avoided the area like the plague for a number of years, but as I've gotten back into photography, I've rediscovered the area and have gone back countless times, either to hike or just to blow away the cobwebs with camera in hand.

A Wintery Neuschwanstein || Olympus 34 mm, f/7.1, 1/80 s, ISO 200
I was at a bit of a loose end in the week after New Years, and one of the other photographers in the Munich Expat Photo Group reached out to me to see whether I wanted to join him for a day's shooting. We'd been trying to get together for quite a while and this seemed like a great opportunity to hit the trail, especially with the fresh snow and icy temperatures forecast. I think autumn and winter are my favourite times of year for shooting here, with the mixed forest providing some great colours and winter providing, well, none. 

Wintery Scenes || Olympus 35 mm, f/6.3, 1/15 s, ISO 200
We'd chosen our day well; it had snowed the day before, it was still cold and there was little wind to speak of, so there was a good chance of shooting with the snow still on the trees. Of course it's possible to shoot in winter without the snow on the trees, but I always find it to be too contrasty, unless it's something simple like a silhouetted tree against a beautiful sky. So fresh snow was looking good to (re-)capture some old favourites and take some new ones that have been on the list.

All of the photos shot here are within a 30 min walk from the respective car parks and should be well within the reach of most people. I would strongly recommend sturdy footwear, or even boots if you venture into the water as suggested below for some of the waterfall shots. 

Alongside your camera, a tripod, polarising filter and even neutral density filter help, as well as spare batteries if your camera is susceptible to the cold.

St. Coloman Church

One of the images that has been on my list for a while is the church of St. Coloman on the flat valley floor below the castles. The snow simplifies this image beautifully, as does the hoar frost on the surrounding trees. This image was also a very interesting object lesson in the benefits of the Olympus hand-held high-res (HHHR) mode. The sky was very tricky here - quite bright even compared to the snowy foreground. The single-shot didn't leave much detail left in the sky. Enter Olympus HHHR. This puts the camera into overdrive, it shoots multiple (16) 20 MP images and assembles them together as a 50 MP RAW file in camera (there is also a tripod high-res mode which boosts the size to 80 MP with fewer shots). The process is relatively slow and no good for moving objects (think leaves or grass in the wind), but for scenes like this it works nicely. The trees here had obviously lost most of their snow already, but they'd picked up a bit of frost overnight (subtly enhanced in post-processing), rescuing the photo.

St. Coloman, Hohenschwangau || Olympus 41 mm, f/6.3, 1/100 s, ISO 200 
I don't often include the beta images here, but in this instance I will. Below is the original photo before editing (compare the sky) as well as a non-HHHR image where I've attempted to tone down the sky in ON1 Photo Raw and just got a muddy blur.

HHHR Unedited
Non-HHHR, Edited
This is definitely a first-thing-in-the-morning shot. Sadly, our lazy asses had missed the first colour of sunrise, but I'm still very happy with this photo, especially as there are no other vehicles in sight; often there are cars parked off to the left of the church. This morning there were no such obstructions.

Castle Neuschwanstein

After parking at the Tegelberg car park, we first headed up the trail to the Rohrkopfhütte. There are two vantage points for taking good photos of Neuschwanstein; the Marienbrücke above the castle (presently closed, due to re-open in autumn 2022) and the path up to the aforementioned hut. Reaching the vantage point for this photo entails a 30 min hike along well-trodden gravel paths; you don't need to do the full 90 min trek to the hut (though it's culinarily worth it, the hut has a good selection of food). If you're not going to go the extra mile, once you've seen this scene twice on successive switchbacks, that's it; there are no further shots of the castle to be had.

Greetings from König Ludwig || Olympus 80 mm, f/6.3, 1/100 s, ISO 200
Because you're looking westwards, it's normally best to shoot this scene early-ish in the morning with the rising sunlight on the face of the castle emphasising the red bricks, Whether you shoot wide or telephoto is up to you, but do be aware that you may encounter difficulties selling shots of the castle itself - the Bavarian Palace Administration is fairly strict about permission for commercial photos. 

There are some nice images to be had here of the larger picture - Füssen itself or even just a catch of some valley detail. With my m43 12-200 mm lens (24-200 mm in full-frame terms), I didn't need to change lens all day and can take the larger vista or pick out details like these lines in the landscape very nicely.

Füssen from the trail up to the Rohrkopfhütte || Olympus 29 mm, f/8, 1/125 s, ISO 200
Winter Lines || Olympus 100 mm, f/8, 1/125 s, ISO 200
Returning to the valley we came across this micro-scene underneath one of the snow canons in action. I love discovering little motifs like this and get more of a kick out of an original shot than the big well-known scenes; it's the reward of originality. This may even be one of my favourite images of the day.

Winter Gems || Olympus 47 mm, f/11, 1/5 s, ISO 200
Working the composition; Photo Mike Didrich

The Pöllat Gorge

Descending back to the Tegelberg car park, we took a left past the Reith Alm towards the bottom of the Pöllat gorge - always worth the detour. I swear that the gypsum mill at the bottom of the gorge looks more and more dilapidated every time I pass by. We didn't stop this time but bypassed the provisional barrier at the entrance to the gorge (as everyone else does) to get to the mill race. The gorge itself is closed again at the moment as it is extremely prone to rockfalls, but the best photos (IMHO) are to be found at the bottom of the gorge, with my favourite golden rock and the green pool below. I don't know what it is about the rocks in the eastern Allgäu mountains, but the water here is almost emerald. It seems to react with the rock as well leading to quite yellow colours, a really pleasing combination.

The Mill Race || Olympus 34 mm, f/5.6, 1/15 s, ISO 200
One of my favourite shots here is to the left of the mill race; a pool below a rock spout. Admittedly I've taken a little liberty with the colours here, but more a nudge than a shove, if you know what I mean.

Golden Trail || Olympus 61 mm, f/16, 4  s, ISO 200
There's one winter scene at the bottom of the mill race that has always eluded me; I've shot it several times, but it's never worked for me. I've been trying to capture it using Joshua Cripp's principle of identifying the element of a scene that first catches your attention and emphasising that in the photo using all the tricks of the trade - making the image a caricature of that aspect of the scene. The iced-up fallen branch is a real attention grabber and I want to make it part of the image. My companion for the day used another principle - eliminate all distractions, cropping out the branch and seemed to get an altogether more pleasing image (this is my version of that). Neither of them are going to end up in my personal gallery though.

Too Many Elements || Olympus 66 mm, f/18, 1 s, ISO 200
Simplifying the Scene || Olympus 100 mm, f/16, 15 s, ISO 200 

Icy Candelabra || Olympus 100 mm, f/16, 1/2 s, ISO 200

The Lech Falls

Mike (the other Mike) had indicated that he wanted to check out the Lech Falls whilst we were on site. It's not a subject that I'd normally shoot, but a while back I'd seen a cool shot of the falls with a cute wooden cabin above them. The falls are an artificial structure (probably why I don't relate to them very well), regulating the water flow through the narrow gorge just before Füssen. Don't forget to look down as you cross the bridge!

Into the Gorge || Olympus 12 mm, f/11, 1/15 s, ISO 200
We were surprised when we arrived to see a heavy flow of water coming over the steps, in fact there was so much that you could barely see the steps at all. Finding the angle to catch the falls and the hut proved almost impossible. I'll post the image that I managed to get here more for information than anything else. If anyone else can do better, I'd be very interested to learn where you shot it from (providing it wasn't a drone shot).

Lechfall || Olympus 12 mm, f/16, 1/2 s, ISO 200
The elusive cabin shot || Olympus 23 mm, f/16, 1/5 s, ISO 200

Stuiben Falls

The Stuiben Falls just outside Reutte (20 min away from Füssen by car) are one of my absolute favourite locations for a number of reasons; not too many people know about them, they're a bugger to find the first time you're there, but once you find out where they are, they're super accessible - just a 5 min walk from the car park over the bridge at the end of the valley. Lastly, the colours are superb, though I definitely need to get back here in deep winter with tons of snow and a bit more ice. To get the best out of these falls, you'll need a tripod and either a remote control / cable release or an on-board timer to enable you to take slow exposures, allowing you to capture the misty water flow. A special dark filter (GND) can help here as well. Depending on the effect you are after, I generally find a shutter speed of 1/5, 1/2, 1, 2 or 15 seconds gives satisfying results.

Looking down on the first section of the falls || Olympus 12 mm, f/16, 1 s, ISO 100
To get to the falls, walk behind the transformer field beyond the car park (over the bridge), cross the footbridge and you're there. The falls themselves break down into three sections in terms of photo opportunities; the first one is just over the footbridge. You can either drop down into the riverbed  and stone-hop to a suitable location (watch out for fluctuations in the water flow, especially if there's a storm over the Plansee) or shoot it from one of the platforms along the path. When shooting from the platforms, do watch out for any vibrations if you're using a tripod for long exposures. The grounding isn't as solid as it looks and if other people are walking nearby, you'll probably have to wait for them to pass before getting a crisp-sharp image.

Lower Falls Detail || Olympus 16 mm, f/11, 1 s, ISO 100
Section two is best shot from the narrow sloping bridge above the first falls looking east. Again, you'll need to coordinate with other people, whether fellow photographers or hikers. The bridge really is quite narrow and setting up tripods is not straightforward. A Gorilla Pod that you can attach to the handrail might even be a better option.

The Middle Falls || Olympus 21 mm, f/16, 1 s, ISO 100
Middle Falls Detail || Olympus 66 mm, f/16, 2 s, ISO 100
To get to the third section worth shooting, carry on up the trail for a couple of minutes until it levels off and you can drop  down to the stream. You'll then need to cross the stream (see caveat above) to look into a mini horseshoe falls. These work either as a detail shot or as a smaller element of the larger scene. Whichever it is though, make sure you have a polarising filter with you to cut out the surface glare.

Upper Falls - Detail || Olympus 31 mm, f/11, 10 s, ISO 100
Upper Falls - In Situ || Olympus 29 mm, f/9, 5 s, ISO 100

Other Locations

Under other conditions, it's often worth a trip to the Marienbrücke for a classic shot of Neuschwanstein with the Forggensee in the background.

Plan A for the day had been to shoot sunset over the water or ice at Hopfensee, a charming location, if a little overrun with Influenzas these days for my tastes. The clouds had already come in though, so we decided to cut our losses and run.

Driving down to Füssen along the B17 there are a couple of spots along the road with vistas overlooking the Bannwaldsee. Given the right conditions (morning mist, evening colour), these spots can be worth stopping at too.

There are nice panoramas of Füssen and the Forggensee to be had from the top of the Tegernsee Cable Car. Be aware that you won't be able to see Neuschwanstein from here though.

Monday, 15 February 2021

Winter Sundowner at the Ammersee

I have the enormous privilege of living about a 10 min car ride from one of Bavaria's most picturesque lakes, the Ammersee. We've seen it in all conditions, from balmy sunny evenings, after torrential rain with mosquito plagues, autumn storms with huge waves and speeding kite surfers to completely frozen over in 2006. Working from home it's really easy to get there for a quick excursion. Although it's really chilly here at the moment - we're talking negative double digit Celsius - I was really surprised not to find more ice when I took off after work on Friday afternoon to check it out. Dawn that day had been really pretty and I had high hopes for the sunset despite the lack of significant cloud.
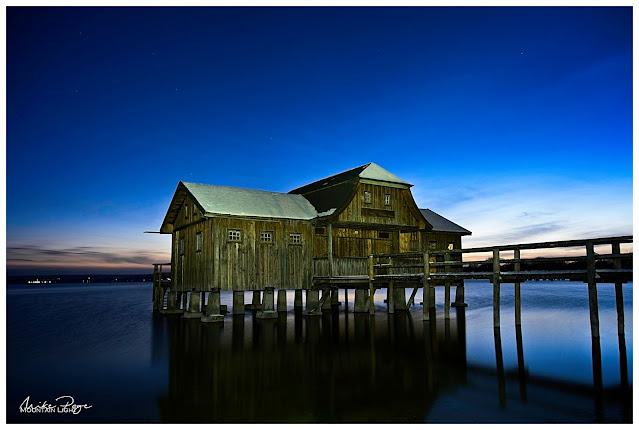
The Boathouse at Stegen I || Olympus 12 mm, f/4, 15 s, ISO 200 
Dressing up warm is critical in conditions like this. I knew I was going to be spending quite a while outside and so I put on downhill ski trousers over my jeans, heavy mountain boots with a second pair of socks, a windproof jacket, scarf, woolly hat and my latest acquisition, my Vallerret Markhof Pro 2.0 photography gloves. These are great thick gloves with foldable tips on the index fingers and thumbs allowing you to access all the necessary dials and buttons on the camera without exposing your whole hand. The finger tips fold back on strong magnets hidden unobtrusively within the fabric to keep out of the way.

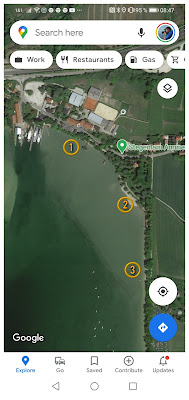
I've included a screenshot of a Google map of Stegen (am Ammersee) detailing where each shot was taken in case you're interested. For more original ideas and inspiration regarding where to shoot at the Ammersee, Google images of the Ammersee or check out some of the local photo websites, such as Werner's Fototräume (also great for other photo spots in the vicinity).
Photo Locations from this Blog


The Solitary Boathouse at Stegen (1)

Arriving at the car park as most people were beginning to leave - not that the car park was very full anyway (had I mentioned how nippy it was?) - I was at first disappointed at the lack of ice, but I'd had the foresight to bring my neutral density filters and was confidant that I'd be able to get a few decent images out of the evening.
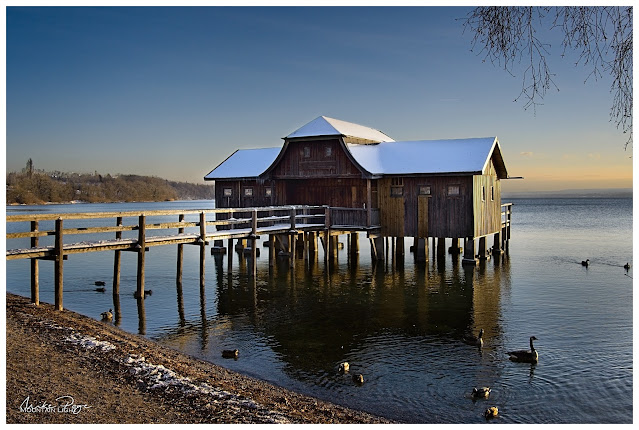
The Boathouse at Stegen II || Olympus 16 mm, f/8, 1/50 s, ISO 200
Once you get past the restaurants, the first landmark is the boathouse next to the beer garden. Always a thankful motive in the evening sun. The light was quite challenging so I slipped the Olympus into exposure bracketing mode and hand-took this image. It's not an HDR, but it is an exposure blend, with the sky, water and boathouse are all taken from separate images and assembled in ON1 Photo Raw - though any decent processing software will do the trick.

Boathouse Row at Stegen (2)

The second landmark is the row of boathouses with the Wasserwacht or lifeguard station. Again, sunset is always kind to these huts as you can see here. Whether or not you use the shoreline as a curved leading line is entirely up to you. On a clear day, the Alps form a pleasing backdrop to the right inviting you to taking a wider panorama. This time I had to be content with a pleasant orange glow on the horizon, which also works. The way the trees echo the line of the houses and the reflection all emphasise the structures in the scene.
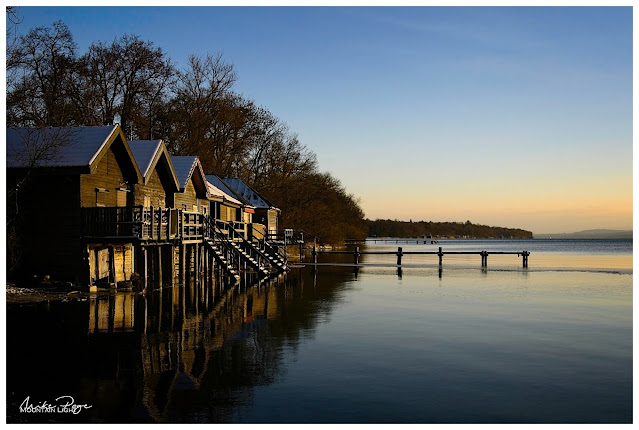
Boathouse Row I || Olympus 23 mm, f/8, 1/125 s, ISO 200

The Jetty at Stegen (3)

The third stop and my actual destination was the background jetty in the photo here. The jetty leading from the beach huts doesn't work as there are no crosspieces down at the moment and looking along it you just get a wooden skeleton. I took my time setting up for this shot. At other times of the year you can line up the jetty pointing at the sun, but in February that's just not going to work. In order to bring a connection between the elements I elected for this 'compromise', placing the setting sun just over the end of the jetty. Tripod out, filters out. Assemble everything together, careful not to zoom out too far as my filters tend to vignette below about 14 mm. It was here that I noticed that the L-bracket had come loose. The clever people at Vallerret had anticipated this eventuality though. The back of each glove has a little pocket that you can stuff things like lens cloths in. The left pocket comes with a tripod key on a lengthy lanyard and so instead of having to fumble around in the fading light for the necessary tool, it was literally to hand.

You can see from the previous shot of the huts that the although the water near the shore was protected and relatively flat, further out the wind was ruffling the surface. In order to reduce the impact of the phenomenon it was time for the Big Stopper, an almost opaque piece of glass that goes in front of lens to reduce light, turning a 1/60 s exposure into a 20 s exposure, the minimum that was needed to iron out those waves. The almost direct sun was a bit of a problem so the next tool in the bag was the graduated filter. This is less dark than the Big Stopper but is gradated, one half being clear and the other darker for bringing down dark skies.
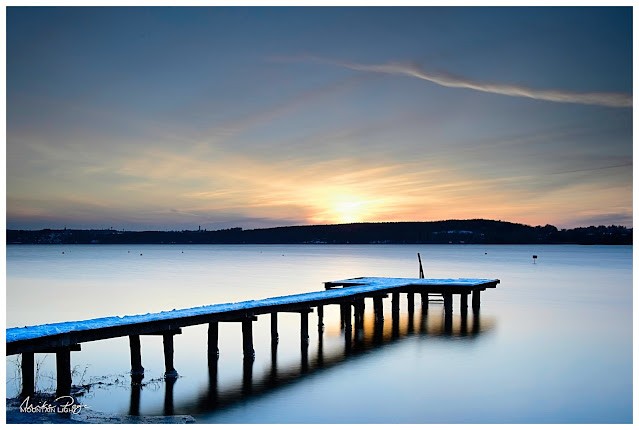
The Jetty I || Olympus 16 mm, f/5.6, 20 s, ISO 200
Processing-wise there wasn't a lot to do here. I've further darkened the sky and actually de-saturated it a bit to make the colours more pastel. I've done my usual trick of actually brightening the snow on the jetty to emphasise the line. As long as you don't blow the exposure, this is a really great technique to make an image stand out that I discovered when astro-shooting in the Alps in the early summer and revisited in my November edit of an image of the first snow of the season. They say that a good photo has rhythm - a difficult thing to define. One of the things I like about this photo is the repeating structures of the lines which are nicely parallel, from the jetty to the clouds and contrails (remember them?).

I shot quite a few of this scene as the sun sank below the horizon, but I think this one was the best of the set. There are always going to be shots that are blurred due to slight movements of the tripod, so shoot a few and sort out the best when you get back to the warm.

Back to Boathouse Row (2)

With the sun well and truly set it was time to start walking back to the car. A couple more 'togs were lingering around the boathouses and so I stopped to scout around to see what the fuss was about. I found this tiny inlet in the shore that caught my interest. Not a classical leading line, but it still takes the  viewer's eye in the right direction. I went as wide as I could, having put the Panasonic Leica 8-18 mm on the camera for this shot. The tripod was set low to the ground too.
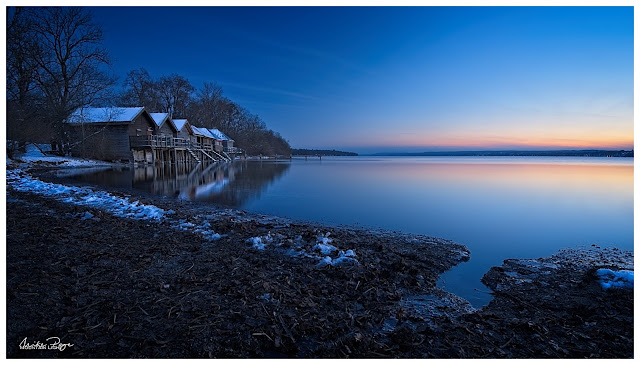
Boathouse Row II || Olympus 8 mm, f/4.5, 5 s, ISO 64
Satisfied that I'd got the best out of the boathouses for the day I combed the beach back towards the restaurants. The sky still had a lot of interesting colour in it and it looked beautiful above the docked pleasure steamers at Stegen. Unfortunately, looking beautiful doesn't always translate to a great photo. I took a few, but none made the cut.

The Solitary Boathouse Revisited (1)

The last port of call was the original boathouse. By now, even though there was still a bit of colour in the sky, it was getting quite dark. But I'd come prepared with both my LumeCube panel and a head torch. The panel didn't like the cold very much. Even though I'd charged it completely before coming out it was only showing 30% power, plus it wasn't really cutting through the dark as I'd hoped. It wasn't the light source for the job. Fortunately the head torch was. My first image was from the east looking towards the sunset (first photo above). You can imagine from the photo why a little extra illumination was necessary. The light beam from the torch was quite narrow and so I waved my head back and forth over the wooden structure over the whole 15 s exposure. If you look carefully you can see the first stars beginning to appear in the sky. This for me is the magic window of light for photography - enough ambient light to be able to see features on the ground, the first stars visible and with a bit of colour in the sky from the setting sun. As you can imagine, it's a very narrow window, but if you get it right you can get some stunning images.
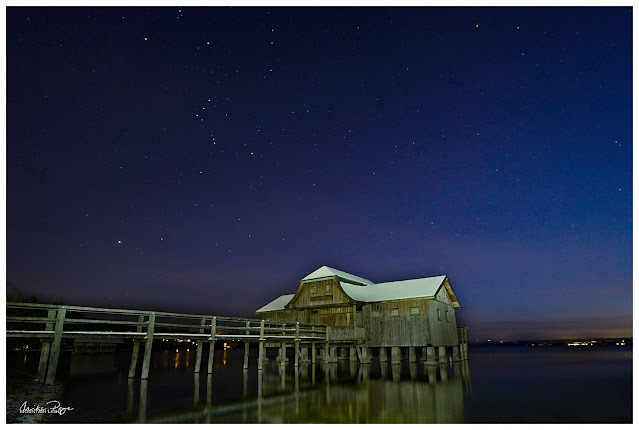
The Boathouse at Stegen III || Olympus 12 mm, f/4, 20 s, ISO 400
This last image is from the other side of the boathouse as the light was really fading. Again the boathouse was lit by my head torch. By playing around I found that if I illuminated for 10 s out of a 20 s exposure the light on the house was about right, though I did adjust it a bit in post - it's always difficult to accurately assess exposure in the dark as the camera screen always looks comparatively bright unless you dim it down. Keeping an eye on the histogram can certainly help, but here it was tricky to judge exactly how much light to add. I was certainly glad of the Vallerrets at this point. I really didn't want to have to be taking gloves on and off to fiddle with the settings in those temperatures.

I love how prominent Orion's Belt is in the winter sky here. Given the wide aperture I was surprised that the stars were as sharp as they have turned out here. That's micro four thirds cameras for you.

If you're local to us in Bavaria and are interested in a pair of Vallerret Markhofs, size L, drop me a line. They were just too small for me and I had to go XL. They're out of stock with Vallerret at the moment so if you want to do some winter photography this season I can warmly recommend them.

Afterword - If At First You Don't Succeed

A couple of the photography YouTube greats have recently released vlogs saying essentially the same thing. The one thing that will advance you as a photographer more than any other, the golden lesson of photography is... ...perseverance. I've had a couple of opportunities to practice this discipline over the last 12 months, whether the various attempts at astrophotography or trying again and again to get the right conditions on the covered bridge at Bad Hindelang, and every time it has paid off in spades. There were a couple of issues with the photos I took on Friday. I was especially unhappy with the photo of the jetty; the composition was off meaning that I had to heavily crop the image to get one that I was happy with and the aperture was so wide open that the depth of field was too narrow to catch the background ridge in focus (below). So tonight I returned, wife and girl-child in tow, to try and rectify my errors.
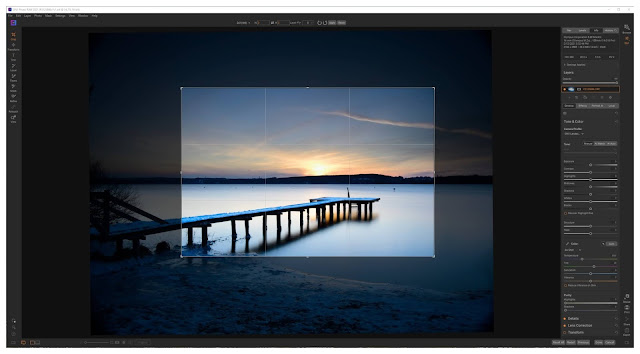
Reducing a picture to the essential elements

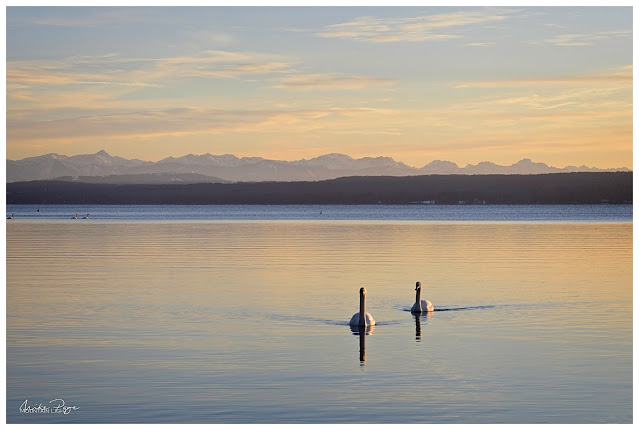
Valentine's Swans || Olympus 57 mm, f/8, 1/125 s, ISO 200
This time the view to the mountains was clear and there was some ice forming on the still water in front of the row of boathouses. On top of this, there were multiple pairs of swans on the water - how aposite for Valentine's day. I allowed myself to be distracted by both the birds and the boathouses before hurrying down to the jetty. I got a better crop, but the bitty ice detracts from the simplicity of the previous image and a lot of snow had gone from the jetty.
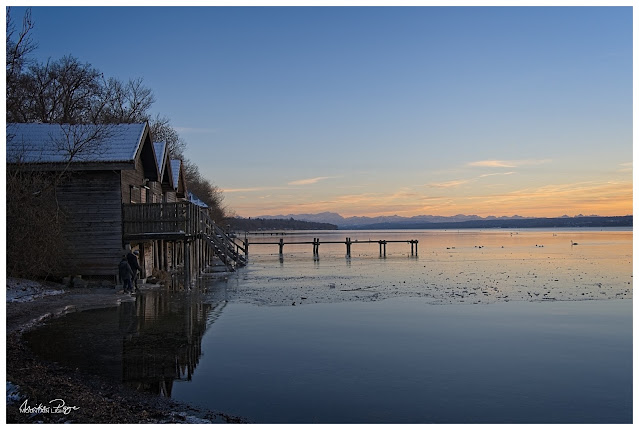
Boathouse Row III - HDR || Olympus 17 mm, f/8, 1/80 s, ISO 200 
This time I could get the composition and focus fixed on the jetty... ...but the ice is too gritty after kids were playing on it all day and the colours in the sky weren't quite as good. But hey, ho.
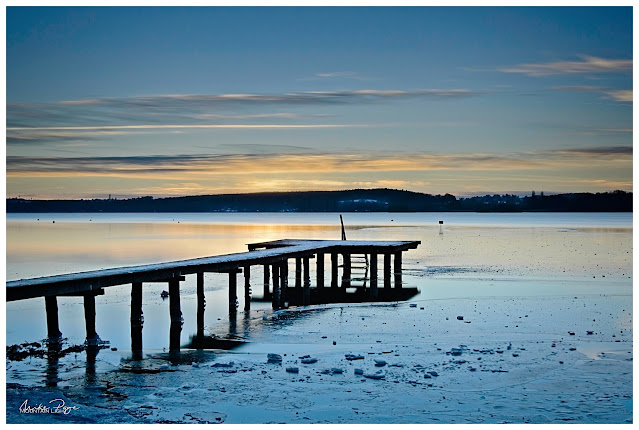
The Jetty II || Olympus 24 mm, f/8, 10 s, ISO 100
It's always a good idea to look around even when you've got a specific composition in mind. Ice had formed around the legs of the jetty and the water level had subsequently decreased, leaving these feet around the bottom. Against the light they formed an interesting sculpture.
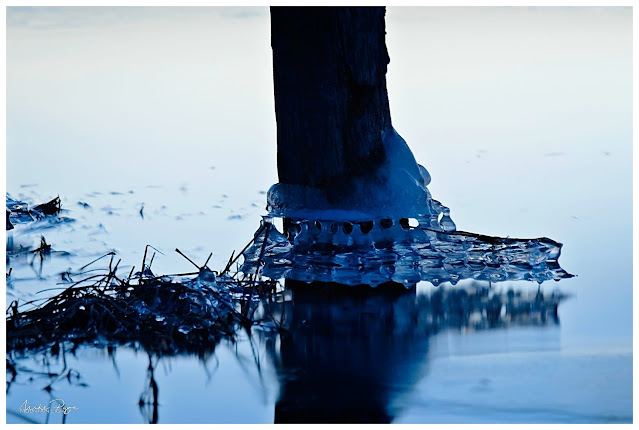
Icy Foot || Olympus 86 mm, f/4, 50 s, ISO 100
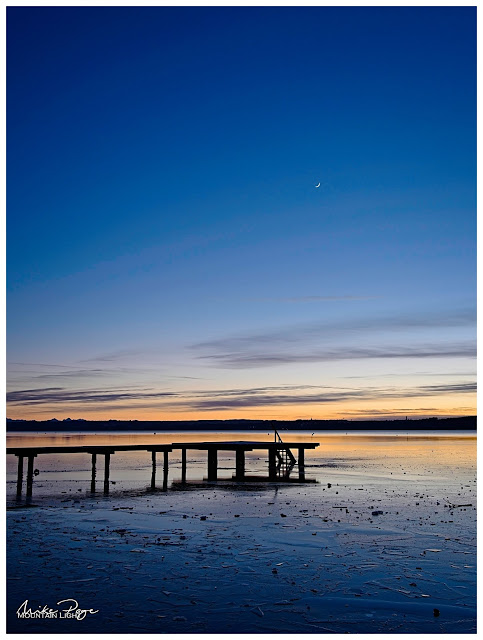
And then the new moon revealed itself in the southwestern sky, giving me a chance to try another composition with the jetty including the mountains in the background...
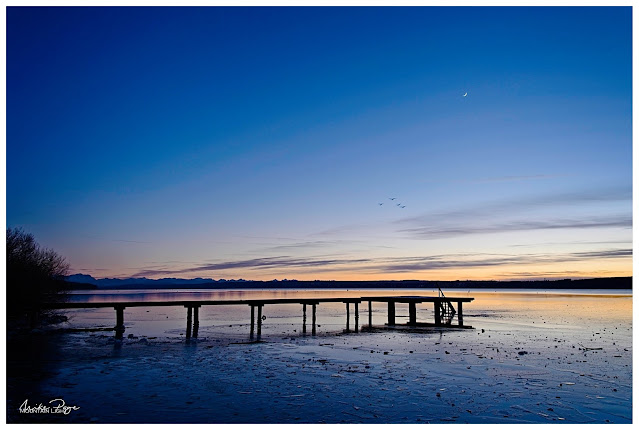
The Jetty III  with New Moon and Swans || Olympus 14 mm, f/8, 1/10 s, ISO 100

The Jetty IV || Olympus 17 mm, f/8, 5 s, ISO 100
...and yet another with the boathouses before I was dragged back to the car by my half-frozen ladies. But I had promised them that we wouldn't stay too long and I was happy enough with the blue-hour photos from Friday. 
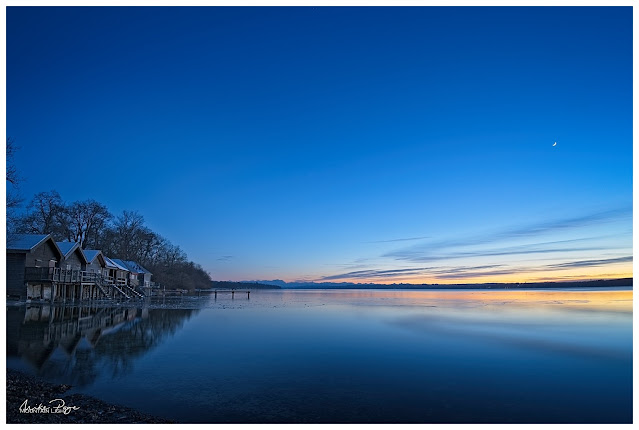
Boathouse Row IV || Olympus 8 mm, f/8, 5 s, ISO 100

Lessons Learned

Every time I go out I make mistakes. Every time I make mistakes I learn something. On Friday I learned about the best composition for the jetty. On Sunday I learned more about the Olympus high res mode and that patience is required when using it in conjunction with long exposures. A couple of times I thought it had crashed, when in fact it was just taking its time. Because I thought it had crashed I turned the camera off mid-processing, leading to me losing the first 2 or 3 high res shots. This mode is also too slow for lunar photography in combination with these long exposures - the moon simply moves too fast. Fewer mistakes to make next time.

Photography is like sailing or hiking. In fair weather it's easy. Mistakes are easily rectified, items are easy to find in rucksacks, etc. But the practice of doing those mundane things in straightforward conditions pays dividends when the going gets tough. When it's so cold that you can't think straight. When it's so dark that you can't remember where you put that filter. When the conditions are changing fast and you need to access a particular function on the camera, if you don't have the fair weather experience to fall back on, you'll just go home frustrated. If you want to be a good photographer, if you want to come home with the great photos taken in challenging conditions, practice all you can. You will be rewarded.

Tuesday, 25 August 2020

Osttirol Revisited - Part I

Back in July we decided that we needed a break; our May vacation plans had fallen flat and we'd been working solidly since our ski trip to Norway in February. After debating where to go, we finally decided that we'd return to Lienz in East Tyrol on the Austrian/Italian border. We'd camped there for 10 days in 2017 and felt that it warranted a second visit, particularly as the area is a very strong contender for us to settle down in in the future. Stuck between the main alpine chain and the Dolomites, this little corner of Austria is charming, a little off the beaten track and very competitively priced.

Old Lienz, the heart of East Tyrol or Osttirol || Olympus 12 mm, f/8, 1/100 s, ISO 200

The campsite was adamant that it wasn't necessary (or even possible) to make a reservation, but we were optimistic that there would be enough space for our six-person tent on the meadow next to the Tristacher See. We needn't have worried; when we arrived on the Thursday afternoon there couldn't have been more than about 20 tents and vans scattered at responsible distances over the large field. Although the campsite restaurant and bar were closed, there were plenty of places open in Lienz itself and the forecast was looking great for at least the next week.

The Region of East Tyrol

The week started off a little overcast as we revisited the hills above Sillian in the Pustertal. What did blow us away was the abundance of wild flowers, especially the alpine roses (actually a misnomer; they're azaleas). Being a little higher than the mountains than are our normal stomping ground in the northern Alps, everything was significantly further behind. They say that the temperature decreases by one degree Celsius per 100 m ascent and the extra 500+ m of elevation on the hills meant that everything was significantly behind Bavaria.

Alpine Roses above Sillian || Olympus 12 mm, f/8, 1/100 s, ISO 200

As well as revisiting some old haunts we used the week to look at some further corners of this remote region that we hadn't seen before, such as the Gailtal, which is pretty, but we were able to rule it off the list of places that we might consider for retirement - despite being very modestly priced, the corridor between Sillian and Kötschach-Mauthen is just too remote.

In the hills above Obertilliach || Olympus 15 mm, f/11, 1/100 s, ISO 200

At the Golzentipp || Olympus 7.5 mm,  f/16, 1/1250 s, ISO 200

The campsite is a couple of hundred meters above Lienz at a sheltered lake called the Tristacher See, great for a swim at the end of a hot day's hiking and free to campsite users. The walk round the lake only takes about 30 min. At the far end is a swanky hotel that didn't look like we would fit in, especially not in our outdoor camping gear.

Evening Mood at the Tristacher Lake || Olympus 20 mm, f/5.6, 1/8 s, ISO 200

The Defereggental is similarly stunning, but a tad too far from the madding crowd as well as being exceedingly steep sided - you'd hardly see the sun in the winter in this deeply cleft east-west running valley. One of the unique features of the area is that in many places, where there's no cable car it's possible to drive really high into the mountains before starting to hike. The Defereggental is one of those places and we were able to drive up to 2,000 m along a very rough logging track before abandoning the car at a small car park before heading into the mountains.

The Majestic Defereggental || Olympus 24 mm, f/5.6, 1/1250 s, ISO 200

Our hike up the strangely-named Speikboden was rewarded with a view of the Groß Venediger, one of Austria's most prominent peaks, together with a field of the eponymous violet flowers and a couple of marmots scuttling across a late snow field. One delight on the way down was a patch of wayside wild lupins at a bend in the road. This was an opportunity to put my new manual 7.5 mm 7Artisans fish-eye lens to the test. Originally bought so that I could cram more sky into my astrophotography, I've taken to using it instead for floral shots like this. You can get within a few centimeters of the flowers, allowing them to take a significant part of the picture, whilst retaining depth of field to the background setting.

Speikboden and the Großer Venediger || Olympus 7.5 mm,  f/16, 1/640 s, ISO 200

Wayside Lupins || Olympus 29 mm, f/4, 1/1250 s, ISO 200

Just outside Lienz is a gorge - the Galitzenklamm - with a number of fixed climbing routes (via ferrata or Klettersteig). After tackling one of the easier routes, the kids decided they wanted to take a crack at "Adrenalin", one of the more challenging routes. Too challenging it turned out, and so Joshua did a solo  on the route next to the water, taking time to pose for a short long-exposure shot.

The Galitzenklamm Klettersteig || Olympus 28 mm, f/13, 1 s, ISO 64

Water in the Gorge || Olympus 86 mm, f/9, 1/5 s, ISO 64

The nice thing about the gorge is that you can spend the morning there and still take in the alpine zoo at Assling, a lovely little village in the Hochpustertal and one that's definitely on our radar for later. On top of the chamoix, ibex and marmots, there's a wonderful lynx enclosure that lets you look in from above without fences as well as some delightful snowy owls.

I was sleeping!  || Olympus 300 mm, f/5.6, 1/100 s, ISO 64


Note to self: When switching from long-exposure shots in the gorge to long focal length shots of animals, it can be helpful to set the ISO back to 200, duh!

Snowy Owl || Olympus 100 mm, f/4, 1/125 s, ISO 200

Still to come: sundowner at the picturesque Dolomitenhütte, a sunny day in Matrei and a close encounter with a kestrel.