Once a year, I get together with a German friend that I met on an Olympus camera group on Facebook and we shoot together for a day or two. I say once a year, we managed it for the second year in a row last weekend, but it works so well that we're both adamant that we want to keep going. Both occasions have been incredibly productive photographically, partly as it's normally the only time in the year that I get up to catch sunrise on the Alps from home.
 |
| The Covered Bridge || Olympus 8 mm HDR f/8, 1 s, ISO 200 |
Last year, we headed down to Füssen and the Stuiben Falls for some epic waterfall shots. This year I wanted to check out a composition that I'd driven past many times but never stopped for and then head to the Zipfelsbach waterfalls at Bad Hindelang. Covid prevented us from entering Austrian Tirol and so we had to stay on this side of the border. There was a chance of a decent sunrise, so I dragged myself out of a warm bed at 5.30 am, grabbed a quick breakfast and coffee before hitting the road. Matthias had driven down the day before and we'd had a productive afternoon in a nearby woods shooting mushrooms and fungi.
Dawn wasn't a huge success, but we did confirm that the composition was solid: a gently snaking farm track leading up to a village church with the Allgäu mountains in the background. Definitely something to be repeated in better conditions.
 |
| Dawn at Seeg || Olympus 8 mm HDR f/8, 1/3 s, ISO 200 |
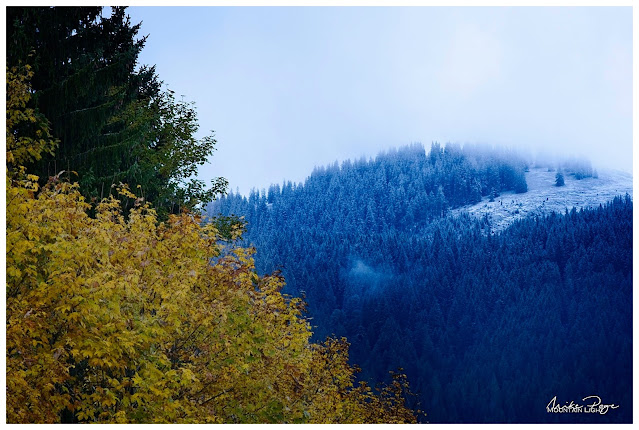
The weather wasn't great - I tend to be a sunshine photographer, but Matthias seemed happy enough with the cloud cover. Grey days are great for waterfalls and so we headed down to Hinterstein to check out a location that I'd been to with the family earlier in the year and wanted to spend a little longer at. When we were there in May it was a hike rather than a photo jaunt and I wanted to spend a little longer trying to get some better compositions. Diffuse light is much better than direct sunlight for waterfalls due to the huge dynamic ranges involved - the highlights are really bright and the shadows are really dark, a challenge for any camera.
Driving up into the mountains from Seeg, the atmosphere became really moody and we had to actually stop once or twice to get the cameras out and take in the scenes around us, whether the misty fir trees or a hilltop signifying the change of season. It was nice to not have to be going anywhere or getting anywhere, just driving and being able to stop for 10 minutes here and there to take it all in and try to capture the atmosphere around us. I've long been trying to build in the communication of mood into my photos. The conditions made it easy.
 |
| Far Over the Misty Mountains Cold || Olympus 100 mm f/5.6, 1/13 s, ISO 200 |
We managed to get a few decent compositions of the waterfalls in the gentle drizzle before heading back down to Hinterstein with a view to finding lunch in the valley. On the road in, we'd noticed a covered wooden bridge on the side of the road and on a whim we decided to stop and check it out. After struggling to find a parking spot in the tiny village we took the cameras and tripods back to the bridge to see what we could find. Very quickly we realised that we'd struck gold. The bridge sits beautifully in the valley with wooded hills behind. The deciduous trees adjacent to the bridge were in good autumn colour and the river colour was a delightful turquoise.
 |
| Zipfelbach Waterfall || Olympus 21 mm f/9, 1/2 s, ISO 200 |
Not only that the bridge sat at the end of a horseshoe bend in the river. It was a bit overcast, but we reckoned we could make something of it nevertheless. We probably spent the best part of 30 minutes working the scene in order to get the best composition before we decided that there wasn't much more that we could do before heading back to the car and searching for an elusive lunch. One of us would spot one compositional element then the other another, walking up- and downstream looking for the best vantage point. From a certain angle you could just make out last night's snow on the hills behind, from another you could block out the road on the other side of the river, from another you could catch the whole river bend and bridge in one shot; it was a real game of cat and mouse to get the right composition. Personally I wasn't overly happy with the light, but I was very smug that once again my nose for a potential composition had proved right.
The Photo(s)
I tried a couple of standpoints along the river, shooting both portrait and landscape, trying to get the snow in and working with and without the grassy bank. Even in the dull-ish light we were having to take multiple shots to get the exposure right, underexposing to get the highlights and re-taking the shot over-exposed to get the shadow detail, a process called exposure bracketing that most modern cameras offer.
I also used the on-board ND filter function of the camera to slow down the river. Rather than freezing the motion with a single short exposure, it adds a sense of calm to a water photo if you can take a longer exposure, evening out the flow.
 |
| Assembling the Panorama Images of the Bridge |
On the single shots I also used a circular polariser to cut down the glare on the water, revealing the beautiful colours and stones beneath the surface. Using a polariser can make stitching panorama shots together tricky though, so for the panorama I took it off. Taking a panorama of a scene like this is relatively easy if you follow a few basic rules:
- always shoot in manual so that the exposure is exactly the same for all the shots, exposing for the brightest part of the scene
- if necessary bracket the exposures (see above)
- focusing manually can help too, making sure that you avoid inadvertently focusing on a blade of grass in front of the camera for the critical middle shot
- make sure the camera is horizontal before you start
- overlap each photo by about a third to make the stitching easier
I did a double exposure for each shot, which actually caused me difficulties in the end - I should have done three, but more of that in the processing.
The Edit
I first bought ON1 Photo Raw soon after buying my Olympus E-M1 Mk II in March 2019. Up until then I was using Photoshop Elements as my main processing software, which only allowed me to perform universal edits. I looked long and hard at the market leading Adobe Lightroom, darling of professional landscape photographers all over, but was put off by the subscription-based approach to purchasing the software; you could only rent the software rather than buying it outright, a concept I couldn't warm to. Looking around for suitable alternatives I finally landed on ON1 (pronounced "on one"), a software that started out as a plug-in for Photoshop but which had relatively recently become a standalone product.
In the meantime I consider myself a relatively advanced user; I develop all of my photos with ON1 - with the exception of astro- and lunar photos as the sole image processor - and I think that I have a relatively good grasp of its capabilities.
Nevertheless, this next shot almost cost me my composure. I couldn't for the life of me get it to look how I wanted it, and in no way did it match Matthias' HDR image of the scene.
To start with, I had a 9-shot panorama taken at 18 mm (36 mm full-frame equivalent) in portrait. Each shot was double - one light one dark for the sky.
The first step was to stitch each of the two panoramas separately in ON1 and then combine them to get exposure blending. I'd previously done a quick HDR exposure blend of another shot to get a feel for how it might turn out:
 |
| Colours are working, but missing the river bend... |
The colours of the shot above are relatively pleasing (to my eye at least), as is the tonal range, so imagine my surprise when I stitched my panorama together and got this:
 |
| A Pale Comparison |
No manner of shifting the white balance and trying to modify the colours would let me get anywhere near this. ON1 wouldn't let me combine the two panoramas for an HDR image. At first I thought it was because there were only two images and an HDR customarily uses three, but it wouldn't accept the format of the stitched panoramas. So I created a third panorama of the darker series, artificially underexposed it and tried again, with the same result.
In the end, I had to create an HDR from each of the seven panels I ended up using for the final panorama, saving these as information-rich TIFs and then stitching those together to get the final image. Fortunately, this worked, but by this time I'd burnt through the best part of the evening trying to bend the original panoramas to my will.
 |
| And the Three Shall Be One! |
This is the raw product of the panorama of the HDR images:
 |
| Our Starting Point |
Now the editing can start. I don't generally do much in the way of global edits in the Develop tab of ON1 unless it's to rescue some highlights at a later stage. Most of my editing I do using a bunch of Effect Filters that I pre-load into each image prior to processing using a privately created preset. A preset is a bunch of amendments that you can apply to a photo in one go. I have one with all of my commonly used Effect Filters loaded and ready to go, but unselected. These are (in no particular order):
- Vignette: Big softy, set at 50% and active
- Curves: Unmodified but active
The following Filters are pre-loaded but in an inactive state:
- Tone Enhancer: Clarity
- Tone Enhancer: Shadows Lighter
- Tone Enhancer: Highlights Darker
- Tone Enhancer: Midtones Lighter
- Tone Enhancer: Tonal Contrast
- Colo(u)r Enhancer: Increase Colour
- Colo(u)r Enhancer: Warmer
- Dynamic Contrast
- Glow: Angel Glow
Many of these effects could be achieved using the Curves filter, but I find it convenient to process my images this way. Each of the Filters is clearly labelled and ready to switch on at the click of a radio button. In addition, I have four Local Effect Filters charged and ready to go: Darken (-1 EV), Lighten (+1 EV), Dehaze Adjustment and Vibrance Adjustment. The main differences between Effects and Local is that the former are normally applied to the whole image by default and the latter applied locally with a brush and the Local Effects are basically a repetition of the global adjustments of the Develop tab, whereas the Filter Effects go way beyond this.
I'll briefly go through all the edits I made to this image together with a quick explanation of why I did it and what part(s) of the image I did it to. The differences between individual images will be very subtle, especially at this resolution, but compare the starting point above with the final image at the bottom and you'll find a very different picture.
Crop
My first step with any image is to crop and level it using the crop tool. Here I just pulled in a bit of the image from each end and lost some of the unnecessary grass in the foreground. At the same time, I stamped out the awkward sapling centre picture and the electric fence by the logs and dulled down the repaired plank on the left of the bridge by locally reducing the saturation.

Colour Enhancer: Increase Colour
Applied just to the river to increase the saturation of the water. Applied using a gradient filter to exclude the trees in the middle as well as the grass in the foreground. Set at 40% opacity.

Tone Enhancer: Darken Shadows
The HDR process took a little too much contrast away, so instead of the usual Lighten Shadows, I used the opposite to bring a bit more substance to the image. Applied globally at 50% opacity.

Dynamic Contrast
There are at least five ways of adding sharpening detail in ON1; Structure in the Develop module or Sharpening, Tone Enhancer: Clarity, Tone Enhancer: Tonal Contrast and Dynamic Contrast. All five do the same or similar things in subtly different ways: they increase contrast in small areas of the image where there are light and dark edges - so-called micro contrast. The theory isn't terribly important, but it's something that should be used with caution. It's easy to add a ton of clarity (generic term, common also to Lightroom) to a picture and it'll look awful.
The different types of sharpening work best for different aspects of a picture. For example, I've found in ON1 that a little bit of Tonal Contrast works really well on adding a bit of detail to forest foliage. Dynamic Contrast, on the other hand, is great at bringing out a bit of detail in wood grain or rocks. In this image I used a masking brush to apply a little Dynamic Contrast to the rocks left and right of the bridge by the water and a little more to the bridge itself.

Tone Enhancer: Tonal Contrast
As mentioned above, a little Tonal Contrast gives a hint of crispness to the edges in forests. I used a radial filter here to add it to the centre of the picture.

Colour Enhancer
Painted in to reduce the saturation and brightness of the grass bank in the foreground whilst at the same time shifting the hue from green towards yellow. The bright green was too dominant in the photo and keeping the eye from progressing to the water and autumn foliage.

Colour Enhancer: Warmer, Colour Enhancer: Fall
Added globally at 100% and 50% respectively to bring out the autumn colours.

HDR Look
I very rarely use this quite strong filter, but here I used it at 45% across the picture to add a bit of brightness to the picture. A Sunshine filter would have had a similar effect, increasing brightness and decreasing darker portions of the photo.

Sunshine
Having mentioned the Sunshine filter, I thought I'd try it out. It adds an extra pep to the image too. Applied at 50% globally.

Glow: Orten
The Orten Effect is an interesting one, again I don't use it often. It adds a sort of ghostly glow that fits a slightly gloomy image like this.

And that's more or less it. I desaturated a tree that looked a tad over-saturated, darkened the grass bank a little more, opened up (lightened) the shadows under the roof of the bridge, lightened the rocks to the left of the bridge and I think that's about as good as I can get it. It sounds like a lot, and it is a lot more than I would do on most images - the easy ones I process in about 2-5 min, but it was necessary and, I believe, worth the effort.
 |
| The Covered Bridge || Olympus 7 Shot HDR Panorama |


