Saturday 24 July 2021

The Best Laid Plans of Mice and Men

So I've been playing about a bit with PhotoPills recently, a really geeky photographer's planning App. There's a steep learning curve, but once you've got the gist of it, it's really quite useful, particularly for sun/moon-set/rise shots and astrophotograpy. I'm not a huge fan of shooting the full moon - it can be a bit bland because the crater shadows are so short (like shooting terrestrially at noon), but if the moon is positioned well, it can still give usable results.

Full Moon and Kloster Andechs | Olympus 400 mm, f/6.3. 1/2 s ± 2 stops, ISO 400
Back in June I already tried shooting the full moon rising behind Kloster Andechs, a local landmark. Unfortunately I got my planning slightly off, meaning that the moon was much further south of the monastery than I'd envisioned, it was a day past full moon due to cloud cover the night before and despite having clear skies at home, there was a cloud bank low on the horizon to the east, obscuring the view and it was quite dark.

Obscured by Clouds | Olympus 123 mm, f/5.7. 60 s, ISO 400
Back home I went over the PhotoPills planning again and found out what my problem was. There are a number of variables that have to be entered; position of the subject, position of the photographer, time, etc. The App determines the distance between the two as well as the elevation distance and you can then select the precise time at which the moon will be at the correct elevation and work out the optimal place to stand in order to fine-tune the position to shoot from. It turned out that I'd taken the elevation into account and then used the wrong line in the map - the one 

Come July and the full moon fell on a Friday again, always good for a late shoot, plus moonrise was 8 minutes after sunset, meaning that there would still be a significant amount of ambient light to shoot with; it wouldn't just be a bright moon against a dark background (🥱). Back in PhotoPills I realised that I'd forgotten all the steps necessary to plan the shoot, so it was back to their helpful YouTube tutorial for a quick refresher.

  1. Subject to be photographed
  2. Standpoint to shoot from
  3. Second panel of Planner
  4. Altitude difference standpoint ⇾ subject
  5. Dial in Moon height using time slider (8)
  6. Line indicating direction of moonrise
  7. Line indicating direction of moon at selected time
  8. Time slider (magnified view).

Slide the time slider back and forth to give the correct elevation to match the altitude difference (4) and then reposition the standpoint pin (2) to position the moon direction line (7). Simples!
Getting into position about a half-hour ahead of time we discovered that the place on the lake shore that we'd worked out in the App was obscured by 2 m high reeds and so we backtracked 150 m north to just outside the Wasserwacht by the Pavillion at Utting. Waiting for the moon to appear we scanned around us for other motives. The sky colours were getting really pretty and pastelly at this stage and so I whipped out the smartphone for this grab. Actually one of my favourite of the evening in the end.

Pastel Tones | Huawei P30 Pro Smartphone
Moonrise came and went and we didn't see anything. Check the App. Oh yes, we have to wait for it to rise sufficiently to be seen behind the 173 m higher horizon to the east. I'd figured that into the planning, but I'd been looking at the moonrise time rather then the time that I'd dialled into PhotoPills. Bang on 21:33 we saw a red-pink glow on the horizon north of the monastery. Our move to a clearer spot had pushed the moon further north than I'd hoped for.

Ah, There She Is! | Olympus 150 mm, f/5.7. 1/3 s, ISO 400 
Starting with the moon 'upstream' of the monastery was much better than downstream, however, since it could only move into constellation and not out of to start with. It was now a waiting game, waiting for the moon to come into a good position, adjusting the tripod position every now and then to make sure the reflection of the moon's light was unobstructed - it would have been messy to have it interrupted by the boats or jetty at this stage. Avoiding this meant repositioning the tripod every five minutes or so.

Moon and Andechs | Olympus 138 mm, f/5.7. 1/2 s, ISO 400

With  as spectacle like this, we weren't the only 'togs out of course. Not sure whether this chap was a planner or an opportunist staying at the local campsite. I always go out of my way and exchange a few friendly words with anyone out shooting. I seem to get two types of reaction; folks are either really ultra friendly and chatty or they give the impression that you're treading on their toes, poaching their photos. It isn't a competition and generally we can only learn from each other. I'm always happy to promote other's photos on social media too if I see merit that deserves sharing. We need to be building each other up, not tearing each other down.

Photographer's Paradise | Olympus 169 mm, f/5.8. 0.8 s ± 2 stops, ISO 400
As we watched the moon rise, we could see the transition in colour from red to orange to yellow. Just like the sun, the more atmosphere the light reflecting from the sun has to travel through, the redder it appears as the shorter wavelengths of light get bounced off into space. Now we could zoom in with the Olympus f/5.6 100-400 to catch a couple of full frame images. Believe it or not, I've toned down the saturation of the moon here as it looked simply too artificial.

Moon and Andechs: Exposure Blend | Olympus 400 mm, f/6.3. 0.8 s ± 2 stops, ISO 400
As the distance between moon and monastery increased, so the size of the two elements in the picture as I had to zoom out as well as the contrast in brightness as dusk slowly arrived. Our work here was done. Almost. Sharon actually spotted this composition of the light playing on the water next to the jetty. And with that we were done.

Moonglow Reflected | Olympus 400 mm, f/6.3. 1 s, ISO 400
Do you have a subject that you'd like to shoot at full moon some time? Want some help planning exactly when and where to stand to take that shot instead of using trial and error? Drop me a line and we'll see if we can set you up.


Monday 5 July 2021

My Latest Muse - It's Serious!

Hi folks, I know it's been a while - no posts for the whole of June 😲. I have been busy shooting, honest, but not much worth blogging about. Plenty of photos, but few words to go with them. I do have a new muse though. It's alright, Sharon knows about her. In fact she didn't even mind me creeping into bed at 2 am Saturday morning having spent the entire evening with her. It's a place, not a person and I've lived a 35 min drive away for the last 18 years and only just got round to visiting.

Science and Faith in Tension || Olympus 12 mm, f/9, 1/25 s, ISO 200, 14 shot pano 
The place in question is, unusually for me, a flat piece of ground, albeit within spitting distance of the mountains. What makes it special is the buildings - it's a satellite communication centre, an arable area spotted with massive 32 m diameter parabolic antennae. What makes this place special though is that it's also home to a beautiful little 600-year old Bavarian chapel; St. Johannes d. Täufer (St. John the Baptist). The whole site is so delightfully incongruous, firstly with the massive satellite dishes set in amongst the farm fields and then with the combination of the dishes and the ancient tiny church. Add a backdrop of the Alps - you're pretty much looking directly at the Zugspitze, Germany's highest mountain and I feel like the whole thing is a microcosm (or is that macrocosm) of my life - science, church, mountains.

Satellite Centre Raisting || Olympus 44 mm, f/8, 1/400 s, ISO 200 
Despite the 'incongruousnous' of the place, it works, there's tension between the elements, but there's also harmony. Visually, the tiny chapel easily holds its weight against the dozens of satellite dishes. This feels like my life to a certain extent, I live in multiple communities; my work community is very science laden with friends who are sceptical about people of faith, some parts of my faith community, my church, are wary about too much science, other communities I belong to are salt of the earth Bavarians where I live or people who share our love for the mountains. Here in Raisting it all comes together.

St. Johann d. Täufer, Raisting || Olympus 100 mm, f/8, 1/250 s, ISO 200
I've been down here three times in the meantime and I don't plan on stopping any time soon. The first time was to try an astro-shoot, the second after a massive rain storm came through and the third to try to catch the blue hour and some more astro shots. Given the right conditions, shooting the Milky Way here could be quite interesting. The trouble is, the dishes are quite well lit at night, obliterating any long exposures for the foreground. Add to that that both times I've been to shoot the stars there have been residual clouds reflecting light from the surrounding villages and you get a frustrating constellation (no pun intended, honest). The night sky is really dark and getting the best out of it requires long exposures to collect as much light as possible. If you've got wisps of cloud, even if they're not visible to the human eye, they catch the light being cast up from the villages below and as you'll see at the bottom of this post, it gives the night sky an ugly orange cast.

Stormclouds at Sunset || Olympus 8 mm, f/5.6, 1/25 s, ISO 200
I'm not going to show any photos from the first trip, they're just not worth it. I arrived late, set up where I thought there might be a nice view and shot into glaring spotlights all evening. The second time was quite special though. I went down with the whole family on the tail of a June thunderstorm. After eating at the delightfully Bavarian Gasthaus Drexl, we emerged to see the setting sun firing up the stormclouds that were slowly disappearing eastwards. What we hadn't expected were all the storks we saw. Sharon had glanced up as we left the Gasthaus and initially thought some silly bugger had posted a plastic bird on a scrappy nest atop their chimney, but then it moved and then we saw the chicks. Over the course of the evening we must have seen a dozen or so of the birds out in the fields, presumably looking for frogs and mice to bring back to their young.

Stork Parent || Olympus 100 mm, f/6.3, 1/800 s, ISO 200
The parabola dishes catch the evening light very satisfyingly, their structure catching the golden rays and reflecting them back. Some of the installations almost look like families with mum and dad towering over a clutch of infants.

Mum, Dad & The Kids || Olympus 29 mm, f/8, 1/60 s, ISO 200
The dishes are also thankful subjects for a monochrome treatment of the images. Here the combination of textures and tones screamed for a monochrome conversion. I pulled out the whites and blacks to make sure the image covered the whole gamut of black to white, added some dramatic contrast to the already moody clouds and sharpened the photo a little to arrive at this hangable composition.

Satellites and Storm || Olympus 13 mm, f/5.6, 1/80 s, ISO 200
My third trip was after a week of rainy storms had formed an impromptu lake in the middle of the fields allowing me to capture this reflection of the dishes dwarfed by an ancient oak tree. Getting low to the water let me catch some of the antennae with the mountains behind.

Satellite Reflections || Olympus 28 mm, f/6.3, 1/800 s, ISO 200
This time I was meeting up with a fellow photographer from Munich. Without him I would never have stepped behind the ancient chapel, but I'm so glad that I did just after the sun had set. Catching the colour of the last rays through the church windows together with the silhouette of the southwesternmost dish was a great start to the night.

Faith and Science at the Blue Hour || Olympus 8 mm, f/5.6, 1/5 s, ISO 200 
One of the nocturnal summer phenomena that I've only recently become aware of, thanks in part to Alyn Wallace's informative "What's in the Night Sky" YouTube series, is that of noctilucent clouds. They can be seen throughout the summer night, mostly to the north as these high altitude ice clouds catch the last of the sunlight. According to Wikipedia, these are normally only visible from about 50° latitude, meaning that they can be seen from the very northern tip of Bavaria. We seem to have had some luck in recent weeks and I've seen several photos of them in and around Munich and saw them myself when trying to catch the moon rising behind Andechs monastery a week previously. Being so far south I could only just see them dancing on the northern horizon, but they're definitely NLCs!

Noctilucent Clouds at Raisting|| Olympus 8 mm, f/2.8, 5 s, ISO 200
Having said that this next and last photo would never see the light of day, I am actually going to post it here. For one it highlights (sic) the problems of astrophotography in areas with urban light pollution, even when it's as sparsely populated as the area south of Dießen. Even the slightest amount of cloud catches the street lights and reflects their garing orange glow back to the camera as you can see here. But the reason I decided to share this image is the excitement that it gives me. This is a 3 min exposure at ISO 800 and not only can you see the beautiful textures of the galactic core, but also star colour is becoming visual. This is a quantum leap forward in my astrophotography, made possible by my Move Shoot Move star tracker, a device that sits between the tripod and camera and, when pointed at Polaris, rotates the camera at the same speed as the earth. Without it, my maximum exposure time is 25 s before the stars start to become streaks. With it I've been able to capture up to 8 min exposures with the stars remaining pin sharp. This allows me to lower the ISO and increase the colour information captured on the sensor. The downside is that, as you can see, with the camera moving even this slowly, any ground becomes blurred. Normally this would be overcome by taking a second similar exposure with the tracker turned off, but I had some technical issues with the untracked images and so this is about as good as it gets under the circumstances.

Milky Way Core || Olympus 8 mm, f/2.8, 3 min, ISO 800
This is definitely not the last you'll be seeing of the Erdfunkstelle Raisting from me; there's a lot more motherlode to be mined here. Watch this space!

Monday 24 May 2021

Olympus IBIS + Kase Wolverine Filters = Dream Team

Oh, the best laid plans of mice and men... Originally we had planned to go up the Branderschrofen near Füssen today to scope some sites for the next astro shoot, but there's still a tad too much snow, the weather forecast wasn't really playing ball and we would have had to have tested to get on the cable car. Not really an issue, but a faff nevertheless. So instead we packed the car and headed off to the Starzlach Gorge near Sonthofen to stretch the legs and play with my new filters; the Kase Wolverine magnetic filters. I figured that if they're good enough for Nigel, they're good enough for me 😉. 

Hard and Soft || Olympus 44 mm, f/4, 1/2", ISO 200 
My previous filters were a set of Lee Seven5 90 x 75 mm rectangular filters with a traditional filter-holder. These were always such a fiddle to mount, plus the astute reader will remember from my comparison with the Kase system that as soon as you put the polariser on the front of the filters, the system becomes completely unusable at wide angle because you can see the filters in the corners of the photos. Well, more than the corners actually. In fact they were so unusable on a day-to-day basis that I did the unthinkable and bought myself a sneaky cross-pol variable filter (but shush, don't tell Matthias, he'll disown me).

The handy alternative is the Kase Wolverine magnetic filter system. You screw a circular metal plate to the front of the camera lens and layer the filters you want in front of the plate. They stick to the plate using powerful magnets and stay reliably in place, even with the camera attached to my shoulder strap using the Peak Design capture system, though I would be wary of doing this when climbing. I absolutely love the ease of use of the Kase filters, the leather box fits conveniently in the side pocket of my lens bag and are always on hand. If I had two complaints, it would be that there's no marking on the CPL to tell me where the maximum filter mark is (I've overcome this using Tippex) and that I can't use the system in conjunction with my lens hood, which has lead to some sun-flare issues.


  1. Attachment ring, ND 8 filter and CPL
  2. Filters Stacked...
  3. ...and mounted
The first significant water fall in the gorge is just below the ticket booth. They charge € 3.50 to use the path along the gorge, perfectly fair in my mind as they do a fair amount of upkeep with railings and footings to keep you safe in very slippery conditions. The Starzlach Gorge isn't as well known or long as the Partnach Klamm near Garmisch or the Breitach Klamm near Oberstdorf, but it's an absolute delight with some very picturesque cascades. The gorge runs roughly from west to east if you want to bear this in mind for light direction. I usually find shooting gorges works best on overcast days where the clouds form a giant softbox, otherwise things can get very contrasty leaving you with completely burnt out or dark photos.

They also sell a local cheese at the booth. If you like character cheese, something which is normally quite hard to find in German supermarkets, get some. It has a wonderfully nutty flavour, like a good Emmentaler and you'll be supporting local farmers. There are a lot of local cheese sellers all around the Allgäu and we've yet to be disappointed by them.

Entrance to the Gorge || Olympus 13 mm, f/8, 2", ISO 200
The length of exposure under these conditions is purely a matter of taste. Some people don't care for long exposures at all, which is fair enough. I dislike long exposures of the sky with stretched out clouds. But I do like a wispy waterfall image. Depending on the speed of the water, generally anything from 1/5" up to about 5" should cover most eventualities. Most cameras would struggle with exposures like this hand held, but the Olympus have industry-leading IBIS - In Body Image Stabilisation, meaning that I can shoot around 2" and still come away with a sharp image, depending on the focal length of course.

Dual Flows || Olympus 12 mm, f/7.1, 1/2", ISO 200
Shooting in a gorge is usually from a narrow pathway and most people wouldn't take kindly to getting stuck behind someone setting up an unwieldy tripod, so generally you'll need to take most of your shots hand-held in relatively dark conditions.

Coffee on Tap || Olympus 100 mm, f/9, 1/2", ISO 200
Sometimes it isn't about getting the bigger picture, but about finding a detail that captures the mood of the place. This short drop in the water gave a nice little curve and helped emphasise the coffee colour in the water caused by all the recent rain that we've been having. The photos are all about balance and flow - images that aren't weighted down on one side or the other - which would be the result of a clean rule of thirds composition.

Gorge Bridge || Olympus 34 mm, f/6.3, 1", ISO 200

Deep Water || Olympus 24 mm, f/7.1, 1/2", ISO 200
Once we were out of the gorge there was time to look around a little more. The forest floor is really greening up right now, ferns are unfurling (I would have shot some as this is a favourite motif of mine, but I couldn't find any where I would have been able to get good separation between the foreground and background.

Separation was easier on these two members of the broader thistle family with its white seeds against the greenery in the background and isolated completely from the background with the macro lens.

Thistle Thingy I  || Olympus 92 mm, f/4, 1/30", ISO 200

Thistle Thingy II  || Olympus 60 mm, f/6.3, 1/200", ISO 200

Thursday 13 May 2021

Twenty-Four Hours in the Mountains

New moon is upon us once more and I was itching to get out and test not only my E-M1 Mk III that I bought after the but also Move Shoot Move star tracker that would let me break the 25 s exposure limit that I was experiencing with my present set up.

Mittenwald and the Karwendel || 6-shot panorama, Olympus 8 mm, f/5.6, 1/500 s, ISO 200 
It's been a while since I was this keyed up for a trip of any sort and by Friday evening I must have had packed and unpacked my gear around 4 times already. Saturday morning and my rucksack was feeling suspiciously light. Huh? Oh yes, the all important camera gear bag. Phew.

It had been a couple of weeks since we'd had a leg-stretch and so Sharon and I set off for Garmisch after a comfortable breakfast on Saturday morning to hike up to the Hausberg. It had been raining on and off for the previous few days in Kaltenberg, but in the mountains it had been snowing. In the first light of sun, the tops were shining pristine and I was really excited about the night to come and the images we would hopefully be able to make. After last year's successes in the Allgäu I have absolutely fallen in love with taking photos in the mountains in early summer as the sun goes down. The snow fields radiate in the late evening light both before and after the sun goes down and I was trigger happy after a few weeks out of the field.

Wetterstein || Olympus 100 mm, f/8, 1/640 s, ISO 200 
The hike up the Hausberg afforded us occasional glimpses of the surrounding snow peaks but no real photo opportunities beyond the occasional spring flowers and a friendly squorrel. The saving grace of the tour was Weißbier and Wurst at the kiosk at the Bayernhaus. It's been too long! 

Alpspitz through the Trees || Olympus 57 mm, f/8, 1/500 s, ISO 200

Forest Foliage || Olympus 100 mm, f/8, 1/640 s, ISO 200

Friendly Squorrel || Olympus 100 mm, f/5.6, 1/160 s, ISO 200
We were at the Mittenwald car park 10 min after Matthias arrived - not bad considering the different journeys we'd had. Sharon then returned home complete with my woolly hat and thermos flask of hot tea (entirely my fault) whilst Matthias and I headed up the Kranzberg via the delightfully situated Korbinian Hütte. Although my shoulders were aching like heck at this point due to all the photographic gear and warm clothing I was carrying in my ancient Deuter rucksack, our spirits were still high at this stage as the clear skies looked set to last.

Korbinian Hütte and Karwendel Spitze  || Olympus 20 mm, f/5.6, 1/800 s, ISO 200
Unfortunately this wasn't the case and we arrived at the summit only to find clouds rolling in from the west. Although this might be fun for the sunset, it was not what we were looking for for the night. We used the time to set up the tripods and snap a few evening shots as well as taking a blue hour panorama of Mittenwald and the Karwendel that would later serve as foreground for the starry landscapes. We waited for the lights in the town to come out for this; a darkened-down shot of a light-less town would not look right and if we left it too late then the difference between the bright lights and the dark mountains would have been too much, plus the exposure would take several minutes at low ISO, time that we'd rather invest in the sky. The combination of sky and ground has to look natural for the photo to work.

Blue-Hour over Mittenwald || 6-shot panorama, Olympus 8 mm, f/8, 2 s, ISO 200
Now it was just a question of waiting for the clouds to go and the stars to come out. Olympus cameras have a built-in intervalometer and can automatically generate time-lapse videos from the shots. Here's my offering from the evening's shenanigans. I'd hoped to catch one of the Milky Way rising over the mountains as well, but failed in that undertaking. 

Video ©️ Mike Page and Rhage Designs

There were plenty of vistas to occupy us while we waited; the Kranzberg boasts a 360° view of the Karwendel and Wetterstein mountains and we must have been able to see at least 50 or more summits of the surrounding mountains. We left the tripods where they were; they were important markers for taking the later shots, and one was recording a time lapse. There was enough light left not to need them with the Olympus cameras anyway. What they lack in noise levels when you jack the ISO up they make up for in spades with out-of-this-world image stabilisation.

Solitary Pine || Olympus 86 mm, f/5.6, 1/200 s, ISO 200

Skeletal Birch || Olympus 80 mm, f/5.6, 1/6 s, ISO 200

Kranzberg Gipfelhaus || Olympus 15 mm, f/5.6, 1/1000 s, ISO 200

Austrian Karwendel || Olympus 50 mm, f/5.6, 1/250 s, ISO 200

Wettersteinspitze || Olympus 20 mm, f/5.6, 1/100 s, ISO 200

Sunset Silhouette || Olympus 100 mm, f/5.6, 1/400 s, ISO 400 
Unfortunately the clouds were teasingly reluctant. Although we could see a clear horizon to the west where the prevailing wind was coming from, the more it blew the more clouds seemed to appear. And Mittenwald is bright at night. Around midnight we began to see more and more stars appearing overhead, but the wind was increasing, the temperature decreasing and there were still bands of cloud over Munich, Mittenwald and Innsbruck that were robbing us of the darkness that you need for really good pictures of the Milky Way. I'd had high hopes of some cool blue-hour photos of the first stars over the Karwendel mountain range. They didn't manifest either.

Best of a Poor Sky || 2x6-Shot panorama, Olympus 8 mm, f/8/2.8, 1/640/25 s, ISO 200/3200
In the end I gave up around 12:30, giving it up as a bad job and retreating to the log cabin on top of the Kranzberg to shiver the night away on a hard wooden bench. Matthias stuck it out in the wind-shadow of the cabin and actually got a half-way decent shot of the arch of the Milky Way over the mountains during a 10 minute interval in the clouds, the composition that I'd been after. But even then, the galactic core wasn't popping the way it can sometimes and so I didn't berate myself for not having stuck it out. I was missing a vital bit of kit for getting a solid panorama anyway and I just wasn't feeling it after my hike during the day as well.

My sleep was interrupted around 4:00 am by a couple of revellers from the valley, who for some bizarre reason decided that the top of the Kranzberg was the ideal place to smoke some whacky baccy and sing badly to German rap blaring out of a ghetto blaster. They blinded Matthias' acquired night vision with a blast from their torch and generally annoyed us for 15-30 min before deciding that shorts and a hoody were insufficient protection from the elements and buggered off whence they had come. Good riddance.

We were up at 5:00 to catch a glimpse of first light. Of course all the interesting clouds had gone by this stage and all we were left with was that typical narrow but intense band of colour low on the horizon as the sun made its welcome face known.

Mountain Dawn || 3-Shot HDR Olympus 8 mm, f/5.6, 1/10 s, ISO 200

Pretty in Pink || Olympus 18 mm, f/5.6, 1/15 s, ISO 200
Matthias had one surprise composition left before we headed down to the car and home, an alpine meadow complete with wooden hay barn in front of the Wettersteinspitze. Another tricky exposure that I've had to exposure blend to make the barn visible against the bright snowy mountain.

Alm Landscape Underneath the Wetterstein || Exposure Blend Olympus 18 mm, f/8, 1/50 s, ISO 200
90 minutes later, after having been standing in the same clothes for 24 h we were back home in blazing sunshine. 

So was it worth it given the disappointing astro' conditions? Every trip like this I learn something. I don't always come away with the shots that I wanted. Sometimes (often) I come away with bonus images that I hadn't expected or even contemplated. So yes, I'm a better - or at least more experienced - photographer than I was this time last week and next time I'll be in a better position to get that shot.

Monday 10 May 2021

Move Shoot Move and Olympus E-M1 Mk III

Milky Way season is upon us and so last weekend I headed out to the hills with fellow photographer Matthias Tannert to try to grab some astro shots in the mountains above Mittenwald, Bavaria. I had some new equipment that I was keen to put through its paces and an ambitious photograph that I was keen to pull off: a panorama of the whole visible Milky Way in the night sky.

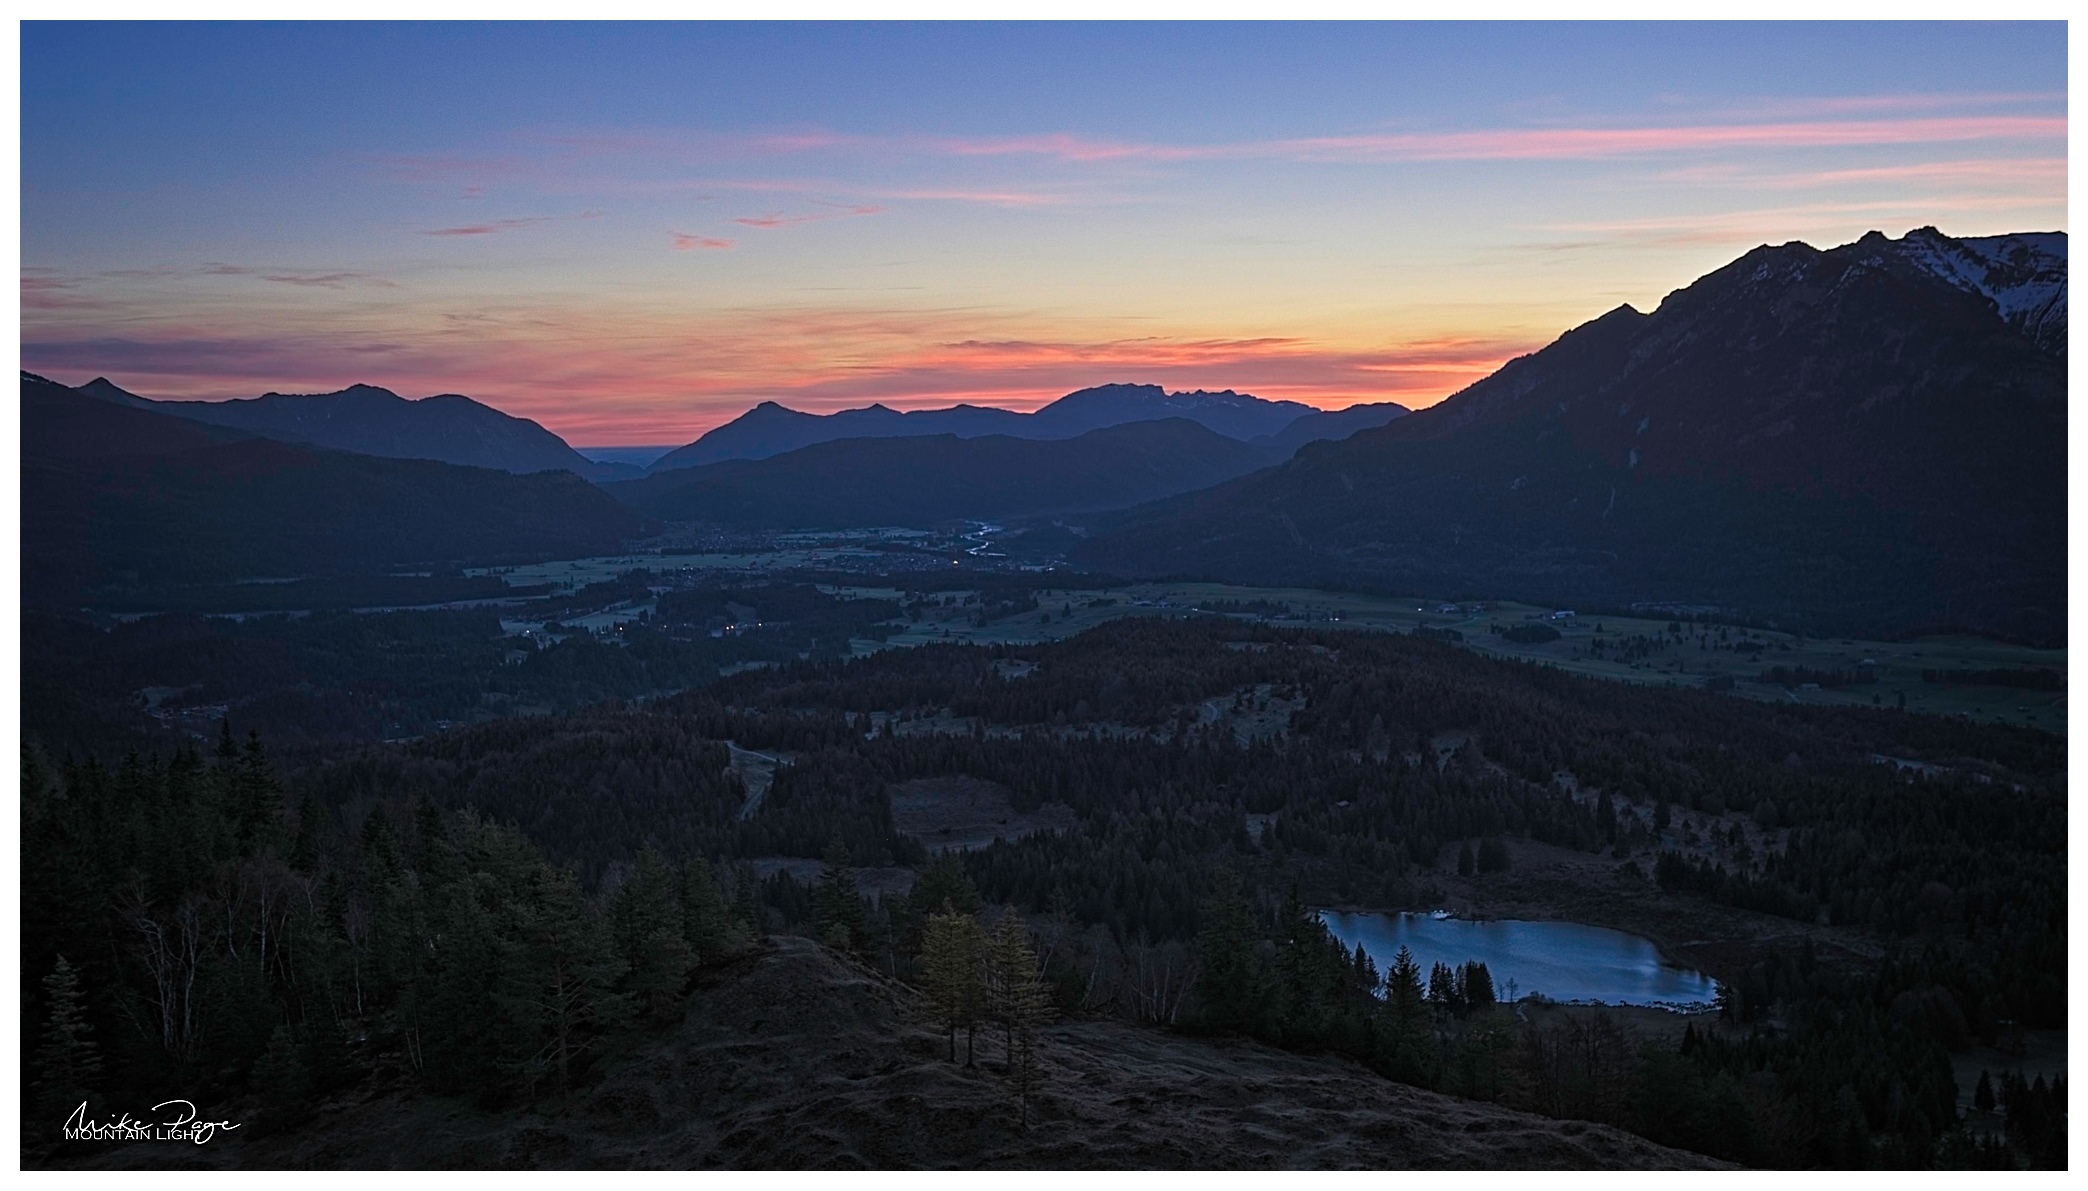
The best I could make of it. My first Milky Way panorama

The trip was a mixed success, I got some cracking shots of the evening and early morning on the Kranzberg, but unfortunately the astro session was not as successful. There was a lot more cloud around as well as a lot more wind than was forecast and it was bitingly cold, leading me to give up my attempts at photography not long after midnight and seek shelter in the summit refuge.

I'll make the presentable shots the subject of another post, this one is going to be all about the technology, so if you're interested in the Move Shoot Move star tracker or astrophotography using the Olympus E-M1 Mk III, stick around. If not, I suggest you check back later in the week to see the other shots.

Setting up the MSM - Preparation

I spent a lot of time preparing for the trip last week, trying to get as much information as I could about setting up the MSM and establishing the best settings for the camera. Fortunately a lot of this information can be found in the same place as the American photographer Alex McGregor has an excellent YouTube channel (and website) called Chasing Luminance

One of the videos deals with calibrating the laser to make sure it's pointing straight. It's just as well I did this as my first attempts over a distance of about 2.5 m gave me a spread of around 10 cm top to bottom and left to right as I span the laser in its dedicated holder. Part of the problem is that there seems to be quite a bit of play room at the back of the laser and each time I tightened the locking screw the sighting seemed to shift a little. I've tried to partially overcome this by lining the back end of the laser holder with some thin card and there's now significantly less wiggle-room.

I ended up shrinking my target of error from about 10 cm to around 2.5 cm (4" to 1" if you haven't joined the 21st century yet 😉). There was a recent post in the MSM Facebook group from Andrew Larkin detailing how important getting the accuracy was in terms of length of exposure, varying from about a minute if you're 10° out up to 4 minutes at 2.5° or even 20 minutes at 0.5°, so setting up the laser is important. My university-aged kids assure me that a 10 cm spread over 2.5 m is approximately 2.5° - so we're already in a reasonably good place. A 2.5 cm spread is already 0.6°. Actually both of those should be half that since 10 cm and 2.5 cm were the diameter of the error field rather than the radius. So even better.

Setting up the MSM - In the Field

I have a relatively sturdy Tiltall carbon fibre tripod that I set up relatively low on the mountainside so that I could operate the camera whilst seated on the ground. I paid attention to making sure that the top of the tripod was horizontal before attaching my geared head. The MSM was attached to this and the camera to the MSM via the original Tiltall ball-head. 

I would really recommend doing a dry run at home to make sure all the knobs and levers are in the right positions before you head out to the field. Once you've established your spot, set up early if you can. If you take foreground images in the blue hour like we did, you're not going to be able to get too many compositions from just the one tripod spot, so be warned.

Setting up the MSM with my Olympus
If you're going to shoot panoramas, slipping a V- or Z-plate between the MSM and the top ball-head will add a ton of flexibility, in fact mine's in the post. This will mean that I can put the assembly on the ball-head and elevate the geared-head to the top layer for better panorama assembly. If I'd assembled it with the geared head on top, the gears would not be in a position to allow horizontal and vertical adjustment.

Sighting on Polaris was gratifyingly easy. I'd already set the elevation to about 47.5° (approx. 1° per ° of latitude) and pointed it north, I wanted to have that laser on for the shortest possible time. Then it was a case of twiddling the geared head so that the tracker was pointing absolutely dead on. The laser is really very visible to the naked eye.

Waiting for night to fall and the clouds to bugger off
Once it got dark and the worst of the cloud had gone I managed to fire off a couple of test shots simply to test trailing. My standard astro exposure with the Olympus using my Panasonic Leica f/2.8 8-18 mm is 25 s, f/2.8 ISO 6400, 8 mm (that's 16 mm to you full-frame types). I tried my first test-shot for 60 s using ISO 3200. 

8 mm (m43), 60 s,  ISO 3200 
Then I dropped to ISO 1600 and went up to 120 s.

8 mm (m43), 120 s,  ISO 1600
And lastly ISO 800 and 240 s.

8 mm (m43), 240 s,  ISO 800
It was quite windy, so there may have been a little blur due to tripod, but I find these images to have a perfectly acceptable level of star trailing. I have not stacked the images or performed any noise reduction on these images, they are single images processed in ON1 Photo Raw 2021 where I have simply tweaked the contrast up 13 points after applying the lens profile. The crops are of the area around Antares (?) top left - approximately 1/3 of the full screen in each dimension.

Olympus E-M1 Mk III

I want to start by pointing out that the images presented here are for technical purposes only. I have not done any significant editing and they're not images I'd want to be judged by. I started my astrophotography path in 2020 using my E-M1 Mk II. This time I was eager to take the Mk III for a test drive with all its astrophotography bells and whistles.

Starry Sky AF

First up is the star focus function on the Mk III. This is a game-changer for me as my manual focus can be a bit hit and miss, even with focus magnification at max. My eyesight is no longer 20/20 and getting those fuzzy little balls of fire as tight as possible with atmospheric movement and camera movement due to fiddling with the focus ring was always a trial of patience. And don't even talk to me about accidentally hitting the ring in the dark when you move the camera. All those frustrations are a thing of the past. Select accuracy (menu A4) and then Starry Sky AF under the focus options and hit the AEL/AEF button on the back of the camera. Works!

HHHR

The E-M1 Mk III has a magic high-res mode that can generate a 50 (or even 80) MP image using a 20 MP sensor. You can choose to do this hand held (HHHR) or in tripod mode. The former samples 16 images which it interpolates in camera, the latter 8 images. According to McGregor, it should be possible to use the HHHR mode to shoot stars and the THR mode to shoot foregrounds (video 1 and 2). There are two theoretical advantages to shooting in high res mode, you get a bigger image (duh!) and the camera performs about 2 stops of ISO-related noise reduction when it interpolates the images. But it does require a tracker.

There are some limits, maximum photo length is 60 s (giving a 16 minute exposure + processing time) and the maximum ISO in THR is 1600.

Tracked HHR for the Stars
This is my attempt at track in HHHR. Something has gone wrong here. Although Antares only appears once, the smaller stars all appear as dotted tracks. Alex, if you happen to read this, what did I do wrong here? You can still see the beginning of the Milky Way bottom left over the mountains, but this isn't an image that I can use. Maybe there's too much ground in the picture for the Olympus to process the stars properly, but the bigger stars have no trails.

MSM-Tracked, HHHR image 8 mm (m43) 60 s, f/2.8, ISO 3200, 50 MP 

Stationary HHHR for the foreground
I turned the tracker off and switched into THR, reduced the ISO and tried a couple of foreground shots. This works really well, but has left me with some unsightly pixel artefacts. Cloning them out will be straightforward, but they're there. The image quality is perfectly acceptable for the foreground image though. I know it doesn't look too hot in the blown-up parts of the image, but a lot of that can be rescued, if by nothing else than reducing the resolution of the image to a useable level.

Untracked, THR image 8 mm (m43) 60 s, f/2.8, ISO 400, 50 MP 

Untracked, THR image 8 mm (m43) 20 s, f/2.8, ISO 400, 50 MP


Lessons Learned

  • Don't go on a 5 h hike with the missus on a day you plan to do astrophotography - it saps necessary energy
  • The MSM is a game changer for Milky Way photography. Although I didn't show any shots without it here, anything that lets me reduce ISO and achieve the low noise levels I have here is a great advantage.
  • I need a wedge for the MSM
  • Starry Sky AF is a huge win for astro with the Olympus
  • High res mode needs further investigation in both hand-held and tripod modes
Thanks for dropping by.