Sunday 7 March 2021

The Wrong Mountain

In future, I think we'll stick to doing winter tours that we know from the summer. Yesterday The Wife and I embarked on a winter tour from one of the books I bought her for Christmas. It was supposed to take us up the 1542 m Reuterwanne above Jungholz, a small Austrian village that is accessible to Germany during the lockdown due to the fact that it exists as an enclave into Germany. Who knows what they were drinking when they drew up the borders after WWII?, but this is definitely a weird one.

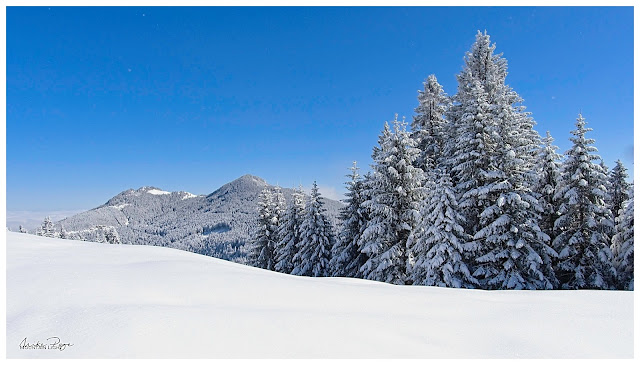
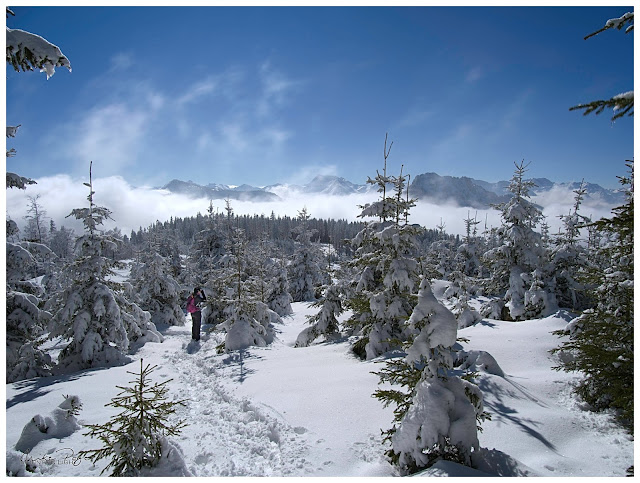
From the Pfeiffenberg || Olympus 13 mm, f/8, 1/1000 s, ISO 200 
Instead we ended up on the 1458 m Pfeiffenberg because we followed the tracks in the snow. Although most of the valley snow has disappeared, it snowed again on Friday. With a cold but sunny forecast for Saturday we decided that it would be rude to sit at home doing nothing and decided to head out to the hills once more. We were treated to a day of two halves. Actually, to be more accurate, we had a foggy day with a sunny interlude because the fog rolled in again as we came down the mountain, giving us some really special images, but more of that later.

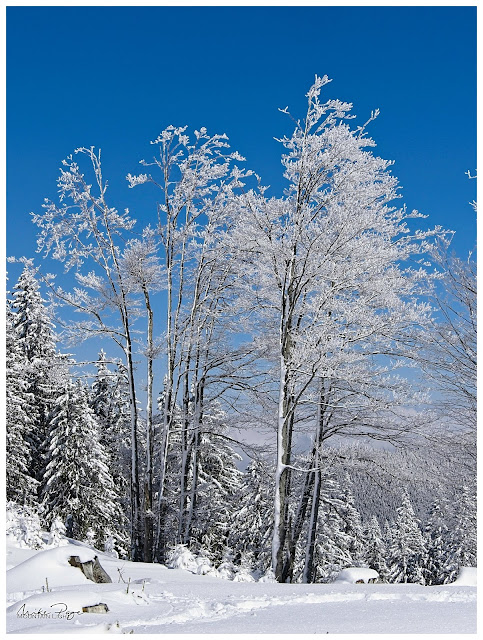
Frosty Trees || Olympus 34 mm, f/8, 1/1600 s, ISO 200
We set off from a surprisingly empty car park in Jungholz - whether people were intimidated by driving into Austria (😮), they'd been put off by the fog, or whether in March they'd simply had enough of the snow, there simply weren't that many people under way, which suited us just fine. Finding the first landmark on the tour was easy since it simply required us to follow the signposts to the Stubentalalpe. The book (and signs) had the path following up the hillside behind the hut to the Reuterwanne and so we blindly followed the tracks leading up the hillside. What we failed to see was where the path to the Reuterwanne diverged and so we found ourselves atop the wrong mountain with no discernible path to getting on the right one.

The Process

But never mind, because we came home with an SD card full of 'keepers' and memories of a lovely winter tour pretty much on our own. A keeper is a photo that I'll keep (duh!) and show either here, Instagram or on my private Facebook page. Not necessarily the best of the best, but good enough to air publicly. After years of photography, I have developed a clear sorting method for photos at the end of the day. I'll import the photos directly into ON1, applying my own private preset - a set of standard modifications that I use during RAW processing. Almost all of these are not actually applied, but available to be used at a single click rather than diving through various menus. During import, I also back the photos up to an external USB hard drive. This has actually saved my butt once recently too as I managed to delete a whole folder worth of photos from my laptop.

Keeper or Not? || Olympus 47 mm, f/8, 1/1000 s, ISO 400 
Once imported, I use the ***** system to indicate which photos I actually want to process with a single star. I'll then go through these one by one, applying the edits I think best enhance the photo to emphasise the aspect of the image that really caught my attention. The edits that I'm happy with I'll give two stars to. These are the images I end up exporting to jpg from ON1, most of which will end up being published somewhere. I tend not to be overly selective here. I have one friend who posts perhaps a couple of photos there a month and they're really top-notch images. I'm a bit more indiscriminate and tend to spray my images everywhere. The really good ones will get three stars, but that's perhaps a small handful of images in a month.
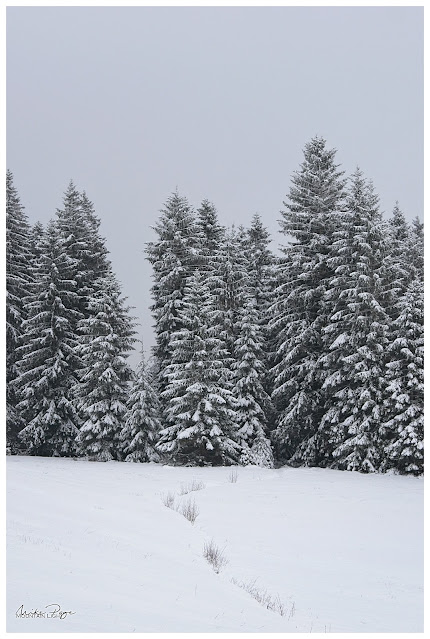
The Foggy Half

Photographing isn't necessarily the first thing you think about doing in fog - but the results can be amazing. I got a couple of really painterly images from yesterday's tour that couldn't have been taken in any other conditions.  This first one of the shed in the snow was actually the very first image I took of the day. This I might even classify as a three star image. Note that it thumbs its nose completely at the rule of thirds etc., but it works, for me at least. Great way to start the day

Lone Shed || Olympus 29 mm, f/6.3, 1/1000 s, ISO 400
As well as the fresh snow there was a wicked hoarfrost as we walked up out of the village due to the freezing fog. We tend to think of nature as a constant, what's there today will be there tomorrow, but these photos tell a different story. Even as I write this 24 h after taking the photos, I know that they were unique, unrepeatable snapshots in time. Never again will that shed scene look exactly like that. Never again will that branch have that constellation of ice crystals. The same is the case for images with powerful clouds. Sobering thoughts.

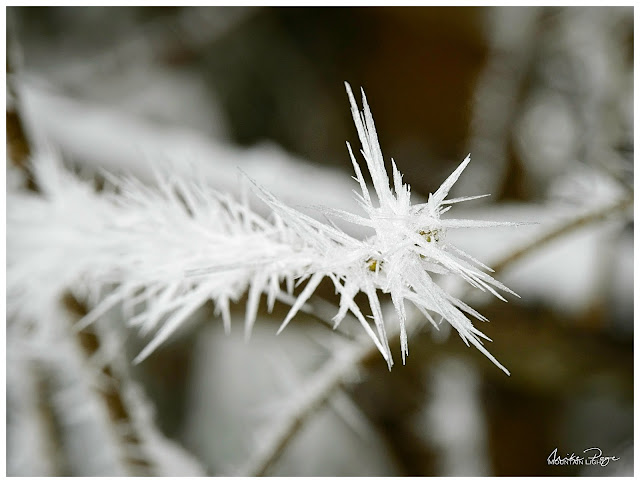
Ice Crystals || Olympus  100 mm, f/11, 1/160 s, ISO 400
I decreased the aperture to f/11 here to increase the depth of field on the crystals. F/8, my standard aperture for this lens, just wasn't doing it and I didn't want to stop down too much further as it would have reduced the shutter speed to a level where motion blur might start becoming an issue. A lot of photographers only talk about aperture as a means to control depth of field, but it's only one of three factors influencing how much of your scene will be in focus alongside focal length and focal distance (how long your lens is and how close you are to the subject respectively).

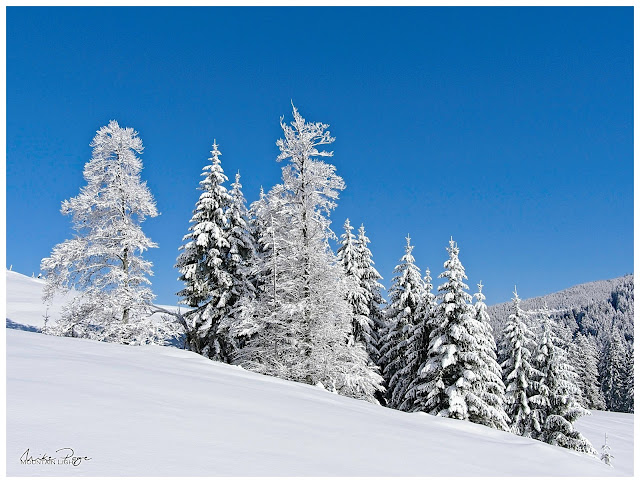
Once we reached the Stubentalalpe we were out in the brilliant blue skies of an early spring day - after all meteorological spring started last week and we continued enjoying that light until we came down again after lunch. There was fog below us and rolling over the tops every now and then, but by and large it was pure sunshine until we descended back to the hut.

Standing Out and Hidden || Olympus 20 mm, f/8, 1/250 s, ISO 200
Snaking our way back down the tarmac to Jungholz at the end of our tour we came across this group of trees across the road. At a first glance the images look black and white, but they're full colour as you can see if you look at the snow poles and trail sign. An interesting set of images that aren't quite my usual style, but I really like them and could imagine them looking good printed on wood.


The Sunny Half

Once we'd reached the Stubentalalpe it was blue skies all the way, giving rise to a different sort of monochrome - white and blue instead of black and white. The colour of the fir trees was essentially non-existent given the bright light. Normally I would have had my CPL polarising filter on in conditions like this, but because the scene was so bright anyway I decided not to use it as it would have made the skies even darker and I was looking for some brighter images.

At the Stubentalalpe || Olympus 21 mm, f/8, 1/2500 s, ISO 400
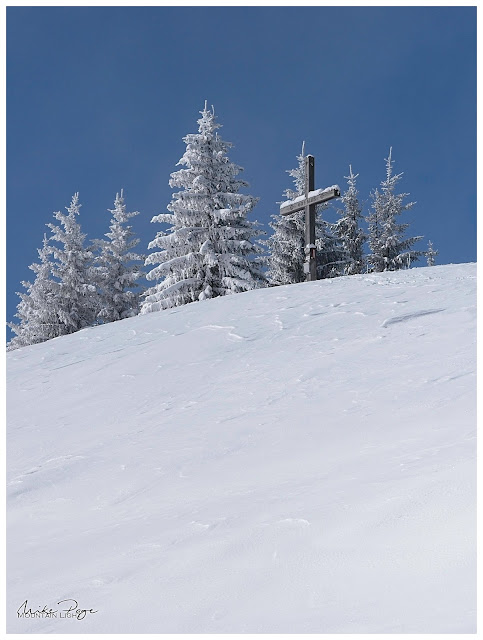
Arriving at the Pfeiffenberg we found this delightful little wooden cross. At this point we thought we were still on the right path - we weren't -  and could see the Reuterwanne but couldn't clearly see how to get to it. Again, a unique image. Never again will this particular snow pattern exist to be photographed.

Pfeffenberg || Olympus 66 mm, f/5.6, 1/4000 s, ISO 200 
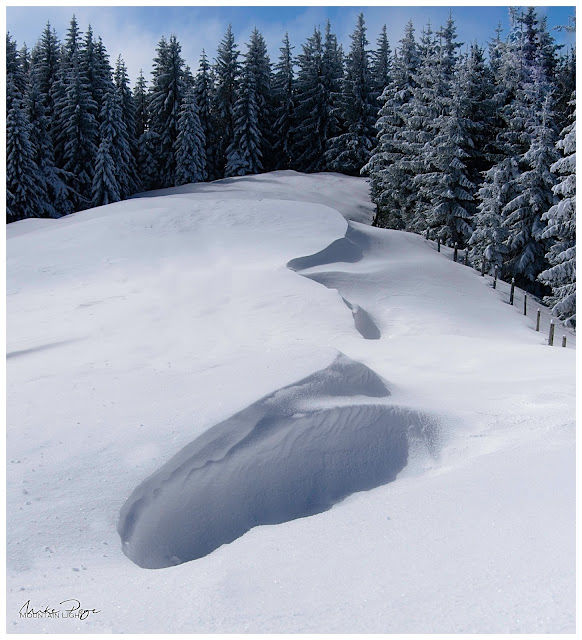
This next image is a complete fake! The path ran through the snow to the left of the drift. Apart from looking ugly, I wanted to see how far I could take the image correction. There are a couple of blotches that I might be able to correct with a little more effort, but the resulting image is adequate without being a showstopper. This is about the limit of corrections that I'll apply to an image outside of focus or exposure bracketing. I won't do sky replacements, for example, not because it's wrong per se, but photography for me is about conveying the beauty of what I saw and experienced. There's an inherent authenticity involved. This is probably a step too far.

Drifts || Olympus 23 mm, f/4.5, 1/6400 s, ISO 200 
Coming off the top we descended into a mini winter wonderland of baby fir trees. You can clearly see the valley fog in this photo. The trail through the snow is the same one as the shot of the drifts, demonstrating the extent of the 'corrections' that were necessary.

Winter Wonderland ||  Olympus HR 12 mm, f/8, 1/1250 s, ISO 200
And I can't come away from a trip to the mountains without a photo of a tree stump!

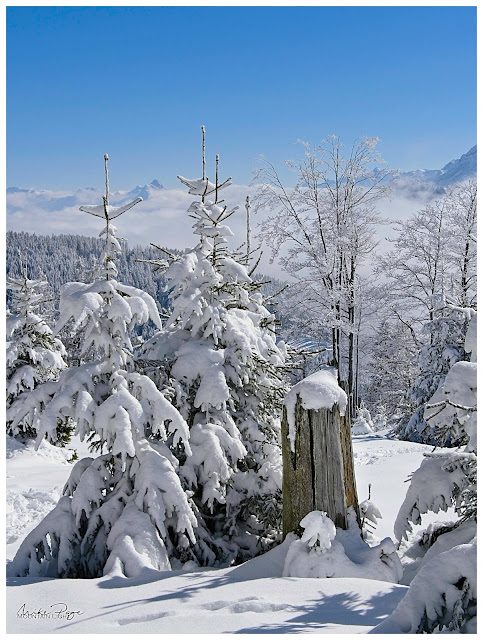
The Stump || Olympus 31 mm, f/8, 1/1600 s, ISO 200
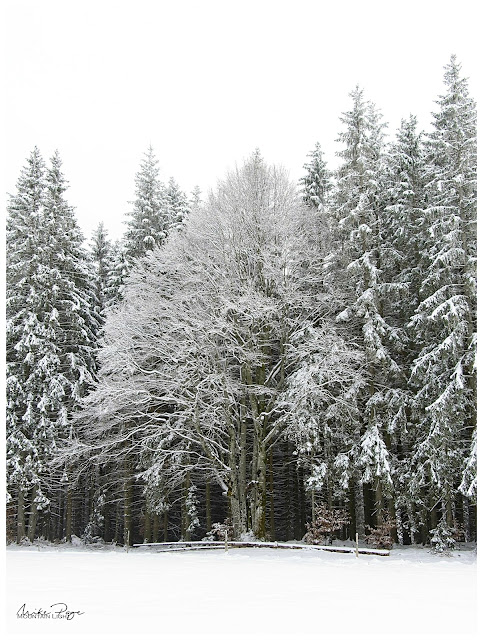
Descending further we came across a mini plateau with a series of deciduous trees that still had snow and/or hoarfrost on the branches giving rise to this fantastic vista - as well as providing a great spot for lunch. 

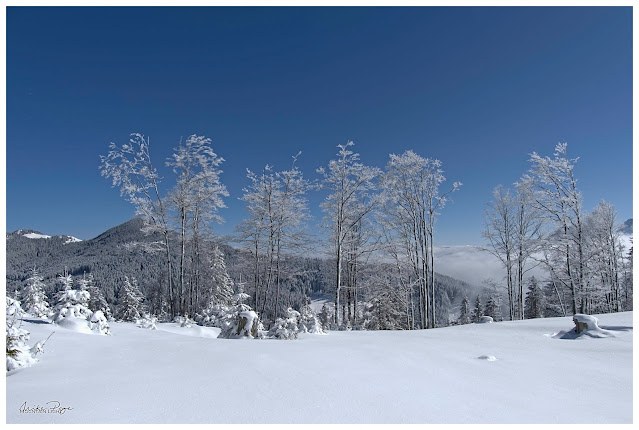
Ming Vase-Landscape ||  Olympus 12 mm, f/8, 1/1600 s, ISO 200
Sat opposite this vista for quite a while gave me plenty of opportunity to 'work the composition' as the profi's would put it, and I tried a number of approaches including two with some 'foreground interest', but as so often with these scenes for me, I found the best image to have been my first 'instinct' shot when I arrived at the scene. The others seem contrived somehow with the foreground detracting from the simplicity of the scene that this one conveys nicely rather than adding to it.

Long Pines ||  Olympus 75 mm, f/8, 1/1250 s, ISO 200
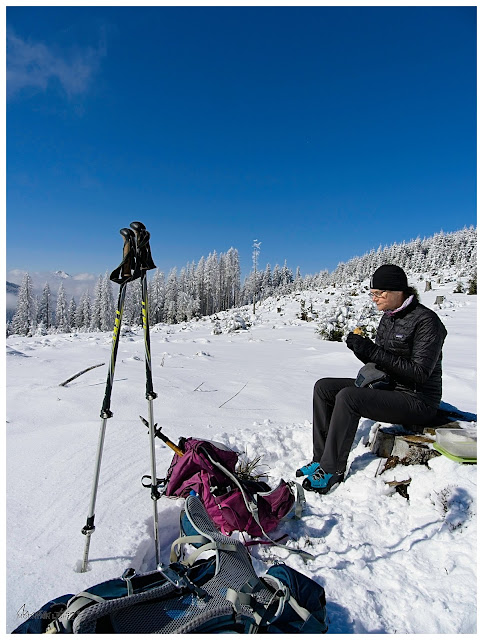
It was also nice light to catch a couple of rare up close shots of Sharon in her natural element - the mountains.

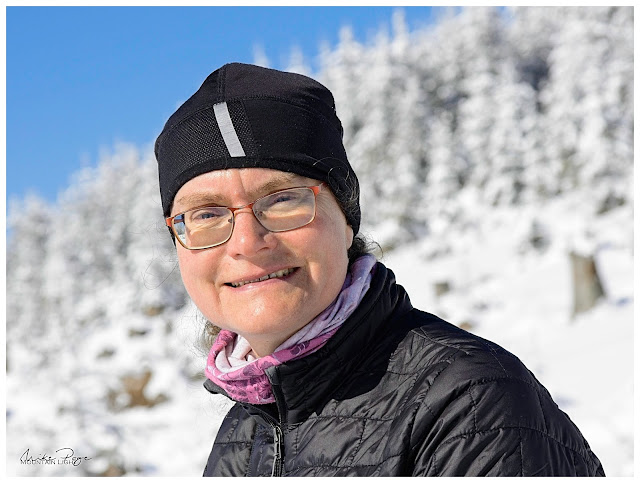
The Wife ||  Olympus 80 mm, f/7.1, 1/1000 s, ISO 200
Mahlzeit! ||  Olympus 12 mm, f/7.1, 1/2000 s, ISO 200
So that was our Saturday morning. What did you get up to, anything interesting?

Monday 1 March 2021

Cloud Inversion on the Hörnle

The blogposts seem to be like London buses at the moment. You wait ages for one, and then three come along at once! Don't worry, this will be the last for a week or so and there won't be as much text with this one.

Layers || Olympus 100 mm, f/8, 1/1600 s, ISO 200
We (i.e. The Wife) decided that we should go for a walk on Sunday morning, so we headed down to one of our regular mountains, the Hörnle above Bad Kohgrub at the edge of the Ammergau Alps. There was an off chance that the kiosk might be open at the Hörnle Hütte - or at least that was the carrot that was dangled before me...

I'd schlepped the regular camera gear with me (in my case this is the Oly E-M1 Mk III with by trusty 12-100 mm lens attached and the Pano Leica 8-18 mm in the bag just in case). Standing around in dense fog in the car park above the Hörnle Bahn I wasn't convinced that I'd actually be getting it out of its pouch. Oh how wrong I was!

Frozen Catkins || Olympus 41 mm, f/5.6, 1/250 s, ISO 200 
It started in the carpark already when I noticed these frosty catkins. Stopping the aperture down to throw the background out of focus and dancing around the hazel to try and get the right composition, this is the best I came up with. It wasn't until we'd got home and I saw the Girl-Child's take on this - she'd managed to get a comp with an old wooden hut in the background, but by then it was too late to go back.

The frozen foggy forest was full of little delights like this, be it the fir trees or cobwebs tucked in between the roots of a tree.

Christmas Decorations || Olympus 54 mm, f/5.6, 1/60 s, ISO 200
Cobweb Gems || Olympus 25 mm, f/5.6, 1/13 s, ISO 200
It's always worth keeping your eyes open for a quick abstract in the forest and this piece of bark caught my eye with its brown and orange tones combined with the frost emphasising the edges. The fog was working as a giant lightbox, taking away the harshness that direct sunlight would have caused.

Bark Abstract || Olympus 100 mm, f/5.6, 1/80 s, ISO 200
Handprints || Olympus 38 mm, f/8, 1/60 s, ISO 200
As we climbed through the forest it got lighter and lighter with occasional glimpses of blue sky above and we knew that we would soon be emerging above the clouds. I was ready for the sun disk, but nothing prepared us for the haunting fog-shadows caused by the trees as we reached the clear air.

Shadows in the Mist || Olympus 28 mm, f/5.6, 1/1250 s, ISO 200 
First Glimpse of Sun || Olympus 100 mm, f/5.6, 1/4000 s, ISO 200
Into the Light || Olympus 12 mm, f/8, 1/8000 s, ISO 200
Haunted Trees I || Olympus 41 mm, f/8, 1/4000 s, ISO 200
Haunted Trees II || Olympus 28 mm, f/5.6, 1/250 s, ISO 200
Edge of the Mist || Olympus 38 mm, f/5.6, 1/250 s, ISO 200
Out of the clouds the hike was pleasant enough, but without the fog as an interest there weren't so many shots to be had any more, though the views from the summit over the thick cloud bank were fine enough. There were plenty of people around at the hut and all three Hörnle summits - Vorderes, Mittleres and Hinteres.

Towards the Hörnle Hütte || Olympus 12 mm, f/8, 1/1250 s, ISO 200
Hörnle Round incl. Zugspitze || Huawei P30 Panorama
Hinteres Hörnle || Olympus 70 mm, f/8, 1/1600 s, ISO 200
We came back down via the sledge run. Fortunately we'd brought our spikes with us - poor man's crampons that you pull over the boots to give extra grip on icy ground. The fog had a couple more special shots left for us before we got back to the car.

Spot: On || Olympus 34 mm, f/8, 1/13 s, ISO 200
Bad Kohlgrub || Olympus 31 mm, f/8, 1/800 s, ISO 200
So, when the forecast is dodgy, don't leave your camera at home. Sometimes challenging conditions can give rise to some unique images.

Wishing you interesting light.

Mike


Saturday 27 February 2021

A Walk In The Park With The Olympus M. Zuiko 100-400 f/5-6.3

I was talking to a colleague on Wednesday when she let it drop that her husband, a good friend of mine, was in one of the parks in Munich photographing tawny owls with their son. I'd known about at least one of the owls - the infamous Kazimir - from another photographer's Facebook posts, but when I learned that there were four of five of them, that they were in relatively predictable positions, that the best time of year to shoot them is when there are no leaves on the trees and that the weather for the following day was going to be great, well I had to go, didn't I? Plus I have such a backlog of leave from last year that I really need to start using up and so early Thursday morning I set off in the car to drive into the centre of Munich.

Schloß Nymphenburg || Olympus 12 mm, f/8, 1/500 s, ISO 200
We've been having some spectacular sunrises at the moment due to Sahara sand in the air and Thursday morning was no exception. Driving down to the motorway I was greeted by the most amazing sight; a perfect disc of yellow rising behind some naked trees with a misty foreground. One of those once in a lifetime shots and I had a car full of camera gear. But also a date with some owls. It'll have to be one of those that got away...

Kanali Catching the Rays || Olympus 400 mm, 1/125 s, f/6.3, ISO 200
Finding my friend in the park wasn't difficult, the first known roost tree is just behind Nymphenburg palace by the canal (I don't think I'm giving any secrets away here), and so there I was before 8 am setting up my tripod in the park, getting out my new mega zoom and trying to find a position through the twigs and branches. The photos make it look easier than it was. Getting the right angle was not straightforward and emphasised the need to be shooting these beautiful birds now rather than in a month's time, when the trees will be shooting bright green new leaves.

Hi-Res Kanali || Olympus 400 mm, 1/125 s, f/6.3, ISO 200
This was one of the first photos I took of the bird who has affectionately been named "Kanali" due to his proximity to the canal (yeah, the Germans can be really imaginative). Remarkably, the bird was sitting still enough for me to engage one of the Olympus camera's super-powers; the high res mode. Using some technical jiggery-pokery, the camera moves the sensor by a few microns in each direction over multiple shots, creating an 80 MP shot using a 20 MP sensor. I never imagined I'd be using this magic on wildlife, but I didn't have anything to lose and am really happy with the way it turned out. If you look at the branches above the owl you can see some artefacts generated by the breeze moving the twigs between the individual shots, but I'm really pleased with how this turned out and could easily imaging this hanging on my wall.

Canada Goose || Olympus 400 mm, 1/160 s, f/6.3, ISO 200

Classical Swan || Olympus 400 mm, 1/160 s, f/13, ISO 200
Of course there aren't only owls in the park. There are more lesser spotted woodpeckers than you can shake a stick at, plenty of tits and nuthatches. An ornithologist friend who was out with us was able to point out the song of some wallcreepers and of course with all the open water there is also an abundance of ducks, geese and swans. On another day I'd have had an eye out for the swans in flight, landing on the water and taking off, but today was all about the owls. I did allow myself to be distracted for a couple of minutes to take this canadian goose resting between the frost-crested mole hills and a classical swan shot. Nothing to write home about, but nice portraits nevertheless. I particularly like the repeating patterns of the molehills with the goose - a nice bit of tessellation with a difference.

Light Through the Palace || Olympus 342 mm, f/11, 1/200 s, ISO 200
After spending an hour or so admiring Kanali we headed north to the Pagoda and the Kleiner See - the little lake. There's another owl roost east of the lake, but be warned that the park rangers don't look kindly on people walking on the grass here.

Tawny Owl || Olympus 400 mm, 1/160 s, f/6.3, ISO 200
Our third owl was in the woods north of the lake, set well back from the path with a poor line of sight. This one is very shy and we had to wait a while for him to show even this much above the lip of his hole.

Shy Owl || Olympus 400 mm, 1/100 s, f/6.3, ISO 200
When shooting birds like this, don't be afraid to fill up your memory cards. Some of the owl shots were taken with manual focus, some with auto focus. Not even the pros get 100% focus lock and so really can be a case of 'spray and pray', sorting out the very best shots afterwards on the PC. You're looking at my pick from 150 photos here, a much lower keeper rate than I'm used to from my landscape and macro photos, but this is a different game and different rules apply.

Back to Kanali || Olympus 400 mm, 1/200 s, f/6.3, ISO 200
You will need a good length lens to get decent shots though. Most of these shots are cropped at least a little bit to focus in on the birds. I was mostly shooting at the long end of the 100-400 mm - that's 200-800 mm in full format terms and I think the tripod was necessary. With more megapixels you could probably get away with a shorter lens, but it would be a compromise.

Leaving the park I was struck by the clumps of snowdrops and crocuses lining the paths and so I dropped back to my trusty 12-100 mm for a few close ups before heading hope for lunch.

Snowdrops || Olympus 54 mm, f/5.6, 1/1000 s, ISO 200

Crocus || Olympus 100 mm, f/8, 1/200 s, ISO 200
Incidentally, if you're interested in getting together to shoot some time, we've now created a Facebook group: Munich Expats Photo Group. If you on Facebook, get in touch, otherwise drop me a line using the contact information on the right here. I'm always looking for partners in crime!

Micro Four Thirds Filter Comparison: Kase Wolverine vs. Lee Seven5

I don't often do gear reviews, but I've recently had reason to change my filter system and I thought I'd compare my old Lee Seven5 filters with the new Kase Wolverine Magnetic filters for my m43 Panasonic Leica 8-18 mm f/2.8-4.

When I made the move from a high-end bridge camera to the micro four thirds system two years ago, I also invested in a filter system so that I could dabble my toes in the waters of long-exposure photography. These filters are essentially light-blockers of various intensities. Because they don't (or at least shouldn't) affect the quality of the light (i.e. the colour), they are referred to as neutral density or ND filters.

At the time I was looking around, the Lee filters were very highly thought of in the field and I quickly snapped up a filter kit designed specifically for cropped sensor cameras such as the m43 system without doing much research. Unfortunately, whilst optically excellent, the Lee Seven5 system is only good down to a focal length of 14 mm when you use the accompanying CPL which attaches to the front of the filter holder. Any wider than this and you can start to see the edges of the filter mount in the corners. Because my widest lens is the Panasonic Leica 8-18 mm, essentially I can't use this filter system with the CPL when using this lens.

Vignetting with the Lee Seven5 CPL


8 mm

10 mm

12 mm

18 mm

Lee Seven5 CPL Vignetting

Although I don't do a huge amount of long-exposure photography, I do some and so this has been an issue for me. Fast forward to 2021 and I've finally got round to doing something about it. A number of the photographers I follow on YouTube had been talking about a new system of filters from a filter manufacturer that I'd not heard of before - Kase. As well as the traditional filters involving a filter holder into which you drop the square sheets of glass, they also provide an innovative system involving circular filters that can be stacked on the front of the lens and which attach simply via magnets. This means a lot less faffing about than the traditional filter contraptions, and if nothing else I'm a huge fan of less faff!

A couple of weeks ago I drifted onto the Kase UK website. As I was browsing, an automatic chat window popped up, asking me if there was anything they could help me with. Because my question was very specific - 'what size filter system do I need to avoid vignetting on the Leica 8-18 mm lens?' I decided to give it a go and was pleasantly surprised to have a very quick reply from someone who clearly knew what they were talking about. A fellow Olympus enthusiast who was familiar with the lenses and issues involved but who couldn't say for sure whether I needed the 82 mm system or I could get away with the 77 mm filters. In the end we decided that I could order both and return the one I didn't need, but I'll save that saga for later.

There are a number of things to bear in mind when considering filters. First and foremost they need to be completely uniform, otherwise you'll get blotches on your photos that will be very difficult to remove in post. A close second requirement is colour fidelity; if the photos come out with a magenta or green colour cast it's a pain. It can be fixed to a certain degree, but it's less than optimal. After this, there are a number of further considerations, but if the filters don't fulfil these requirements then leave well alone. Durability, ease of use, cost, accessories and availability of replacements also need to be born in mind.

Optical Comparison

When the Kase filters arrived we were experiencing milky skies due to dust storms from the Sahara (we live in southern Germany). The morning after the packet arrived I slipped over the road to shoot some test shots against the rising sun. With zero cloud cover this made ideal conditions for testing the filters as there were no clouds to create artefacts - the sky should be a homogenous gradation. All the shots were taken within a few minutes of each other (I hadn't had breakfast yet and so was highly motivated to get through the various series) at a constant aperture of f/4 and ISO 200. The images are a 25% crop of the top left quadrant of the photos. They are from the raw files but are essentially unprocessed apart from lens correction. Although I had the camera, an Olympus OMD E-M1 Mk III, set on auto white balance, this only affects the jpeg images and not the raw files. I exposure-bracketed each time and have chosen the +2 EV images in order to give the lightest possible images to compare the exposures.

With the Lee filters I used the 0.45 and 0.9 ND filters (1.5 and 3 stops respectively), for the Kase filters I used the ND8, ND 64 (3 and 6 stops respectively) as well as the CPL filters - a stack of three filters (this will be important later - see below under Afterthought).

Filter

None

Lee Seven5

Kase Wolverine 77 mm

Kase Wolverine 82 mm

8 mm

*

10 mm

12 mm

18 mm

*top right corner chosen as a mis-aligned filter caused shadow on the corner - this was not a vignetting issue.

Lastly, I tested the 82 mm filter at 8 mm focal length with the tripod high-res mode. A friend had mentioned that he’d seen vignetting with HR that hadn’t been visible in normal mode. Not a biggy, but something to watch out for.

High-res mode with 3x 82 mm filters
The bottom line is that both systems appear to be colour neutral as well as highly homogenous and that the 77 mm Kase Wolverine filters vignette slightly with multiple filters at 8 and 10 mm but the 82 mm filters don’t - unless you’re shooting in the Olympus high res mode.

Afterthought

The reason I stacked three filters for Kase is because that's how I often used the Lee filters; the 1.5- and 3-stop filters are relatively weak and I often found myself stacking them. Having slept on it, I'd probably normally only use two Wolverine filters - the 3-, 6- or 10-stop with the CPL in front. In the meantime the clouds have come in and so I was restricted to lighting up a section of wall in the house to see whether reducing from three to two filters could overcome the last vignetting issues. Again, all photos at f/4, ISO 200 and this time all at 8 mm and top left hand quarter of image.

8 mm, no filters
8 mm, 2x 82 mm filter
8 mm, 2x 82 mm filter, tripod high-res
8 mm, 2x 77 mm filter
8 mm, 2x 77 mm filter, tripod high-res
As you can see, there's hardly any shadow with the 82 mm filters, but a little with the 77 mm's still. The 82 mm filter works fine with the Leica 8-18 mm at the widest end even in high-res mode.


Other Features

As I mentioned above, optical comparison is not the only feature to take into consideration; durability, ease of use, cost, accessories and availability of replacements. Both systems have their pros and cons, though I notice that the Lee Seven5 appears to have been discontinued in favour of their 85 mm square filter system - perhaps they realised that the CPL was essentially unusable for wide angle photography.

System

Lee Seven5

Wolverine Kase Magnetic Pro

Availability

Available, but no longer in production

Available

Filters provided

1.5, 3 and 10 stops, CPL, hard grad

3, 6 and 10 stops, CPL

Durability

Hard resin, resistant to falling damage but not to scratching.

Toughened optical glass, reportedly extremely durable.

Ease Of Use

Easy to use, though attaching the CPL can be a bit fiddly in low light

Extremely easy to use, though details regarding which filter is which written very small

Drawbacks

  • Bulky with the holder and CPL

  • Susceptible to light bleed from the side (unless using the big stopper which has a gasket)

  • Not readily combinable with graduated filters (there is a circular soft grad available, but unless your horizon is slap bang in the middle it’s not much use)

Accessories

  • Cordura filter pouch with strap

  • Cleaning cloths (separate cloth pouch for each filter)

  • Graduated filter

  • Leather filter pouch with sturdy clip

  • Cleaning cloth

  • Wax paper envelopes for filters


Bottom Line

I really like the look and feel of the Kase filters and will definitely be keeping the 82 mm set and pensioning off my Lee system. Anyone in the EU want a 77 mm set of Kase Wolverine filters? Otherwise I'll have to send it back to the UK. Somehow. Wish me luck! 

If you're interested in these filters, look up one of their affiliate photographers to get a 10% discount. In the UK you could go to Ian Worth (though you may need to sign up to his Clubhouse). Here in Germany I got a voucher from Manfred Zobrist. Otherwise, check out the Kase website of your country of choice and look up their affiliate photographers.

The Ordering Saga

Warning: Long, rambling story ahead: I live in Germany. My interaction was mostly with the UK Kase website simply because even after 30 years and despite being fluent in German, conversing in English is still my first language. Plus my initial contact via the website was extremely positive and this continued throughout. The people on the other side were very friendly, very knowledgeable, seemingly available at all hours and just willing to chat. In fact I don't think I've ever come across customer service this good. Believe it or not, Sauter Munich also rate very highly with me due to their help tracking down a camera and lens last year, but the Kase people were first in class.

After the initial contact I managed to get my hands on a 10% discount voucher via Ian Worth's website. Bearing in mind Brexit, I thought I'd be clever and order the filters from Kase Germany. Having sorted out the order, I got to the last step - entering the voucher code - and got bounced. Code not recognised. After asking around a bit we worked out that Ian's voucher was only valid with the UK site. I looked around a bit for a German equivalent, but at the time couldn't find one. So back to the UK site, Again, all the goodies in the basket (there were 6 items in all, the two filter systems plus two adapters each for for a 67 mm and 72 mm lens thread) - all from different parts of the website. Voucher accepted. Great. Shipping information: no shipping to Germany. Nuts! The chat box was active again and I brought up the shipping issue with the Kase colleague at the other end. "No problem sir, we'll have that fixed in an instant" - no sooner said than done and literally within seconds I was able to process the order on a Friday evening.

In the meantime, I'd managed to find a German photographer who was offering Kase discount codes on his website. I sent off a request, but unlike the UK people, he appeared to be off for the weekend already. Anticipating a positive response, I checked back with Kase UK (I did say this was a long, rambling story, didn't I?) to ask whether the order could be delayed for a couple of days whilst I waited for the German voucher. They checked, but unfortunately by this stage the order had been processed and couldn't be held up any longer.

A couple of days later I received an email from the package service asking me to pay the European VAT/MWSt. I'd envisioned having to drive several miles to my nearest customs depot to pay import tax, but contrary to the experience of other ex-pat friends, DPD appears to have all its ducks in a row. After filling out the requisite forms and giving my credit card details (yes, of course I cross-checked the package number from the DPD payment request with the Kase dispatch note), the order was once again on its way and a couple of days later in my hands. 

So now the filters are tested, the 77 mm Pro kit back in its box and waiting to either go back to Kase UK or on to some lucky person this side of the Channel. If you don't have anything wider than about 14 mm (m43 equivalent) and are interested in a set of top quality filters, get in touch, perhaps we can do a deal...