Showing posts with label PC. Show all posts

Friday 5 June 2020

Moonshots - Getting the Shot and Post-Processing

Who doesn't want to take cracking images of the moon, our closest celestial object? We've all seen startlingly bright photos of the craters and then perhaps gone out to try to make our own and come back disappointed with black photos containing a bright, blurry smear in the middle. With a little bit of know-how and a decent-length lens it's not too difficult to get images that will stun our friends. There are two important steps: getting the images in the camera and then processing the pictures on the PC. 

Moonrise over the Allgäu || Olympus f/8, 1/1250 s, ISO 200


Some phases of the moon are definitely more photogenic than others. When the sun hits the moon obliquely, like here at just after half moon, the shadows on the craters are longer and stand out more. At full moon the sun is full-on and the shadows shrink. This was one of those 'oh wow' moments that I knew I had to capitalise on. We were sitting outside at a restaurant in the mountains when one of the kids noticed the moon rising over the hillside. I had to dash to the car to grab my telephoto lens and was able to capture this image before the moon became too high above the hillside.

Getting the Images

All the images in this article were taken using my Panasonic Lumix 100-300 mm lens at the long end on my Olympus E-M1 Mk II, a micro four thirds camera, making this equivalent to a 200-600 mm lens in 35 mm terms. Without image stabilisation we need to watch out for the shutter speed / focal length rule (maximum shutter speed = 1/ focal length; for a 500 mm lens, for example, the max shutter speed should be 1/500 s). 

The next challenge is getting the exposure right. Most cameras are set to evaluate the exposure over the whole image, combine this with some intelligent guess-work and provide you with what your camera thinks is a suitably exposed image. So for an image of the moon your camera sees a bright spot - even at 600 mm FF equivalent we're talking about an area that probably takes up less than 5% of the image - against a dark background and will try to provide you with an images that balances the light and dark.

Exposure

So we have to trick the camera or even go to manual. If you know how to adjust your exposure with exposure value (EV) adjustment - experience tells me that setting your camera to -3 EV should give you a decently lit image. Alternatively, you can go manual. The night images were taken at 1/640 s at f/5.6 and ISO 200 on my Olympus. You could try starting from there and adjusting the exposure as needed.

Even though you can hand-hold these shots, there is one significant advantage to sticking your camera on a tripod; aligning your images in post will be much easier.

Focus

Sticking your camera on a tripod also makes focusing your shot easier, and I really would recommend slipping into manual focus for this to be on the safe side. If your camera allows you to magnify around the focus point then use this, in fact use every trick you can to get the image as sharp as you possibly can. Don't leave anything to chance. What you'll notice is that the moon won't stay still on your camera display. Don't worry, your camera isn't slipping on the tripod mount (well, it might be, but not necessarily). What you're seeing is the moon moving in relation to the earth.

Multiple Exposures

Why images and why align them? Because a single image isn't going to give you much of an picture. In fact, you're going to want to grab at least about 50 images. This will give you enough to generate a mean image in post (colloquially and mathematically) reducing noise and sharpening the image. The atmosphere is full of convection currents, particularly in the summer, which will muddy your image.

Processing the Images

Ok, so the fun part is over, now the work begins. First we need to do a little bit of basic editing in your post-processing software of choice. I make no apologies for using a slightly obscure programme for mine; ON1 Photo Raw 2020 instead of Lightroom or Photoshop for the same reason I make no apologies for shooting with an Olympus rather than Canon, Nikon or Sony. They're informed decisions that I made and stand by - I've never been afraid of going down the road less travelled.

Initial Processing

Import your RAW images into your processor of choice and select the images from your series. Most image processing programmes allow you to apply the settings you apply to one photo to a series of photos, so you can hopefully just edit one and cascade to the other images. Crop your image to the final size you want for the image, allowing room around the edges for a final crop. You may want to increase the basic exposure and clarity, but don't over-do it and leave the noise reduction for now, we'll get back to that later.  Apply the crop and adjustments across the whole series and export them all to tiff or jpeg files in a dedicated folder for stacking.

Image Stacking

You will probably have noticed that your photos are a little muddy, a little unclear. That's perfectly allowable; your subject is at least 384,000 km away and you're shooting through 480+ km of air. That air is seldom clean and often full of convection currents, making matters worse. Stacking your images will give you a mathematical mean image, reducing image noise and sharpening the details.

The software I use is a free programme called RegiStax 6 and can be downloaded from the website here. The programme will first align the various images - like I said, the moon will be in a slightly different place each time due to the relative motion of the earth and its satellite. Before the images can be averaged, they need to be lined up. After that, you can select what percentage of the base images you want to use for the averaging before stacking.

Rather than list the specific steps I used and palm them off as my own, I'll point you to the Sarah and Colins Astro YouTube video that I followed verbatim. After aligning the images, there will still not be much difference from the original until you adjust what the programme calls 'wavelets'. Then the magic happens and the crisp image begins to reveal itself. 

I had problems using tiffs; firstly the tiffs I generated from ON1 weren't recognised by RegiStax. The tiffs from Olympus Workspace were recognised, but the resulting image had a lot of digital noise. My best results were from Olympus RAW files exported to jpeg in ON1 Photo Raw. The output from RegiStax can be saved in any of the usual formats, though if you've used jpeg as the starting point for stacking, you possibly won't gain anything by saving the output in any of the information richer formats.

Final Processing

Now it's time for the last polish. Re-open the image in your image processing software. It's likely to have quite a bit of noise in the smoother parts of the image and it's now time to deal with that and any other adjustments you might care to make.

In ON1 I dealt with noise using Luminance 2020 Noise reduction, setting Luminance to 30 and Detail to 5. Your mileage will of course differ. I loose a little bit of detail like this, but it's a sacrifice I'm prepared to make to get rid of the unsightly noise.

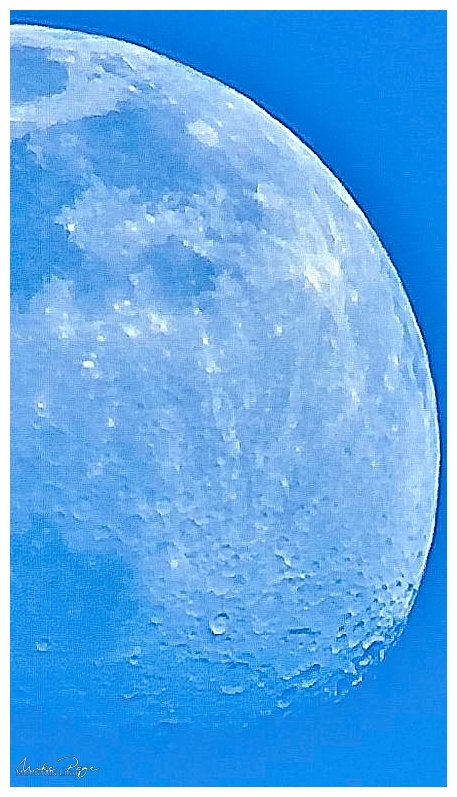
Watch the craters at the bottom of the moon as well as the noise in the Sea of Tranquillity (the darker patch towards the top).


Starting Image


After Stacking


After Noise Reduction


Layers

As a last step, you may want to assemble the final image(s) in layers. This will let you plant your final moonshot back in its environment as with my Moonrise over the Allgäu shot at the beginning of this article. I used this process to slightly magnify the moon in this scene to emphasise it. 

What Next?

If you found this tutorial useful, link to your final image(s) below, it would be great to see them. 

If you're still looking for a challenge? Go and take a look at Alyn Wallace's YouTube tutorial on taking gorgeous HDR images of the half moon.

I'll close with two more before and after pics taken later that evening from home to emphasise how much detail can be wrung out of these images. I had to add a gaussian blur to the background on the stacked image due to an ugly moire pattern, but that's trivial.


Later the Same Night: Before || Olympus f/5.6, 1/320 s, ISO 200

Later the Same Night: After || Olympus f/5.6, 1/320 s, ISO 200

Friday 7 February 2020

Picture Editing - Philosophy and Workflow

There are some people who suggest that anyone who uses Photoshop (or equivalent) to process their photos is cheating in some way. What you can't forget though is that the jpeg straight out of the camera has already been processed - by the camera. If you compare a RAW photo OOC with the corresponding jpeg (if you shoot this way), the former will look drab, maybe a bit skewed and with colours which don't really match the original. This is because every camera has a built-in RAW processor which interprets the RAW based on pre-ordained settings, pre-ordained either by the camera on its own or by certain criteria that you have determined.

Spotlight on the Cinque Torri - Final Photo
Saying then that any post-processing is cheating is akin to saying that anyone who bakes a cake from scratch rather than using a pre-assembled baking mix is cheating. Actually, all that you're doing is giving away some of the creative control in the process to the camera. I suspect (correct me if I'm wrong) that a lot of people who are strongly anti-processing are simply baffled by the process and think that it's unfair that others can do it.

The original RAW image converted to jpeg
"The aim of post-processing is to convey to the viewer the impression the photographer had when they viewed the scene."

But how much is too much? Most of the photographers that I follow essentially use the same principle when it comes to post-processing. Their aim with a photo is to convey to the viewer the impression they had when they viewed the scene. I like this principle, it gives both leeway and limits. It allows correction and enhancement but veers away from embelishment.

There is a certain legitimacy to this approach; as good as modern cameras are, they still don't have the dynamic range of the human eye; the eye is still able to perceive a greater difference between the brightest part of a scene and the darkest significantly beyond the ability of any present camera.

Of course at the end of the day this can only ever be a philosophical question, a question of style or preference or choice, one of artistic licence, but it's never a moral issue as some would seem to suggest. If you enter a photo into a competition which includes in its conditions that no composite images are permitted but submit just such a photo, then the moral issue is not how much digital manipulation has occurred, but whether or not you misrepresented your photograph, stating that it complied with the rules when it did not.

So, philosophical questions aside, how do I go about processing my images? Over the last few years I've developed (see what I did there?) a system. It was originally based on a very helpful eBook by Ken DuFault called "The Ultimate Guide to Fundamental Editing", which does an excellent job of explaining the basic steps involved in processing an image as a whole (in comparison to local adjustments). Although based on Photoshop and Lightroom, the principles of cropping, white balance, white and black points, contrast and saturation are universal to all common processing software.

When I upgraded from the Lumix FZ1000 to an Olympus mirrorless SLR in early 2019, of course the first thing I had to update was the photo editing software I was using at the time since the RAW converter - the filter that is able to interpret the Raw data from your camera into a usable image - was no longer current. Each camera or camera system essentially has its own format. In light of the Ken DuFault's book I looked long and hard at Lightroom, but like many was put off by the fact that it is no longer (easily) possible to buy a copy of the software but are forced into a monthly subscription to be able to use it.

Opening the image on ON1 Photo Raw 2020

Looking around at alternatives, my attention was caught by the relatively new ON1 Photo Raw, once a Photoshop plug-in and now a standalone product. Rather than go into the various pros and cons of the software, it'll be simpler to just walk you through my present practice step by step.

The first I do when I get back from a photo excursion is to download the images to the camera and sort through them. I look through them all in the ON1 browser and use the rating system to mark which images I'm going to actually edit. For me this tends to be about a 75% cull out of the box. ON1 (like Lightroom) allows you to generate so-called 'presets' - a set of standard modifications that you find yourself making to every image you process. To generate one of these you need to have edited a few photos first in order to see for yourself which steps you are regularly employing.

Still in the browser module I apply my standard preset(s) to all of the selected images - I say presets because I have a different one for each of my three lenses, each including a separate lens correction to the image. 

Presets are en vogue at the moment, with lots of photographers selling their own - mostly for Lightroom - in order to allow others to reproduce their particular editing style on their own photos. These presets can go for serious money. The whole process is anethema to me. Yes, the learning curves in these photo editing programmes can be very steep, but at the end of the day, I want my photo to be recognised as a Mike Page original, and not confused with someone elses style. I could only ever envisage buying someone else's preset in order to work out how they achieve a particular effect, not to 'mask' my own photos.

Coming back to the photo, it's a question of applying a series of adjustments in order to render the RAW image into a closer approximation of that which I saw on the day, to convey the impression I had of a scene to a third person. Before I start working, it's important for me to have an end-point in mind. How do I want the image to look? If I don't have a clear idea where I'm going, there's a very real danger that I just keep correcting and tinkering until I wreck it. A light touch is important, and ON1 makes it easy to 'paint in' adjustments with a relatively soft touch.

A lot of my present workflow I attribute to the wonderful Robin Whalley of Lenscraft Photography, who not only put out a great Essential Filters tutorial on how to use Tone Enhance and Colo(u)r Enhance to really subtly strengthen an image, he gave me some valuable feedback on the following photo, some of which I'll use to illustrate the steps below (although the global edits are a legacy from my previous work flow). The difference between the images at each step can be rather subtle, and that's intended, but comparing the end points reveals the overall effect. 

Cropping

One of the first steps I perform with any image is a crop to try to communicate the aspect of the image that caught my attention. Here I'm not too interested in the immediate foreground or the upper sky. The attention should be on the tower of rock in the sun in the context of the moody mountains in the background. I could have cropped in even tighter, but I liked the overbearing feel of the Tofana in the background and I wanted to use the clouds to convey our impression of the weather on that day, going from bright sunshine (top left and tower) through to the dramatic cloudburst top right. My standard crops tend to be 5:4 or, like here, 16:9. Occasionally I'll use a square crop if I think it helps the image.

The Cropped Image


Global Edit (Develop Tab)

Global edits include adjustments to overall Exposure, which I try not to change too much, Highlights and Shadows, which let me bring more visible details into the brightest and darkest parts of the image, White Balance, Saturation and Vibrance. My current workflow doesn't change these settings too much.

Something which I do always apply is the lens correction tool. This automatically corrects any lens-created distortion, chromatic aberration or possible darkening of the image towards the corners. The reason that I have three basic presets is that I have three lenses. In the browser module I'll allocate a specific colour tag to the images according to which lens was used and then use the tag colour as a filter to select which images each preset is allocated to.

Global edit complete

Effects (Effects Tab)

There are five effects that I have pre-loaded in my preset. Two are always on, namely Vignette (big softy, set to about 50% opacity) and Curves (unmodified but ready to be applied) and three are present but deactivated; Dynamic Contrast, Tone Enhancer and Colo(u)r Enhancer.

One of the great things about ON1 is that you can choose which elements of a given image the effects filter is applied to and by how much. By default, the filter is applied to the whole image, but you can elect to 'paint' the filter in (or out) using the brush tool, apply one of a number of gradients or apply it to particular aspects of the image (the brightest parts, for example, or to a particular hue).

Dynamic Contrast is great for adding detail to particular parts of an image, such as rock faces or places that I want to enhance the texture of. Here I used it judiciously on the Cinque Torri and the Tofana, but avoided applying it to the clouds or foreground.

Dynamic Contrast to add detail to the rock faces

The Tone Enhancer lets me control what happens to the light at various intensities or luminosities and I often use it to tone down the highlights or lighten up the shadows.

Using the Tone Enhancer to add some detail to the forest

The Colo(u)r Enhancer lets me control how individual colours appear in a scene. I can elect to make my greens duller, for example, or push them further towards yellow.

Lastly, I sometimes employ a Glow filter or a Sunshine filter to enhance the quality of the light in the image.

One of the most tricky aspects of this picture was getting the dark forest light enough and with sufficient detail that it wasn't a black splodge without taking away from the drama of the image. In the end I acchieved this with a Tone Enhance filter.

Lastly, I applied a Colo(u)r Enhancer to the foreground to warm the image up a little without affecting the sky too much (thanks Robin!).

With some warmth added

Local Edits (Local Tab)

I tend to use local edits to subtly brighten or darken smaller parts of the image that need it. Other aspects that can be applied here include changing the colour intensity or enhancing details. Care needs to be taken on how they're applied, otherwise they can result in unsightly edges or borders in the image.

Here I used a drop down darken filter to put a bit more shade on the Tofana in the background.

And that's about it. The signature is added as I save the final image to jpeg format (the Export function in ON1), leaving the original Raw file unchanged. All the steps I applied to the image are stored as a set of instructions in a separate linked file, ready for me to return to at any time.

What are your thoughts and experiences on photo editing?