Showing posts with label Stacking. Show all posts

Sunday 30 August 2020

Osttirol Revisited - Part II

The dream is relatively straightforward and specific; buy up an old farmhouse with a barn but not too much land somewhere close to Lienz. The farmhouse has a large country-style kitchen with a massive table. The barn will be converted into holiday accommodation; downstairs the guest rooms and upstairs a massive open-air space that will serve as kitchen, dining room, living room, seminar room and anything else you'd chose to use it for. The barn will be available to rent for small groups of up to 10 people, mostly self-catering but with the option of breakfast in the farmhouse if needs be. It'll open for pretty much any type of group accommodation, but the focus will be on photo safaris and workshops in the surrounding mountains. Both the main chain of the Alps and Cortina - the heart of the Dolomites - will be within easy driving distance for day tours. When the kids visit, there will be plenty of room for them and when we get too infirm to run the photo safaris, we'll still have the additional income of the holiday let to fall back on. Like I say, straightforward and strangely specific.

Covered Bridge, Matrei || Olympus 25 mm, f/8, 1/40 s, ISO 200

In the meantime, I've got a few years to work on my photography and instructor skills. I'm not yet where I want to be, but I'm happy with the trajectory so far as I look back over the last two years. We'll keep you posted.

But back to our most recent foray to Osttirol.

Matrei and Kals

To change things up a bit, instead of hiking we decided to rent some trekking bikes and cycle up the valley along the Isel, a tour that I would recommend to anyone, especially the way round we did it; Lienz-Matrei-Lienz. The tour gains around 300 m in altitude over about 30 km - 300 m that are much more acceptable downward than up after lunch! 

The cycle ride up to Matrei was good fun if a little challenging in places. The bikes we'd rented from Probike Lienz (for a very reasonable price) admirably did the job of getting us up the valley and the views on the trail, which changes from one side of the river to the other, are varied. We found Matrei asleep at lunchtime, the streets practically deserted. Part Corona, part mid-day slump on a hot day. Quizzing the waiter in the pizzeria, even without Corona the village is quiet on sunny summer days as the tourists are all up in the mountains at midday.

Old Matrei || Olympus 24 mm, f/8, 1/40 s, ISO 200

After visiting the National Park Centre (really a must if you're in town), it was out into the streets. There are a couple of really quaint corners of old Matrei near the Park Centre, including the neighbouring Pfarre Matrei church, a couple of old wooden houses and the lovely covered bridge over the Bretterwandbach stream that bisects the village. 

Parish Church, Matrei || Olympus 13 mm, f/8, 1/200 s, ISO 200

One of my favourite scenes of the day was a little church on the hillside above the Isel in the tiny village of Gereiter.

St. Niklas, Matrei || Olympus 100 mm, f/8, 1/100 s, ISO 200

We stopped off on the way back to go up the Hochstein chairlifts and take in the view down the Drau valley. Of course, if you're up here already, you may as well come down on the Osttirodler, probably the coolest summer Rodelbahn out there.

The next day saw us up in Kals, a picturesque village at the foot of the Großglockner, July is still a little bit ahead of the main summer season and so only the cable car open was the one up to the Adlerlounge and so we headed up to the Rotenkogel before hitting the thoroughly recommendable Kals Matreier Törl Hütte. If you're ever up there, just don't forget to ask for Gina 😉. 

Towards the Großglockner || Olympus 12 mm, f/16, 1/125 s, ISO 200

Kals Matreier Törl Hütte || Olympus 34 mm, f/8, 1/160 s, ISO 200

On the way back we stopped off at the spectacular Staniska waterfall - always worth a visit either on the way to or from Kals from Lienz and really low hanging fruit - you have to walk 10 m from the car park to set up your camera! Generally I prefer shooting waterfalls in more subdued light because of the high contrast situation you'll often find, but the full-on afternoon sunshine here didn't detract too much. I used a variable ND filter here to reduce the light level so that I could shoot at 1/10 s to blur the water.

Staniska Waterfall || Olympus 14 mm, f/22, 1/10 s, ISO 64

Lienzer Dolomites

If you've seen any photos of the Lienzer Dolomites, you'll have probably seen shots of the beautiful Dolomitenhütte. This delightful hut lies at the starting point of many tours in the Lienzer Dolomites. You can drive up from the valley to 1,600, saving yourself a 1,000 m slog up a fairly boring track. From the Kreithof it's a toll road. Unless... We were camping at the Tristacher See and wanted to drive up for dinner at the hut accompanied by shooting the sunset. We drove up to the toll booth and found the barrier up and the hut unoccupied. Asking at the Hütte the road is open from 17.00 onward and you can drive up to the hut without paying the € 8.50 fee.

In the Stube, Dolomitenhütte || Olympus 44 mm, f/4, 1/3 s, ISO 200

Unfortunately the terrace was full, but inside the hut is very appealing too and so we settled down to dinner, waiting for the sun to set. We were not disappointed! The light was challenging - classical sunset problems of bright skies and dark foregrounds. I started writing how I overcome this problem in this post but decided that it was probably better in a post of its own. I'll post it later and link here.

Dolomitenhütte at Sunset I || Olympus 50 mm, f/5.6, 1/50 s, ISO 200

Dolomitenhütte at Sunset II || Olympus 23 mm, f/5.6, 1/125 s, ISO 200

The next day Sharon drove me up to the Kreithof and then went off with the kids to do another Klettersteig that was outside of my comfortable power to weight ratio, leaving me to meander down to Lavant on my own and take time over the photos. It was another case of everything going different than planned: I'd understood that there was a small gorge on the descent to the valley and a massive waterfall just beyond the village at the bottom. The gorge proved to be pretty much unshootable and I couldn't get to the waterfall because there was too much shooting! The Austrian army was using their firing range  at the bottom of the Frauenbach waterfall, preventing access. 

Emerald Beetle || Olympus 100 mm, f/8, 1/60 s, ISO 200

Harebells || Olympus 66 mm, f/4.5, 1/400 s, ISO 200

None of this stopped me from getting some lovely woodland images on the walk down and some decent shots of the St. Ulrich church above the village. There's a 'Stations of the Cross' path leading up to St. Ulrich and I followed this down into the old part of Lavant. The path comes out an old farm that looked like just the sort of place that I'd envisioned. After establishing that the Frauenbach waterfall was off the ticket for the day I went into a local restaurant to sate my thirst. The village lies at the northern foot of some pretty steep mountains. Speaking to the locals at the restaurant I discovered that the village doesn't see sun for two months a year - it simply doesn't get high enough behind the Lienzer Dolomites to shine. That's Lavant crossed off the list then!

St. Ulrich, Lavant || Olympus 29 mm, f/4, 1/500 s, ISO 200

The Wicked Woman

On our last day, the kids decided that they weren't getting enough exercise and went off mountainbiking on their own, leaving Sharon and I to drive up to the Hochsteinhütte above Lienz and from there to hike up the wonderfully named "Böses Weibele" - I think literally the Evil Wench. One of the many attractive things about Osttirol is the sheer variability of the mountains, from the high Alps of the Groß Venediger and Großglockner to the impressive crags of the Lienzer Dolomites and the more gentle slopes of the Vilgratener Mountains to the west. 

Down the Drau Valley || Olympus 13 mm, f/8, 1/250 s, ISO 200

The Böses Weibele was a fitting final tour - an Ausklang or finale. Only 500 m up from the 2,000 m high car park. The trail leads along a gently climbing long ridge up to the Weibele with amazing views both of the Drau and Isel valleys. As we were approaching the summit, Sharon spotted a bird hovering above the slopes not far from us - a kestrel. He/she didn't appear to be in any hurry, giving me time to swap out lenses for my longer-reaching Panasonic f/4-5.6 100-300 mm lens. She disappeared for a moment, swooping down on some prey, drifted down away towards Assling before returning to her starting point, letting me snap away in continuous shooting mode. Don't ask me how many shots I rattled off! This was about the best I could make of it. A shot I'm happy with, especially as the bird is nicely lit against a relatively dark background rather than being a black silhouette against a bright sky, but it's still not absolutely sharp. Probably my favourite shot of our time in Osttirol though as I've been looking at getting an image like this of a kestrel for a while.

Kestrel on the Böses Weibele || Olympus 300 mm, f/6.3, 1/2000 s, ISO 500

Sunday 28 June 2020

In Seach of the Milky Way - From Dusk 'Til Dawn in the Allgäu

At the end of May I scouted a possible location for an astro shoot in the Allgäu mountains come next new moon. A good milky way photos lives and dies by the foreground and I wanted somewhere with a good view over the alps. The middle of June arrived and the forecast for Friday and Saturday was awful; clouds, rain, the lot. Nothing doing. The next weather window was going to be Tuesday night. To make matters worse, the initiator of the whole idea - my friend Matthias - couldn't make it as he was stuck up at work in northern Bavaria. But an old school friend who happens to live in Munich was interested enough to bite when I announced my intentions on Facebook and so Martin and I ended up heading down to Fischen im Allgäu early Tuesday evening to see what we could see. Meteorologically we were on a rising tide - there were still some clouds around but the weather was definitely clearing from the north and so we were optimistic.

The Shoot


Waiting For The Moon To Set || Huawei P30 Pro


Dusk

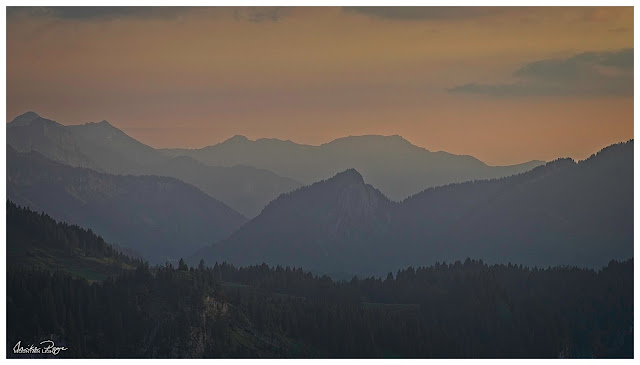
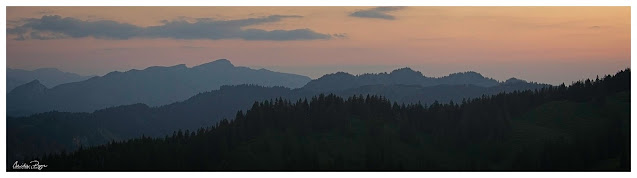
Driving down there were still cloud remnants lurking in all the wrong places, but the northerly wind was driving them deeper into the alps and so we weren't too concerned. We set off from the car-park in the early evening light. Normally, like most people, I spend most of my time in the mountains during the day. Unless I'm staying in one of the mountain huts, I'm generally back down in the valley for dinner. This evening's experience may get me to revisit that schedule. There's a good reason why landscape photographers choose to shoot at the ends of the day; the light quality is very different. It's softer, gentler and less blue. Watching the pastel colours changing on the Vorarlberg mountains in the gathering dusk made me start rethinking how I plan my days in the Alps.

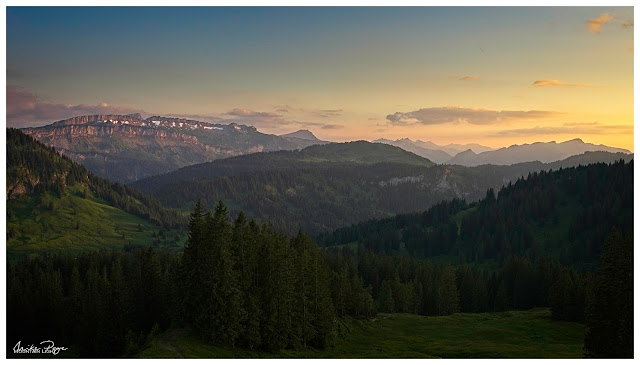
As the Sun Goes Down || Olympus f/7.1, 1/80 s, ISO 200

It was great to see that not all of the snow had disappeared in the intervening weeks; I find the last snowfields really make a photo like this and I don't shy back from exaggerating them in post-processing like  here (above).

The Pastel Colours of Evening || Olympus f/7.1, 1/160 s, ISO 200

All the Layers || Olympus f/7.1, 1/30 s, ISO 200
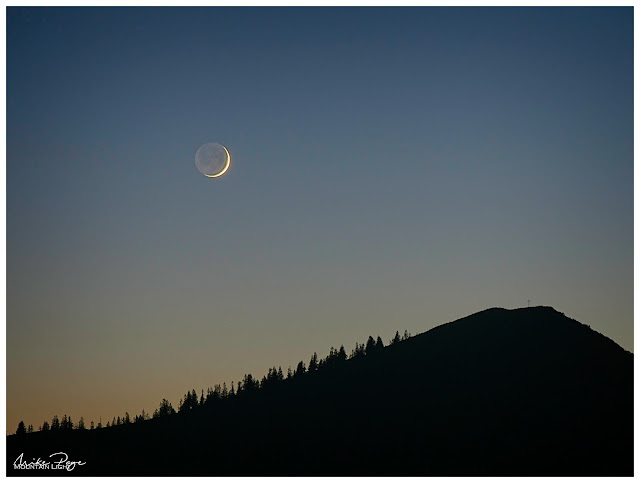
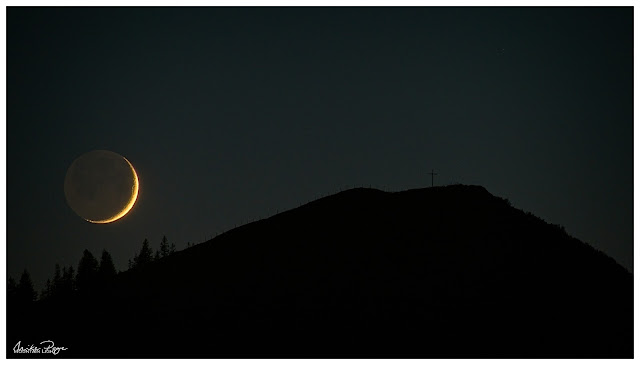
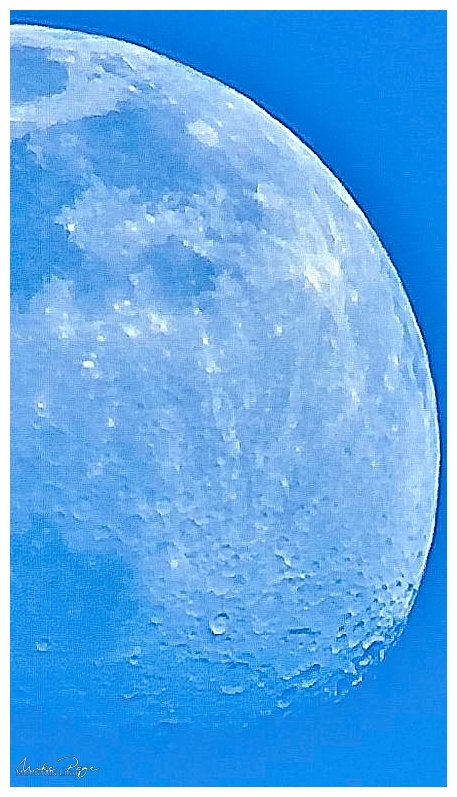

Moonset

I'd promised my school chum a relatively easy hike up to the first mountain top that I'd identified. Unfortunately we didn't make it all the way and ended up about 100 m below the summit on a slight shoulder. The location was optimal for the first spectacle of the evening - the fresh new moon was due to set behind the peak above us and our location appeared to be optimal for that. My smartphone app (Sky View) was showing me where the moon should be in the sky, but for the life of me I couldn't find it. I was beginning to fret that either (a) the app was playing up, or (b) there wasn't going to be enough moon to see. As the sky darkened and I still couldn't see it Martin spotted it - why we hadn't seen it before was a complete mystery as it was so clear at this point.

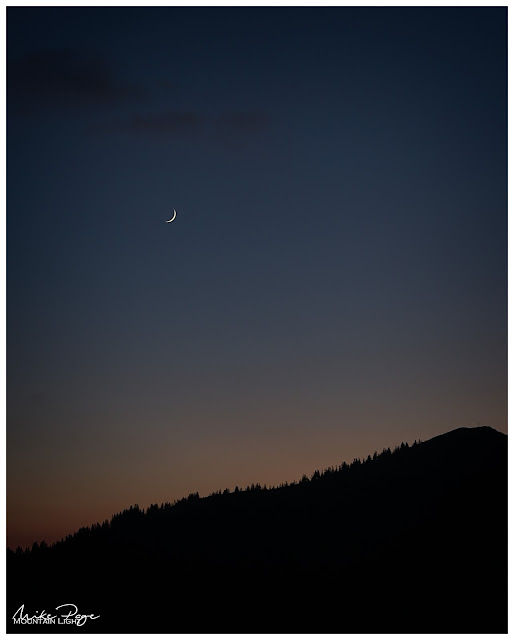
Well It's Obvious Now! || Olympus f/8, 1/5 s, ISO 200


Setting Moon || Olympus 100 mm f/5.6, 0.6 s, ISO 400

Before we turned our attention to the stars that were beginning to appear in twos and threes there was one more dusk photo to grab before the technical stuff began:

When Purple Comes Out To Play || Olympus f/5.6, 40 s, ISO 200

As fun as it was to shoot the setting moon, it cost me my first milky way shots as I wasn't set up to get a good foreground photo during the blue hour that I could use to blend into the final image in post. The shot I ended up getting was ok, probably one of my better photos of the Milky Way per se, but the foreground is lacklustre. I don't know whether it would have been any better 100 m higher up either, but the lesson is that you need to be in position early, you need to get your foreground shots in in good time and you can only recon on about two good astro shots per night, one after the sun goes down and one before it rises, unless you're shooting with multiple cameras.

Collision Imminent || Olympus 300 mm f/5.6, 0.6 s, ISO 1600, Composite Image
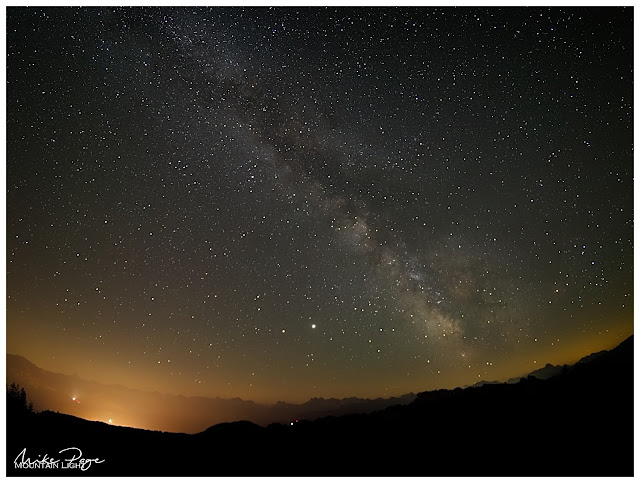
Milky Way

The challenge with astrophography is the low light levels. You need an open aperture and relatively high ISO with a wide angle lens to get enough light to the sensor before the earth's rotation turns the star points into lines - the so-called star trails. As a rule of thumb, the maximum exposure time before this happens is 500/focal length* (400 if you're being conservative). So for my 16 mm equivalent wide angle lens, I can shoot for 25 s. In order to further increase light-sensitivity, we need to increase the ISO. Small sensor cameras (I shoot with an Olympus micro four-thirds crop sensor, technically a small sensor camera) are notorious for being sensitive to high ISO, the images tend to have a lot of unsightly noise - a random phenomenon that causes an unsightly buzz in the image. But being random, there's a solution: If you take multiple shots and then take the average of those shots, the noise is diminished. The challenge is that the software performing the calculations needs to take into account the fact that the stars are moving - if it didn't you'd end up with the trails again. All in all quite a technical feat, especially when there's a foreground involved. Fortunately the free Windows software Sequator can do all of this - it's what it was written for. It's not the most user-friendly app, but if you know what you're doing (or in my case if you know someone who knows what they're doing), it's extremely powerful. The trick seems to be not using too many of the features, but more of that below.
*25 mm equivalent, so with my micro four-thirds sensor I need to double my focal length

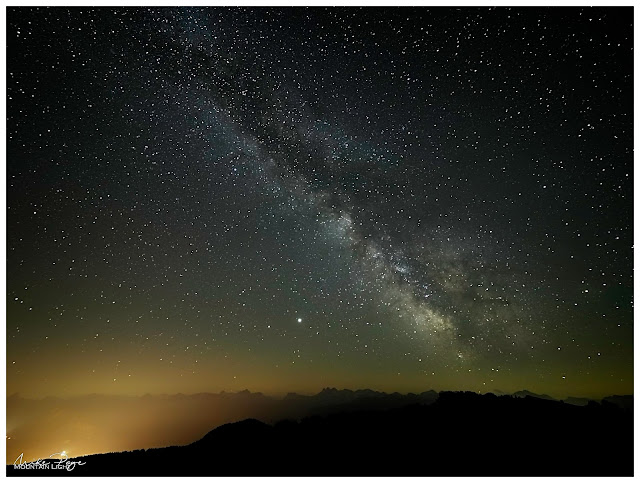
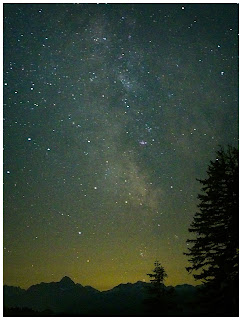
First Starlight - Stacked but Unprocessed || Olympus 8 mm, f/2.8, 25 s, ISO 6400, Stacked

We could just about make out the trail of the Milky Way in the Allgäu sky. From our vantage point I tried several series of shots, with and without my Haida Clear Light filter and Tiffen Fog filter and with the new 7Artisans 7.5 mm fish-eye. In the end I liked the unfiltered images through the Panasonic Leica 8-18 mm the best. The above image is stacked to reduce noise but otherwise unprocessed. The sheer clarity of the image just blows me away. The detail in the Milky Way is amazing. But I don't think this is a good Milky Way photo. It's a good photo of the Milky Way, but like I said earlier, a good Milky Way photo stands or falls by the foreground and I wasn't satisfied with what I was getting here, so after a cup of tea  and a pasty (thanks Martin, those were life-savers) I lay down for a 45 min shut-eye before heading up to the ridge, where I knew just the spot.

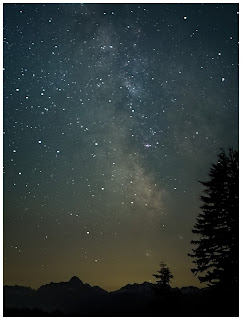
With Haido Clear Sky Filter, Unprocessed

7Artisans 7.5 mm Fish-eye Lens, Unprocessed

One of the greatest challenges with astro photography is finding infinity on the focus dial. Looking through the viewfinder you're confronted with an almost completely black image - finding something to focus on can be extremely difficult. If there's a bright light a couple of miles off this works relatively well, as at this distance there's effectively no focal change between 2 miles and infinity. It was quite a challenge in the dark though, and I had to hunt through the magnified viewfinder on the Olympus to locate Jupiter (bright spot in the middle of the images above) and twiddle the focus ring of the lens to render the tiny fuzzy light as tight and small as possible. Then it's shoot and hope. You can examine the images on the camera display, but you're never entirely sure whether your photo is sharp or not until you get the image on the computer screen.

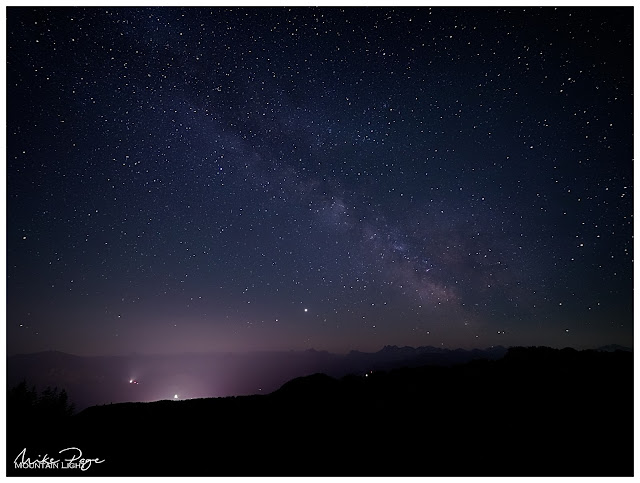
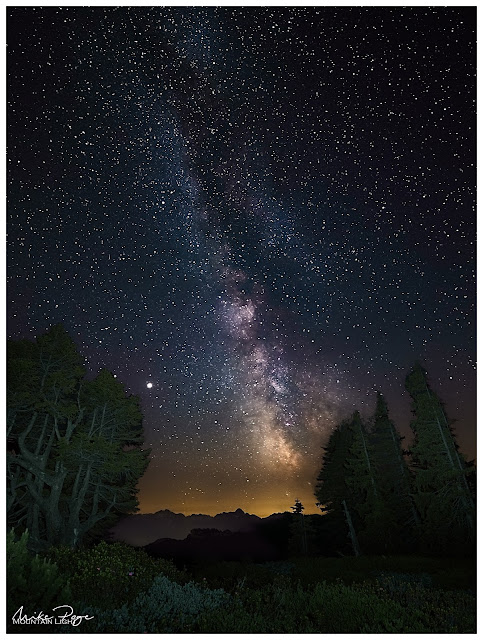
Despite being pitch dark, it was easy enough to find my way by the light of my head-torch, having scouted the area less than a month before. I located the second spot relatively easily and set up the tripod again. A few ultra-high-ISO shots helped me frame the photo correctly. I also tried some low ISO long exposures with a bit of light painting so that I would have a foreground to go with it. This is a separate image that is blended with the processed astro image in post processing (see last image). This final photo here has to be my favourite image of the year so far. I didn't get a huge number of finished shots that I was happy with, but at the end of the day, if you come away with at least one, that's a win.

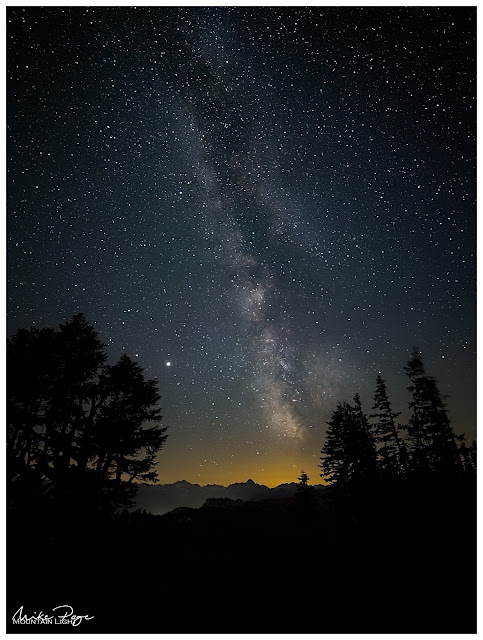
Milky Way Over The Allgäu || Olympus 8 mm, f/2.8, 25 s ISO 6400, Stacked

I carried on shooting for a while after this into the blue light of pre-dawn before giving up and catching a few more minutes sleep lent against my rucksack. It was a mild night with little wind and the ground was comfortable and dry beneath me, not a sound to be heard.

Birdsong and a yipping fox in the valley below alerted me to the coming dawn. By the light of the red band of cloud to the east I could just make out a small peat pond nearby that I'd just avoided in the dark. In retrospect I should have taken a lower vantage point for this shot. This is two images blended in ON1 Photo Raw, one for the sky, one for the foreground. I took the liberty of brightening the tufts of cotton grass to emphasise them in the pre-dawn light.

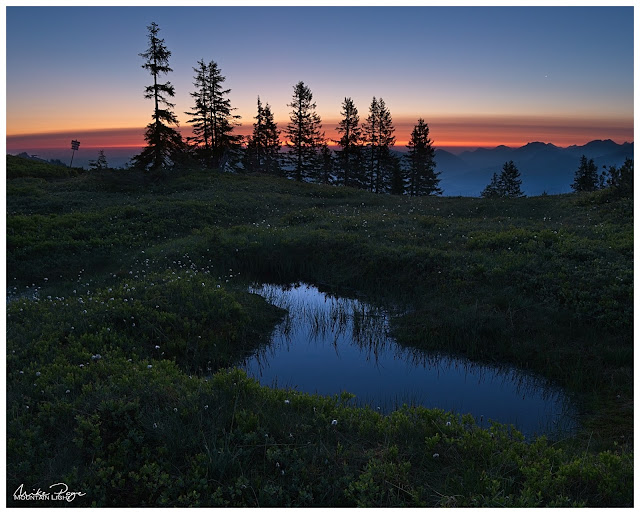
Mountain Tarn at Dawn || Olympus f/5.6, 1/6 s, ISO 200

Then it was down to find Martin and head down to the car. I found him warming himself over his camping stove and ready to return to the valley. As I waited for him to pack his things there was time for one last shot of the sun rising on the mountain escarpment opposite us. 

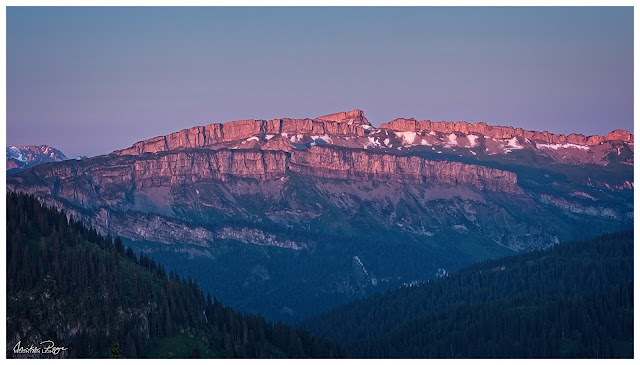
The Red Light Of Dawn || Olympus f/5.6, 1/30 s, ISO 200

Processing the Images

If you're not interested in the nitty-gritty of processing astro photography you can probably stop reading here and scan to the last images. It's very easy to over-process Milky Way photos: I spent two evenings working on this last shot only to have Sharon (correctly) tell me that it was too speckled and she didn't like the foreground. I've left this technical bit to the end for my techie friends who'll be interested in this stuff (hi Matthias!). 

Before the images can be 'stacked' (averaged), they need to be in tiff format. ON1 Photo Raw, my post-processing software can export tiffs, but they're the wrong format for my stacking software, Sequator. The images have to be opened in Olympus Workspace and exported as tiffs from there. For each image I used 10 star images and two control images with the lens cap on (lights and darks respectively).

Crop of main image


Unprocessed image OOCStacked in Sequator
10 Star images, 2 Noise images (with lens cap on), Align stars, Freeze ground, Sky region: Partial, otherwise all default settings
Processed in ON1 Photo Raw 2020
Develop:
Contrast +24, Highlights +18, Midtones +15, Shadows -20, Whites +45, Temperature +40, Tint -3
Effects:
Sharpening, Noise Reduction (Moderate), Tone Enhancer (Shadows Lighter on foreground; Midtone Contrast Boost, 50%), LUTs (1983, 35%), Sunshine (Sunglow, 50%), Curves (mild S-curve), Dynamic contrast on Milky Way


I also tried a blend of my favourite image with the light-painted foreground in ON1 Photo Raw. It's not perfect as I seem to have adjusted the camera between frames and had to stretch the resulting images to fit. I'd be interested to hear which image you prefer, this one with more detail in the foreground trees, or the original "Milky Way Over The Allgäu" above. My jury is still out on this one.

Milky Way Over The Allgäu II || Olympus 8 mm, f/2.8, 25 s ISO 6400, Stacked and Blended


Friday 5 June 2020

Moonshots - Getting the Shot and Post-Processing

Who doesn't want to take cracking images of the moon, our closest celestial object? We've all seen startlingly bright photos of the craters and then perhaps gone out to try to make our own and come back disappointed with black photos containing a bright, blurry smear in the middle. With a little bit of know-how and a decent-length lens it's not too difficult to get images that will stun our friends. There are two important steps: getting the images in the camera and then processing the pictures on the PC. 

Moonrise over the Allgäu || Olympus f/8, 1/1250 s, ISO 200


Some phases of the moon are definitely more photogenic than others. When the sun hits the moon obliquely, like here at just after half moon, the shadows on the craters are longer and stand out more. At full moon the sun is full-on and the shadows shrink. This was one of those 'oh wow' moments that I knew I had to capitalise on. We were sitting outside at a restaurant in the mountains when one of the kids noticed the moon rising over the hillside. I had to dash to the car to grab my telephoto lens and was able to capture this image before the moon became too high above the hillside.

Getting the Images

All the images in this article were taken using my Panasonic Lumix 100-300 mm lens at the long end on my Olympus E-M1 Mk II, a micro four thirds camera, making this equivalent to a 200-600 mm lens in 35 mm terms. Without image stabilisation we need to watch out for the shutter speed / focal length rule (maximum shutter speed = 1/ focal length; for a 500 mm lens, for example, the max shutter speed should be 1/500 s). 

The next challenge is getting the exposure right. Most cameras are set to evaluate the exposure over the whole image, combine this with some intelligent guess-work and provide you with what your camera thinks is a suitably exposed image. So for an image of the moon your camera sees a bright spot - even at 600 mm FF equivalent we're talking about an area that probably takes up less than 5% of the image - against a dark background and will try to provide you with an images that balances the light and dark.

Exposure

So we have to trick the camera or even go to manual. If you know how to adjust your exposure with exposure value (EV) adjustment - experience tells me that setting your camera to -3 EV should give you a decently lit image. Alternatively, you can go manual. The night images were taken at 1/640 s at f/5.6 and ISO 200 on my Olympus. You could try starting from there and adjusting the exposure as needed.

Even though you can hand-hold these shots, there is one significant advantage to sticking your camera on a tripod; aligning your images in post will be much easier.

Focus

Sticking your camera on a tripod also makes focusing your shot easier, and I really would recommend slipping into manual focus for this to be on the safe side. If your camera allows you to magnify around the focus point then use this, in fact use every trick you can to get the image as sharp as you possibly can. Don't leave anything to chance. What you'll notice is that the moon won't stay still on your camera display. Don't worry, your camera isn't slipping on the tripod mount (well, it might be, but not necessarily). What you're seeing is the moon moving in relation to the earth.

Multiple Exposures

Why images and why align them? Because a single image isn't going to give you much of an picture. In fact, you're going to want to grab at least about 50 images. This will give you enough to generate a mean image in post (colloquially and mathematically) reducing noise and sharpening the image. The atmosphere is full of convection currents, particularly in the summer, which will muddy your image.

Processing the Images

Ok, so the fun part is over, now the work begins. First we need to do a little bit of basic editing in your post-processing software of choice. I make no apologies for using a slightly obscure programme for mine; ON1 Photo Raw 2020 instead of Lightroom or Photoshop for the same reason I make no apologies for shooting with an Olympus rather than Canon, Nikon or Sony. They're informed decisions that I made and stand by - I've never been afraid of going down the road less travelled.

Initial Processing

Import your RAW images into your processor of choice and select the images from your series. Most image processing programmes allow you to apply the settings you apply to one photo to a series of photos, so you can hopefully just edit one and cascade to the other images. Crop your image to the final size you want for the image, allowing room around the edges for a final crop. You may want to increase the basic exposure and clarity, but don't over-do it and leave the noise reduction for now, we'll get back to that later.  Apply the crop and adjustments across the whole series and export them all to tiff or jpeg files in a dedicated folder for stacking.

Image Stacking

You will probably have noticed that your photos are a little muddy, a little unclear. That's perfectly allowable; your subject is at least 384,000 km away and you're shooting through 480+ km of air. That air is seldom clean and often full of convection currents, making matters worse. Stacking your images will give you a mathematical mean image, reducing image noise and sharpening the details.

The software I use is a free programme called RegiStax 6 and can be downloaded from the website here. The programme will first align the various images - like I said, the moon will be in a slightly different place each time due to the relative motion of the earth and its satellite. Before the images can be averaged, they need to be lined up. After that, you can select what percentage of the base images you want to use for the averaging before stacking.

Rather than list the specific steps I used and palm them off as my own, I'll point you to the Sarah and Colins Astro YouTube video that I followed verbatim. After aligning the images, there will still not be much difference from the original until you adjust what the programme calls 'wavelets'. Then the magic happens and the crisp image begins to reveal itself. 

I had problems using tiffs; firstly the tiffs I generated from ON1 weren't recognised by RegiStax. The tiffs from Olympus Workspace were recognised, but the resulting image had a lot of digital noise. My best results were from Olympus RAW files exported to jpeg in ON1 Photo Raw. The output from RegiStax can be saved in any of the usual formats, though if you've used jpeg as the starting point for stacking, you possibly won't gain anything by saving the output in any of the information richer formats.

Final Processing

Now it's time for the last polish. Re-open the image in your image processing software. It's likely to have quite a bit of noise in the smoother parts of the image and it's now time to deal with that and any other adjustments you might care to make.

In ON1 I dealt with noise using Luminance 2020 Noise reduction, setting Luminance to 30 and Detail to 5. Your mileage will of course differ. I loose a little bit of detail like this, but it's a sacrifice I'm prepared to make to get rid of the unsightly noise.

Watch the craters at the bottom of the moon as well as the noise in the Sea of Tranquillity (the darker patch towards the top).


Starting Image


After Stacking


After Noise Reduction


Layers

As a last step, you may want to assemble the final image(s) in layers. This will let you plant your final moonshot back in its environment as with my Moonrise over the Allgäu shot at the beginning of this article. I used this process to slightly magnify the moon in this scene to emphasise it. 

What Next?

If you found this tutorial useful, link to your final image(s) below, it would be great to see them. 

If you're still looking for a challenge? Go and take a look at Alyn Wallace's YouTube tutorial on taking gorgeous HDR images of the half moon.

I'll close with two more before and after pics taken later that evening from home to emphasise how much detail can be wrung out of these images. I had to add a gaussian blur to the background on the stacked image due to an ugly moire pattern, but that's trivial.


Later the Same Night: Before || Olympus f/5.6, 1/320 s, ISO 200

Later the Same Night: After || Olympus f/5.6, 1/320 s, ISO 200